Manually Set Up Azure Continuous Scanning
Take the manual approach to configuring the Mondoo Azure Integration to scan Azure resources.
Take the manual setup if you want to create and manage the app registration yourself, your key vaults use the legacy access policy permission model, or your Azure environment is unusually large. Most users should use the much faster automated setup instead.
Prerequisites
- Editor or Owner access in the Mondoo space where you want to add the integration
- An Azure account with an active subscription, plus these Microsoft Entra roles:
- To create the app registration: Global Administrator, Application Administrator, or Cloud Application Administrator
- To grant admin consent for the Microsoft Graph application permissions (Step B): Privileged Role Administrator or Global Administrator. Application Administrator and Cloud Application Administrator can't grant consent for Microsoft Graph application permissions. If you don't hold one of these roles, ask someone who does to complete Step B.
- To assign Azure roles in Step C: Owner or User Access Administrator on each subscription (or management group) you grant access to. Contributor can't assign roles.
- Command-line access to Azure via either Azure Cloud Shell or the Azure CLI (run
az loginto authenticate)
Check your Entra roles in the Azure portal: Microsoft Entra ID > Users > (your account) > Assigned roles.
Register and grant permissions to an Azure app
Mondoo authenticates to Azure as a service principal created by an Entra app registration in your tenant. The trust is one-way: Mondoo trusts the Microsoft identity platform. The app registration grants Mondoo read-only access to Azure resources, web apps, Key Vault, and the Microsoft Graph API. For background, see App registration, app objects, and service principals in the Azure documentation.
You'll work through six steps:
- Step A: Register an app with Microsoft Entra ID
- Step B: Grant Microsoft Graph permissions
- Step C: Grant subscription read permissions
- Step D: Grant web app read permissions
- Step E: Grant Key Vault permissions
- Step F: Create a client secret
Step A: Register an app with Microsoft Entra ID and create a service principal
-
Log into the Azure portal as a global administrator, application administrator, or cloud application administrator. These roles can create the app registration. Granting admin consent in Step B requires a Privileged Role Administrator or Global Administrator.
-
Find and select Microsoft Entra ID.
-
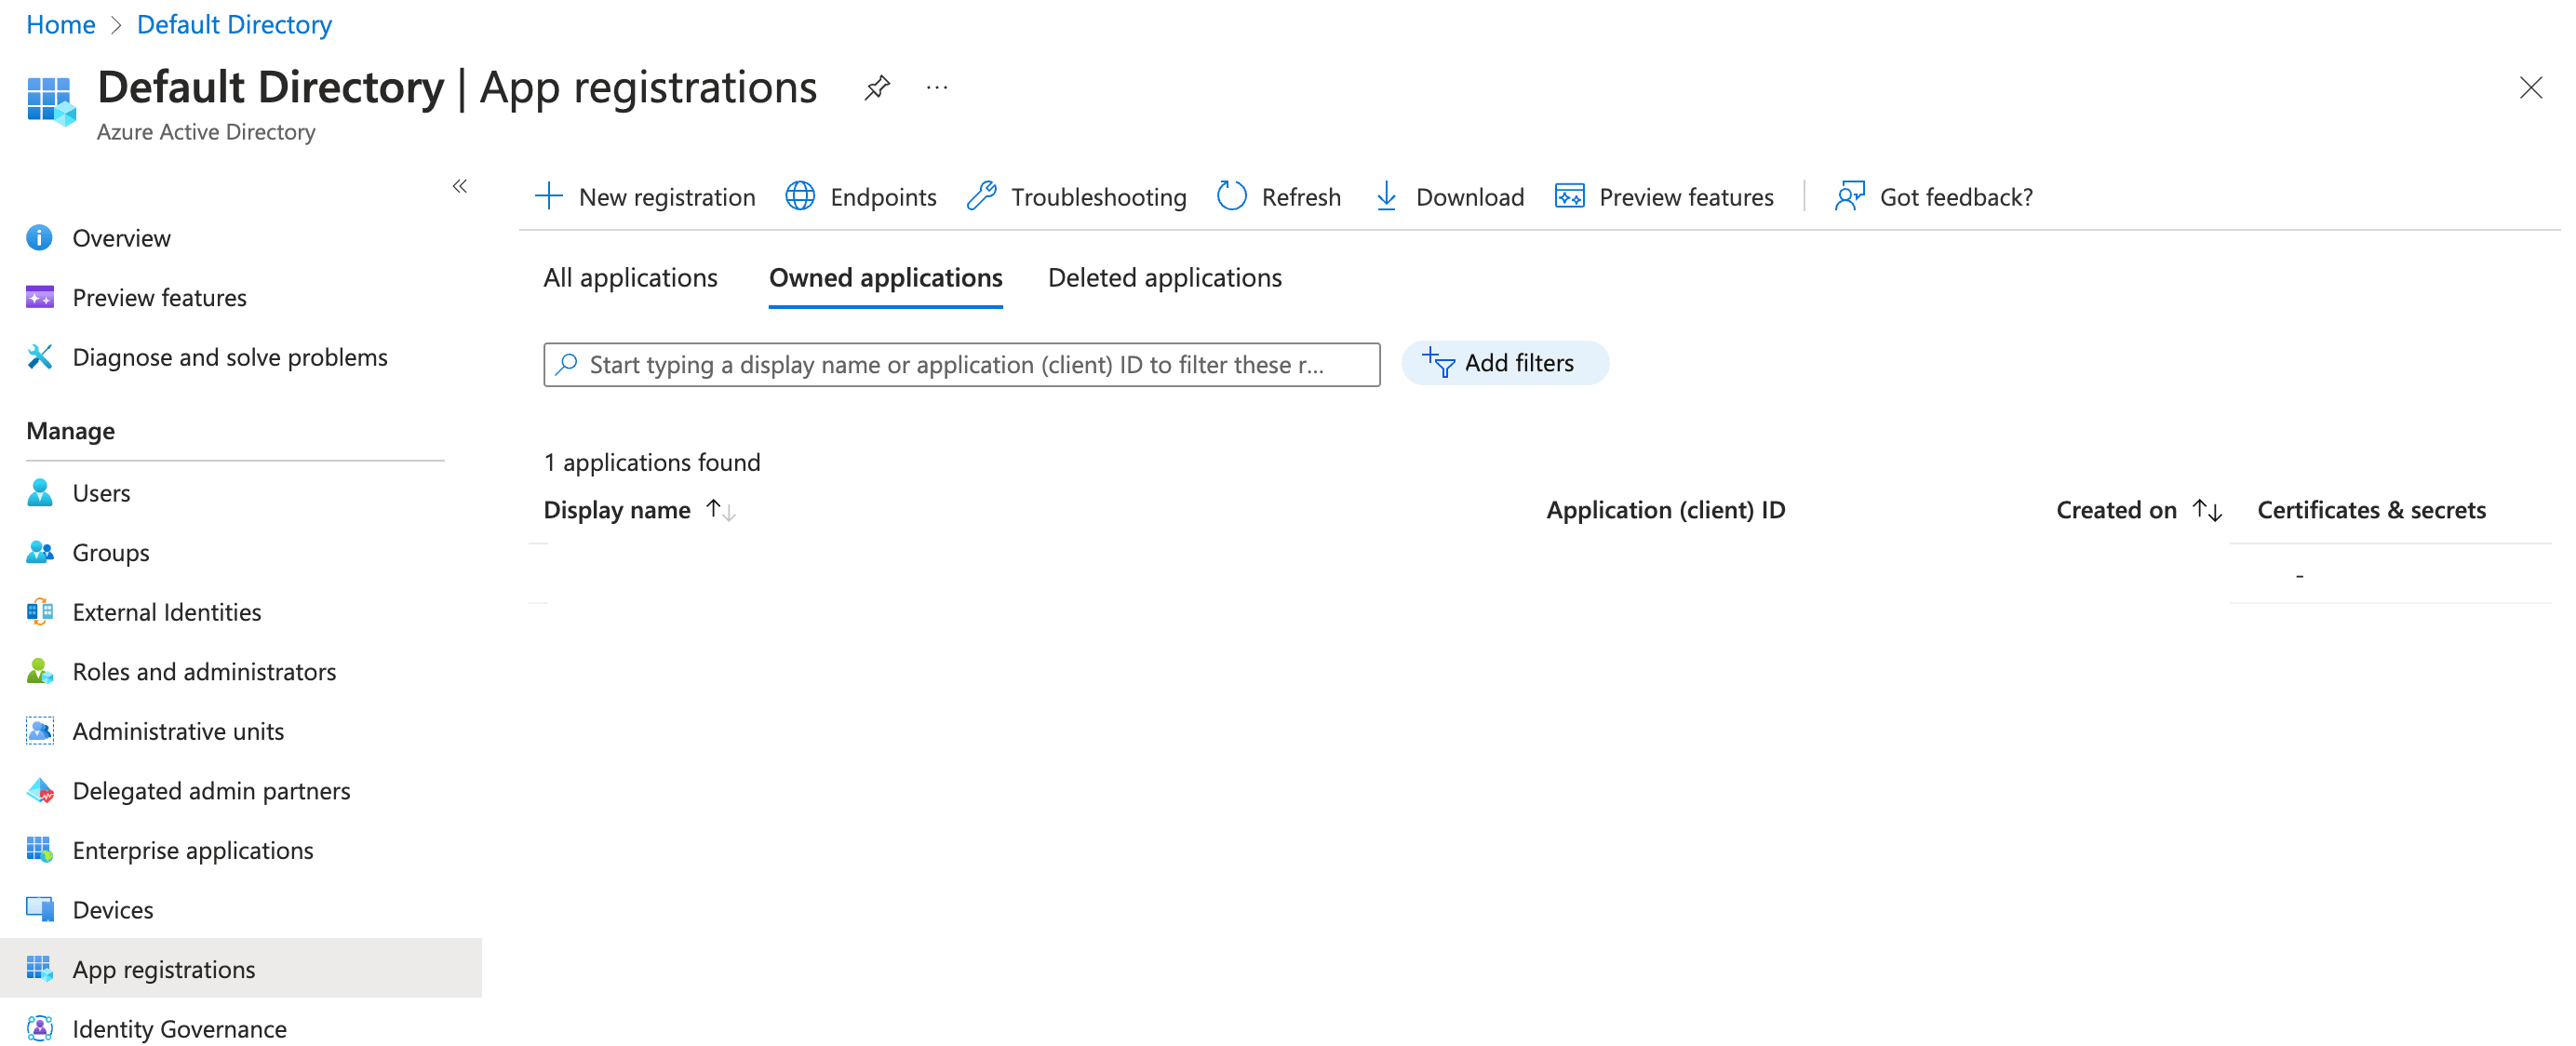
In the navigation sidebar, select App registrations.
-
Select + New registration.
-
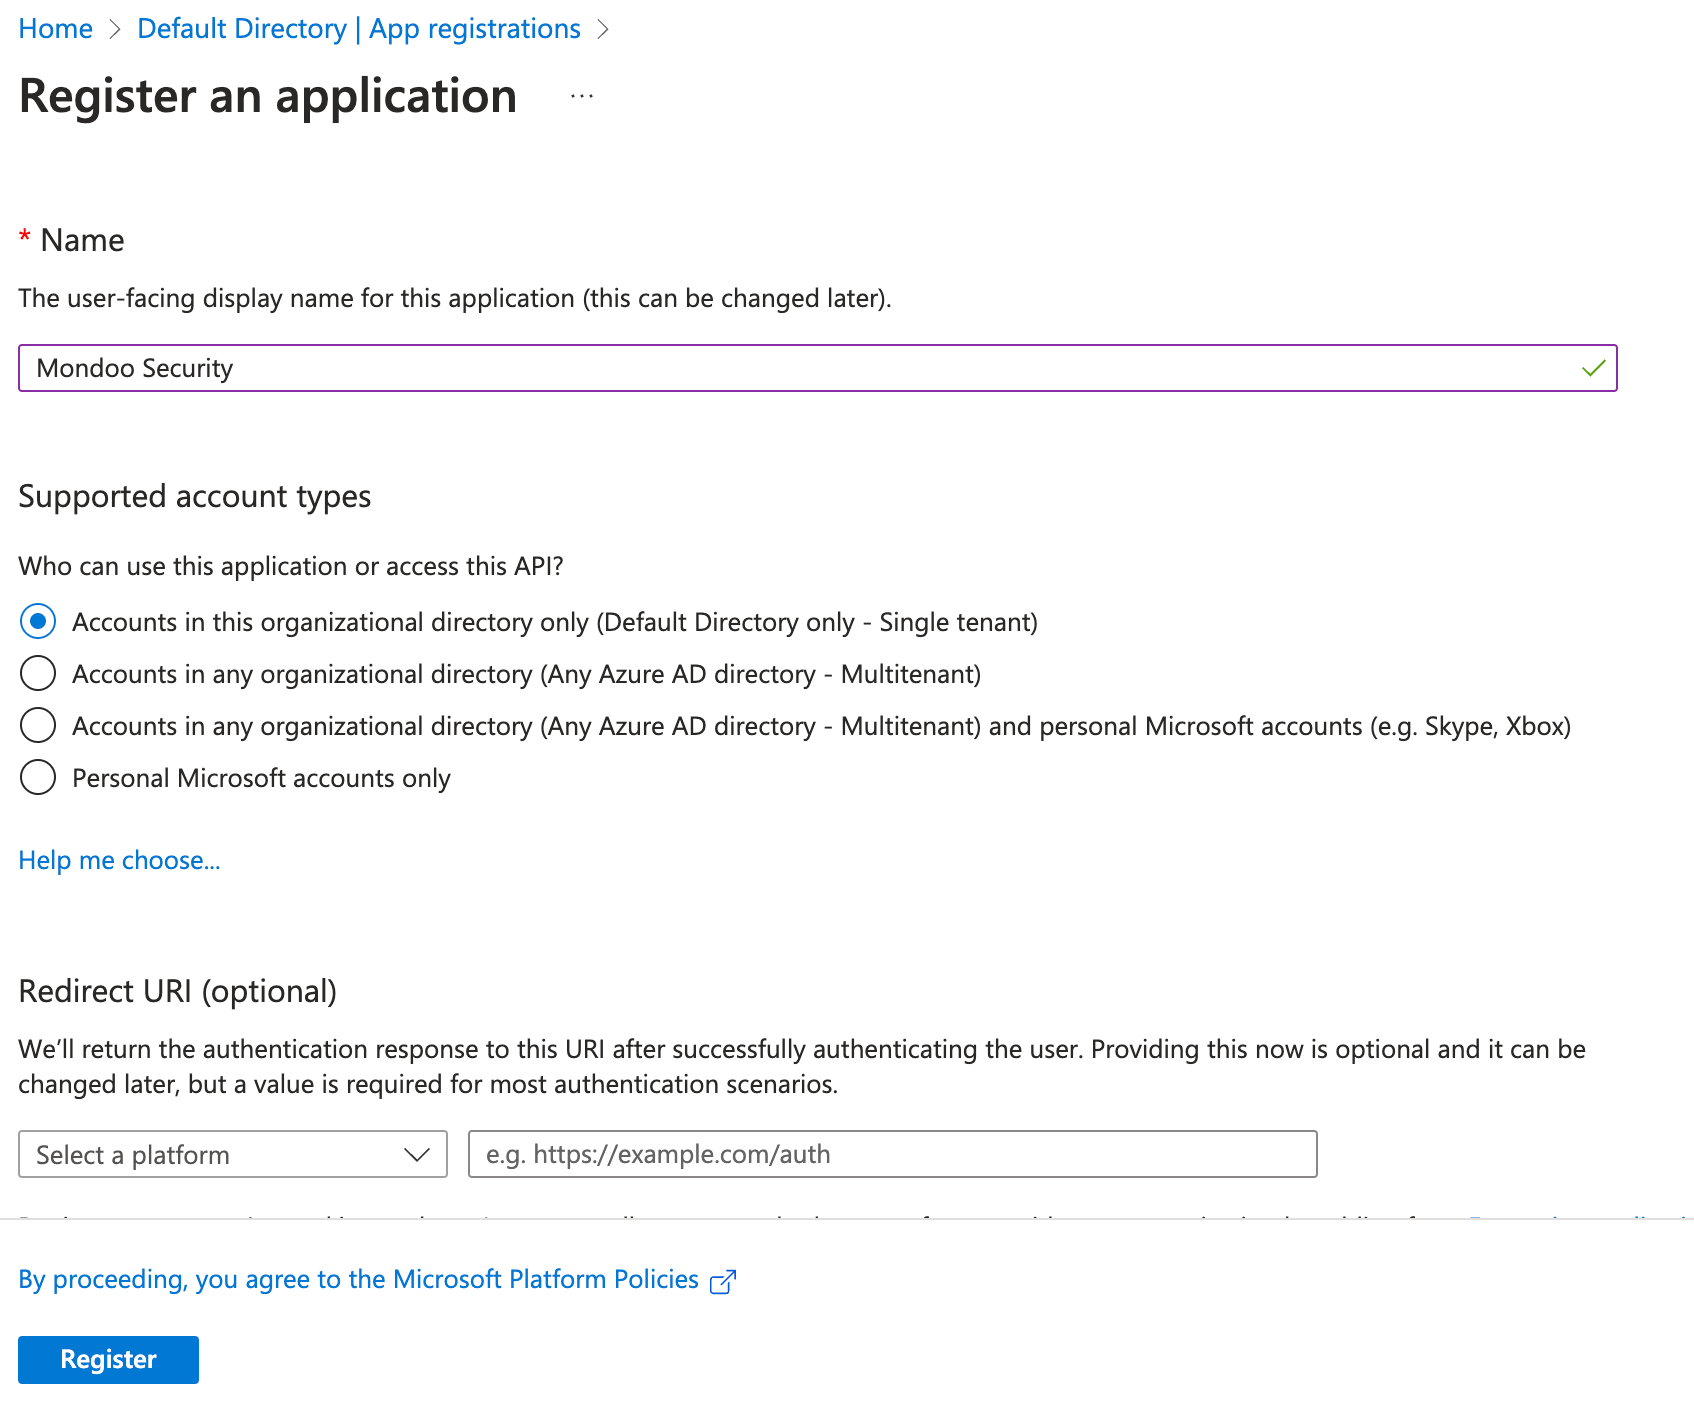
Enter an application name (such as
mondoo-security) and select Accounts in this organizational directory only as the supported account type. Mondoo does not require an application redirect URI. -
Select the Register button.
Microsoft creates the application ID and displays it in the application registration overview.
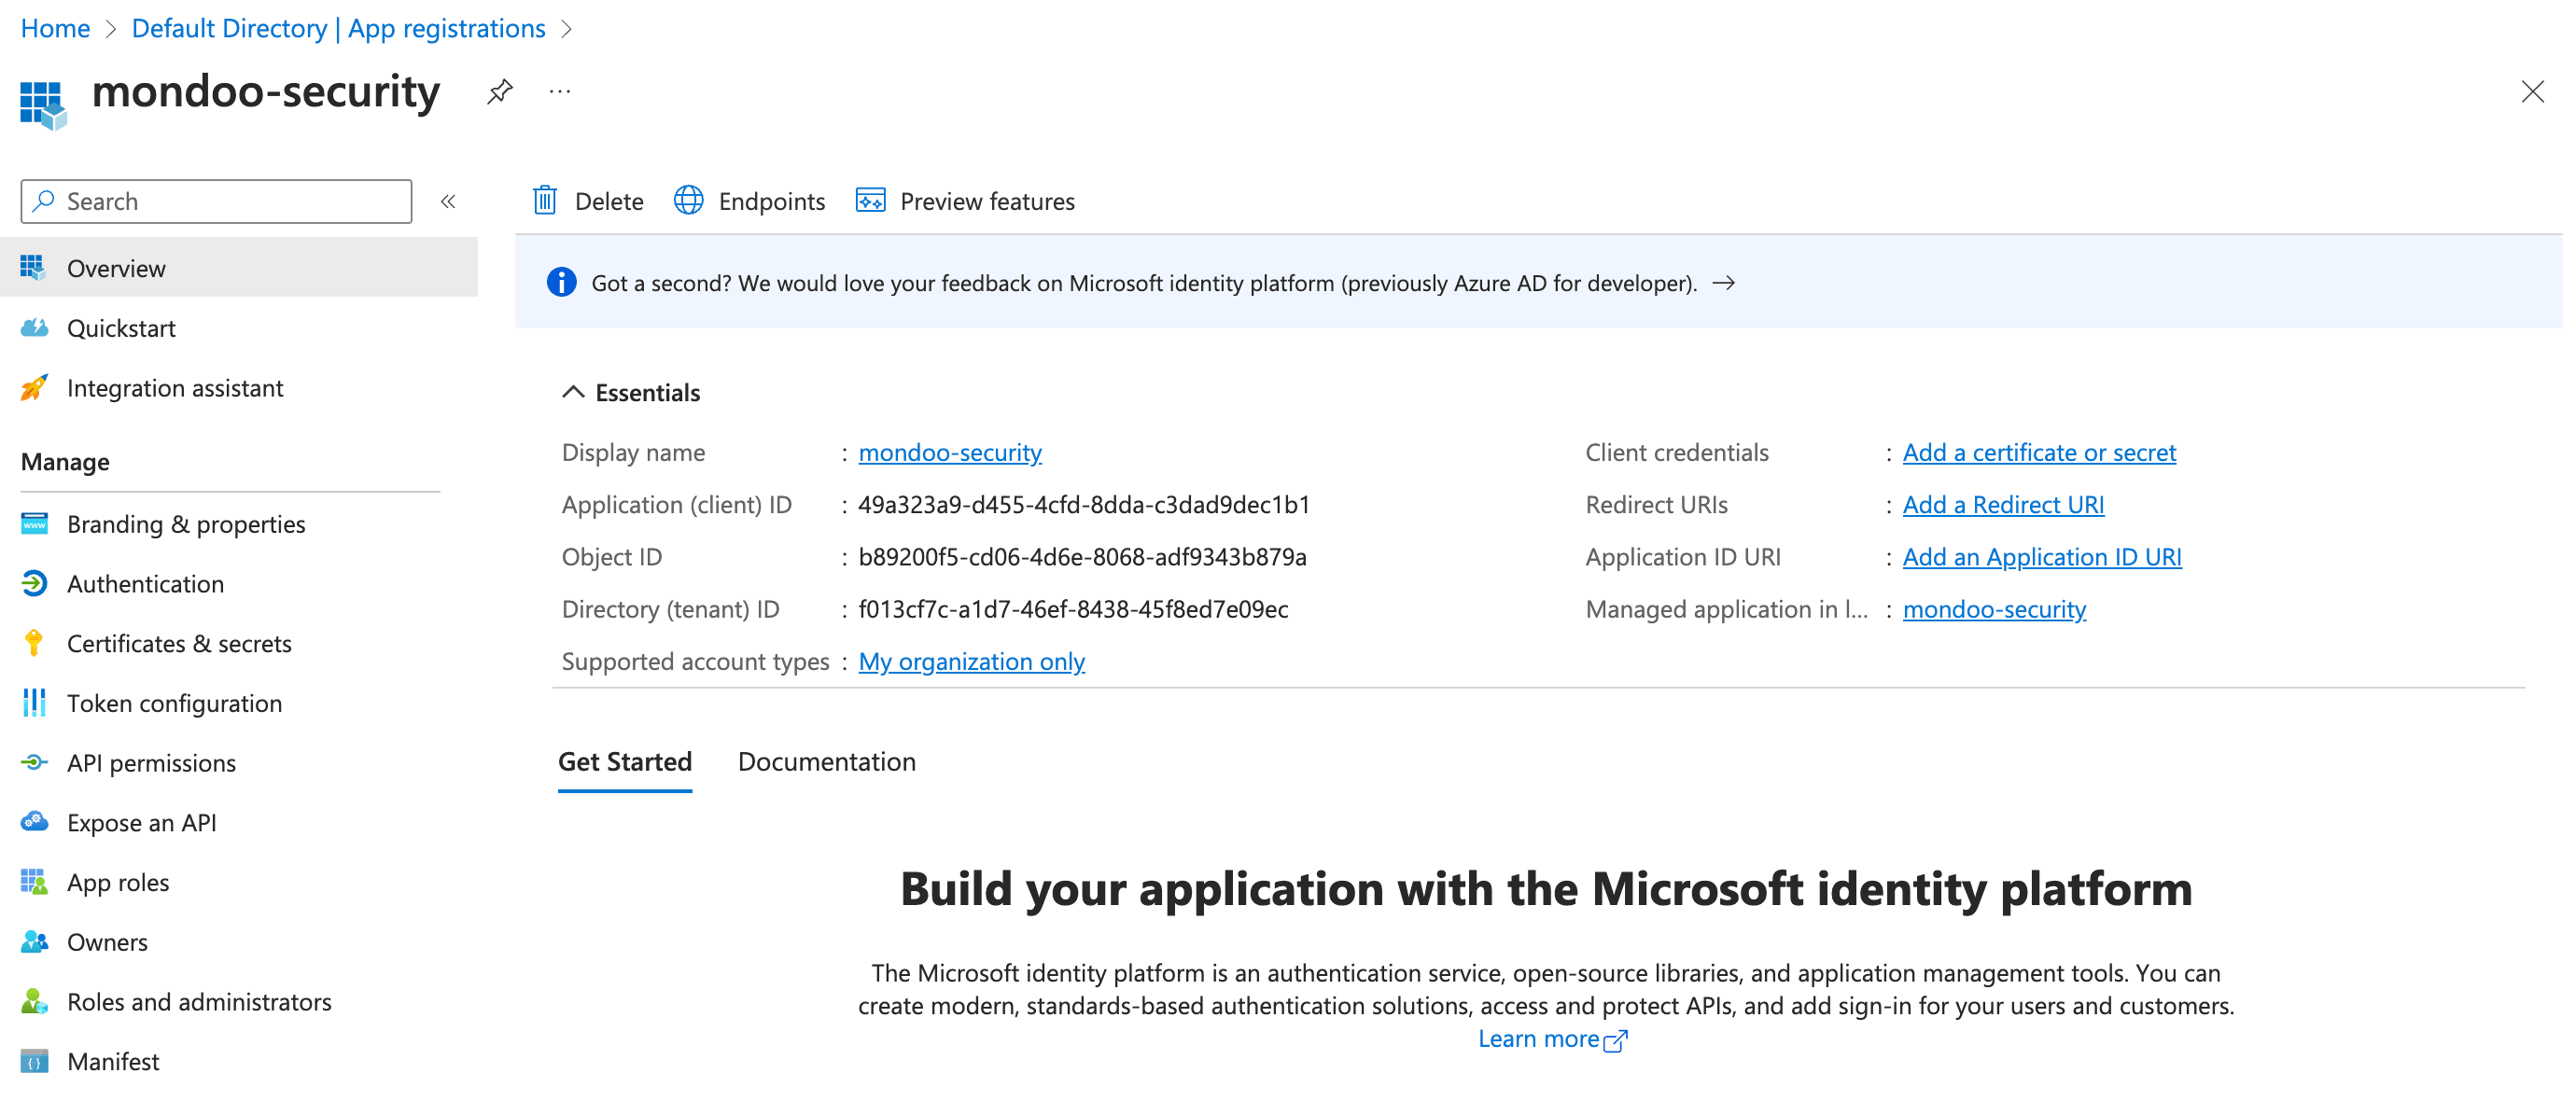
Keep the page open as you continue to the next step.
Step B: Grant permissions to access Microsoft Graph (API permissions)
-
In the navigation sidebar, select API permissions.
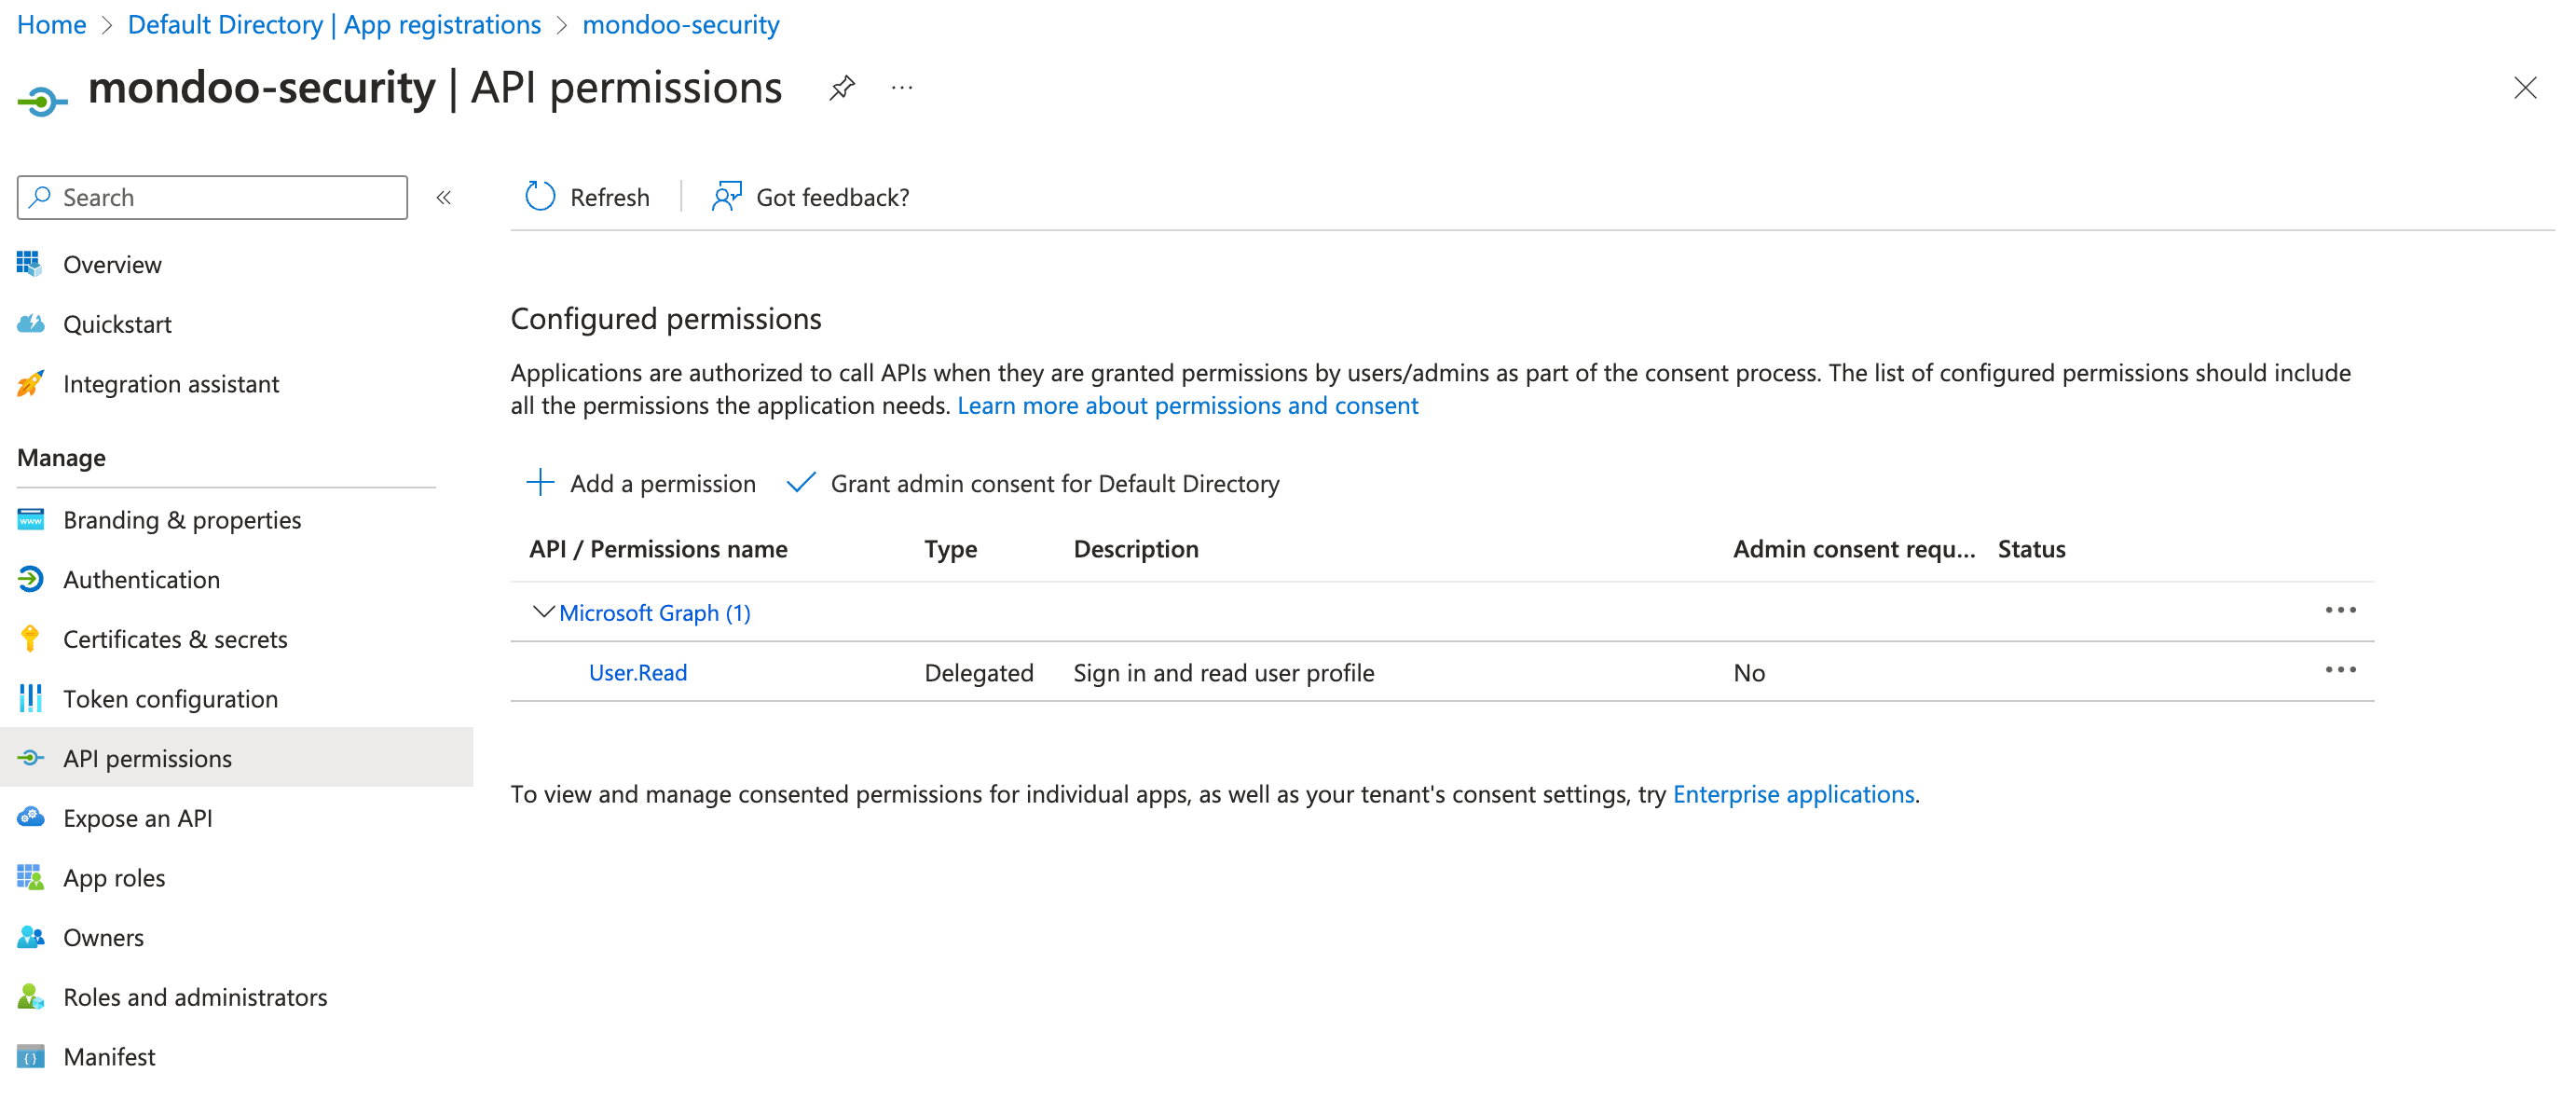
By default, Microsoft grants your new application
User.Readpermission for Microsoft Graph. It's not required for Mondoo, so you can remove it. -
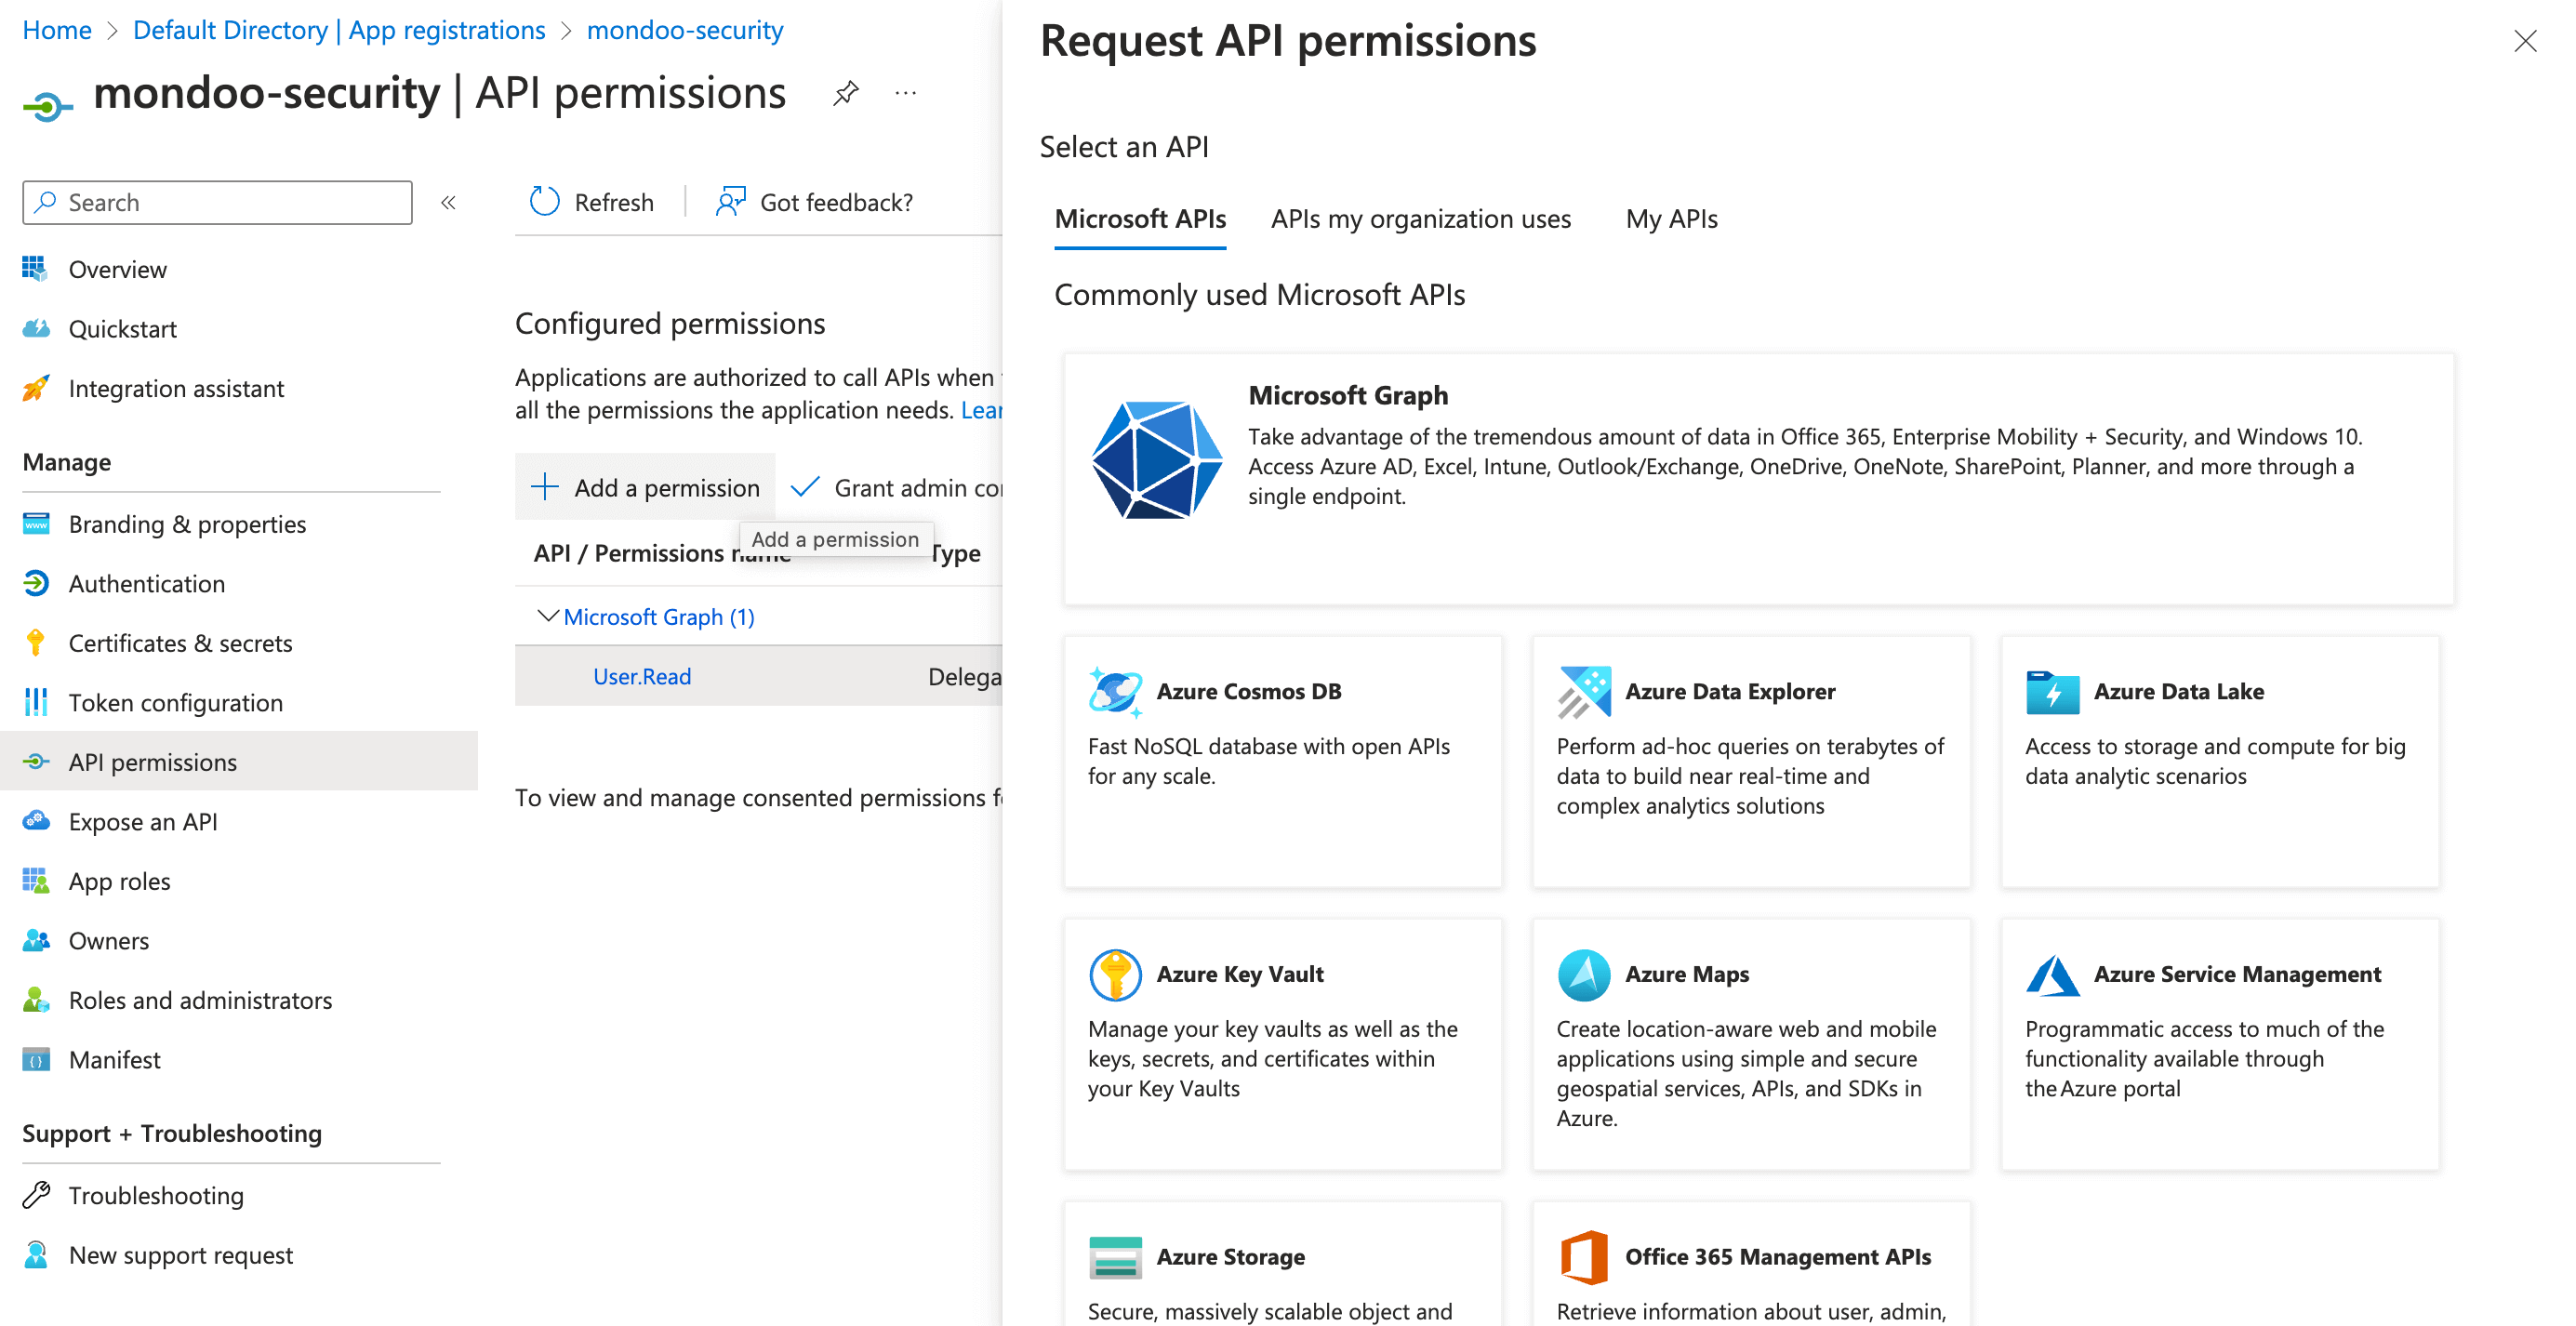
Select + Add a permission.
-
From the list of Commonly used Microsoft APIs, select Microsoft Graph.
-
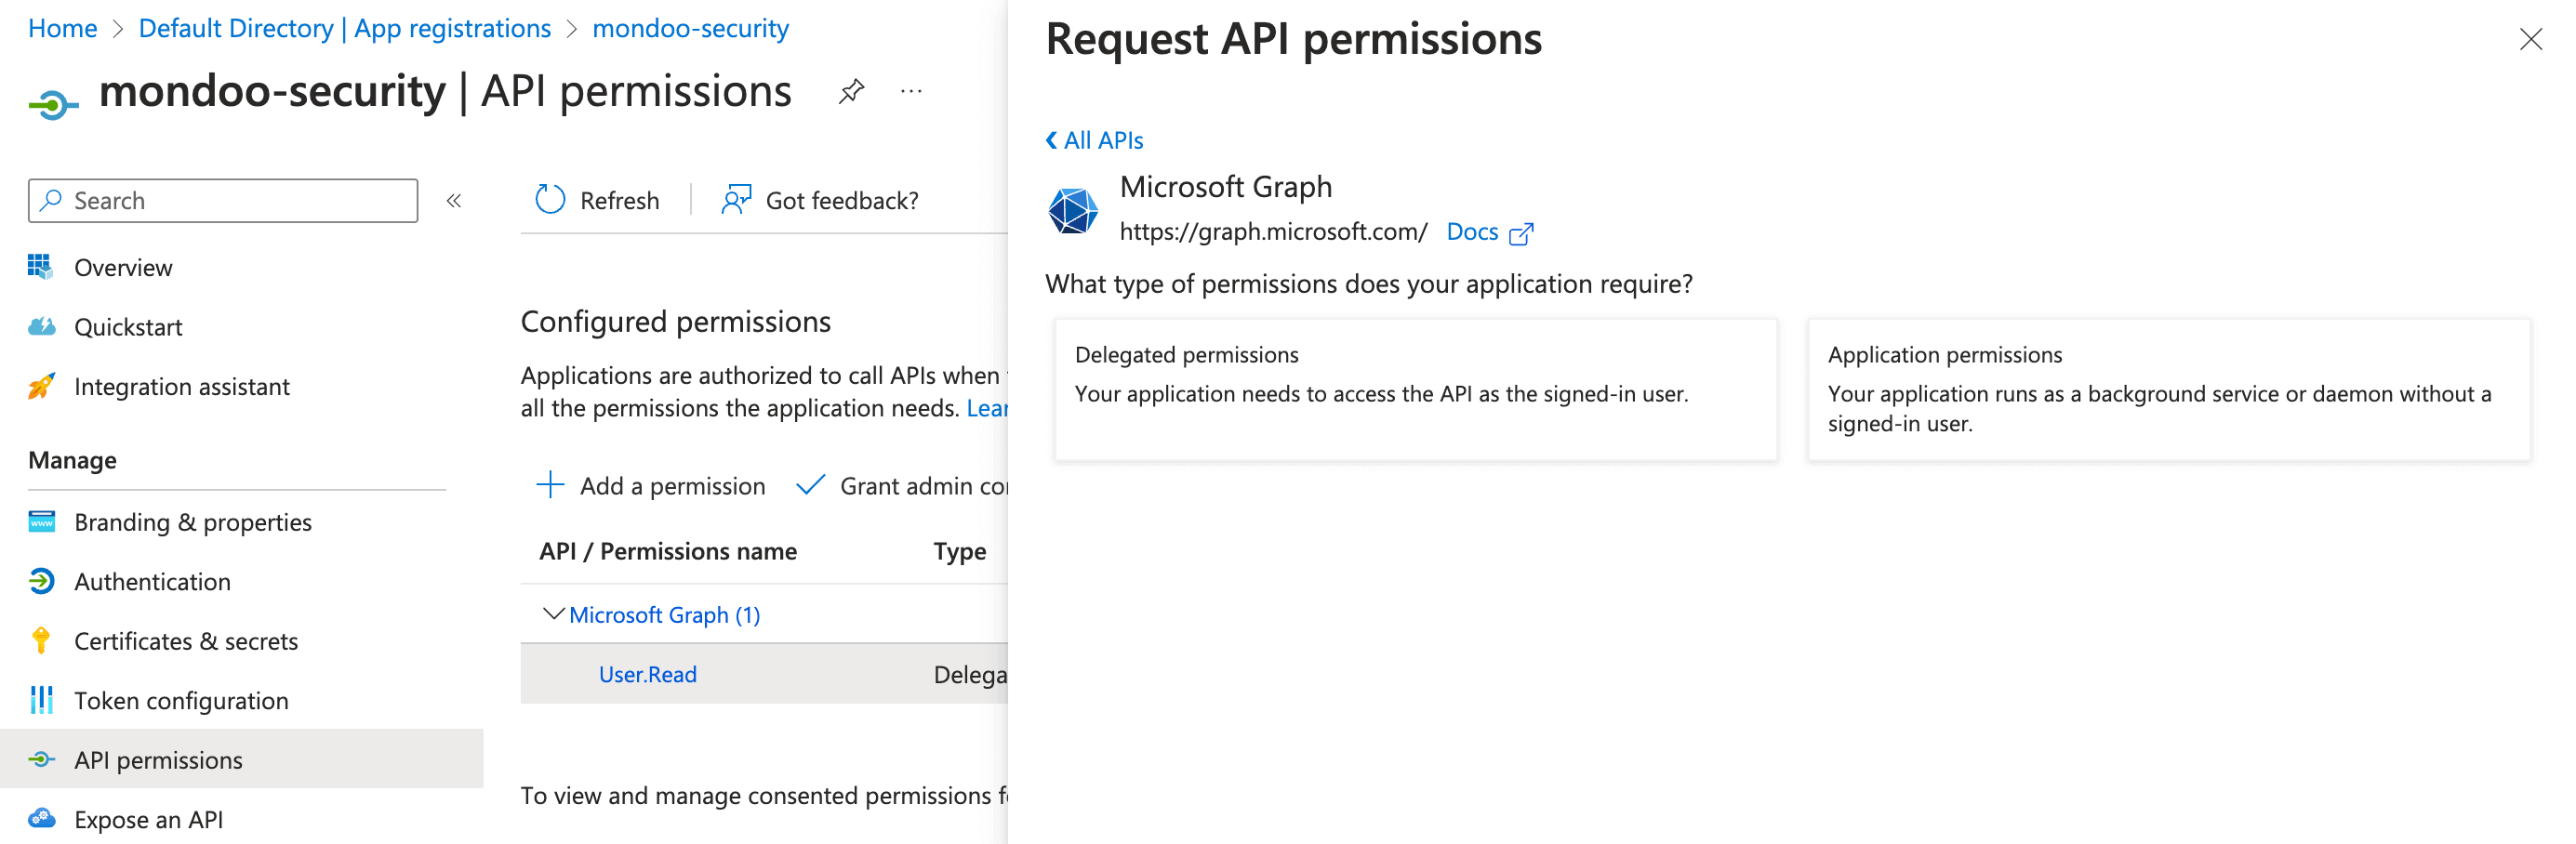
Because Mondoo acts as a service, select Application permissions.
-
Select expand all to see all permissions. Then select the required API permissions:
| Microsoft Graph | Type | Description |
|---|---|---|
| Application.Read.All | Application | Read all applications |
| Directory.Read.All | Application | Read directory data |
| Domain.Read.All | Application | Read domains |
| IdentityProvider.Read.All | Application | Read identity providers |
| IdentityRiskEvent.Read.All | Application | Read all identity risk event information |
| IdentityRiskyUser.Read.All | Application | Read all identity risky user information |
| Policy.Read.All | Application | Read your organization's policies |
| Policy.Read.ConditionalAccess | Application | Read your organization's conditional access policies |
| Policy.Read.PermissionGrant | Application | Read consent and permission grant policies |
| RoleManagement.Read.All | Application | Read role management data for all RBAC providers |
| SecurityActions.Read.All | Application | Read your organization's security actions |
| SecurityEvents.Read.All | Application | Read your organization's security events |
| ThreatAssessment.Read.All | Application | Read threat assessment requests |
| ThreatIndicators.Read.All | Application | Read all threat indicators |
-
Select the Add permissions button.
-
To complete the process, select Grant admin consent for (your tenant name) and select the Yes button to confirm. This step requires the Privileged Role Administrator or Global Administrator role. Application Administrator and Cloud Application Administrator can't grant consent for Microsoft Graph application permissions. See Grant tenant-wide admin consent to an application.
Step C: Grant required READ permissions to the app
You need the Owner or User Access Administrator role on the subscription (or management group) to assign roles in these steps. These steps guide you through setting the READ permissions and "Key Vault Reader" permissions for a single subscription. If you want to scan several subscriptions, you must repeat the same steps for each subscription.
If you want Mondoo to monitor an entire management group, you can perform these steps at the management group level: Search for "management groups" in the Azure portal and then select the management group you want to monitor. To monitor the entire directory, select the Tenant root group.
Set subscription-level permissions for your new app registration:
-
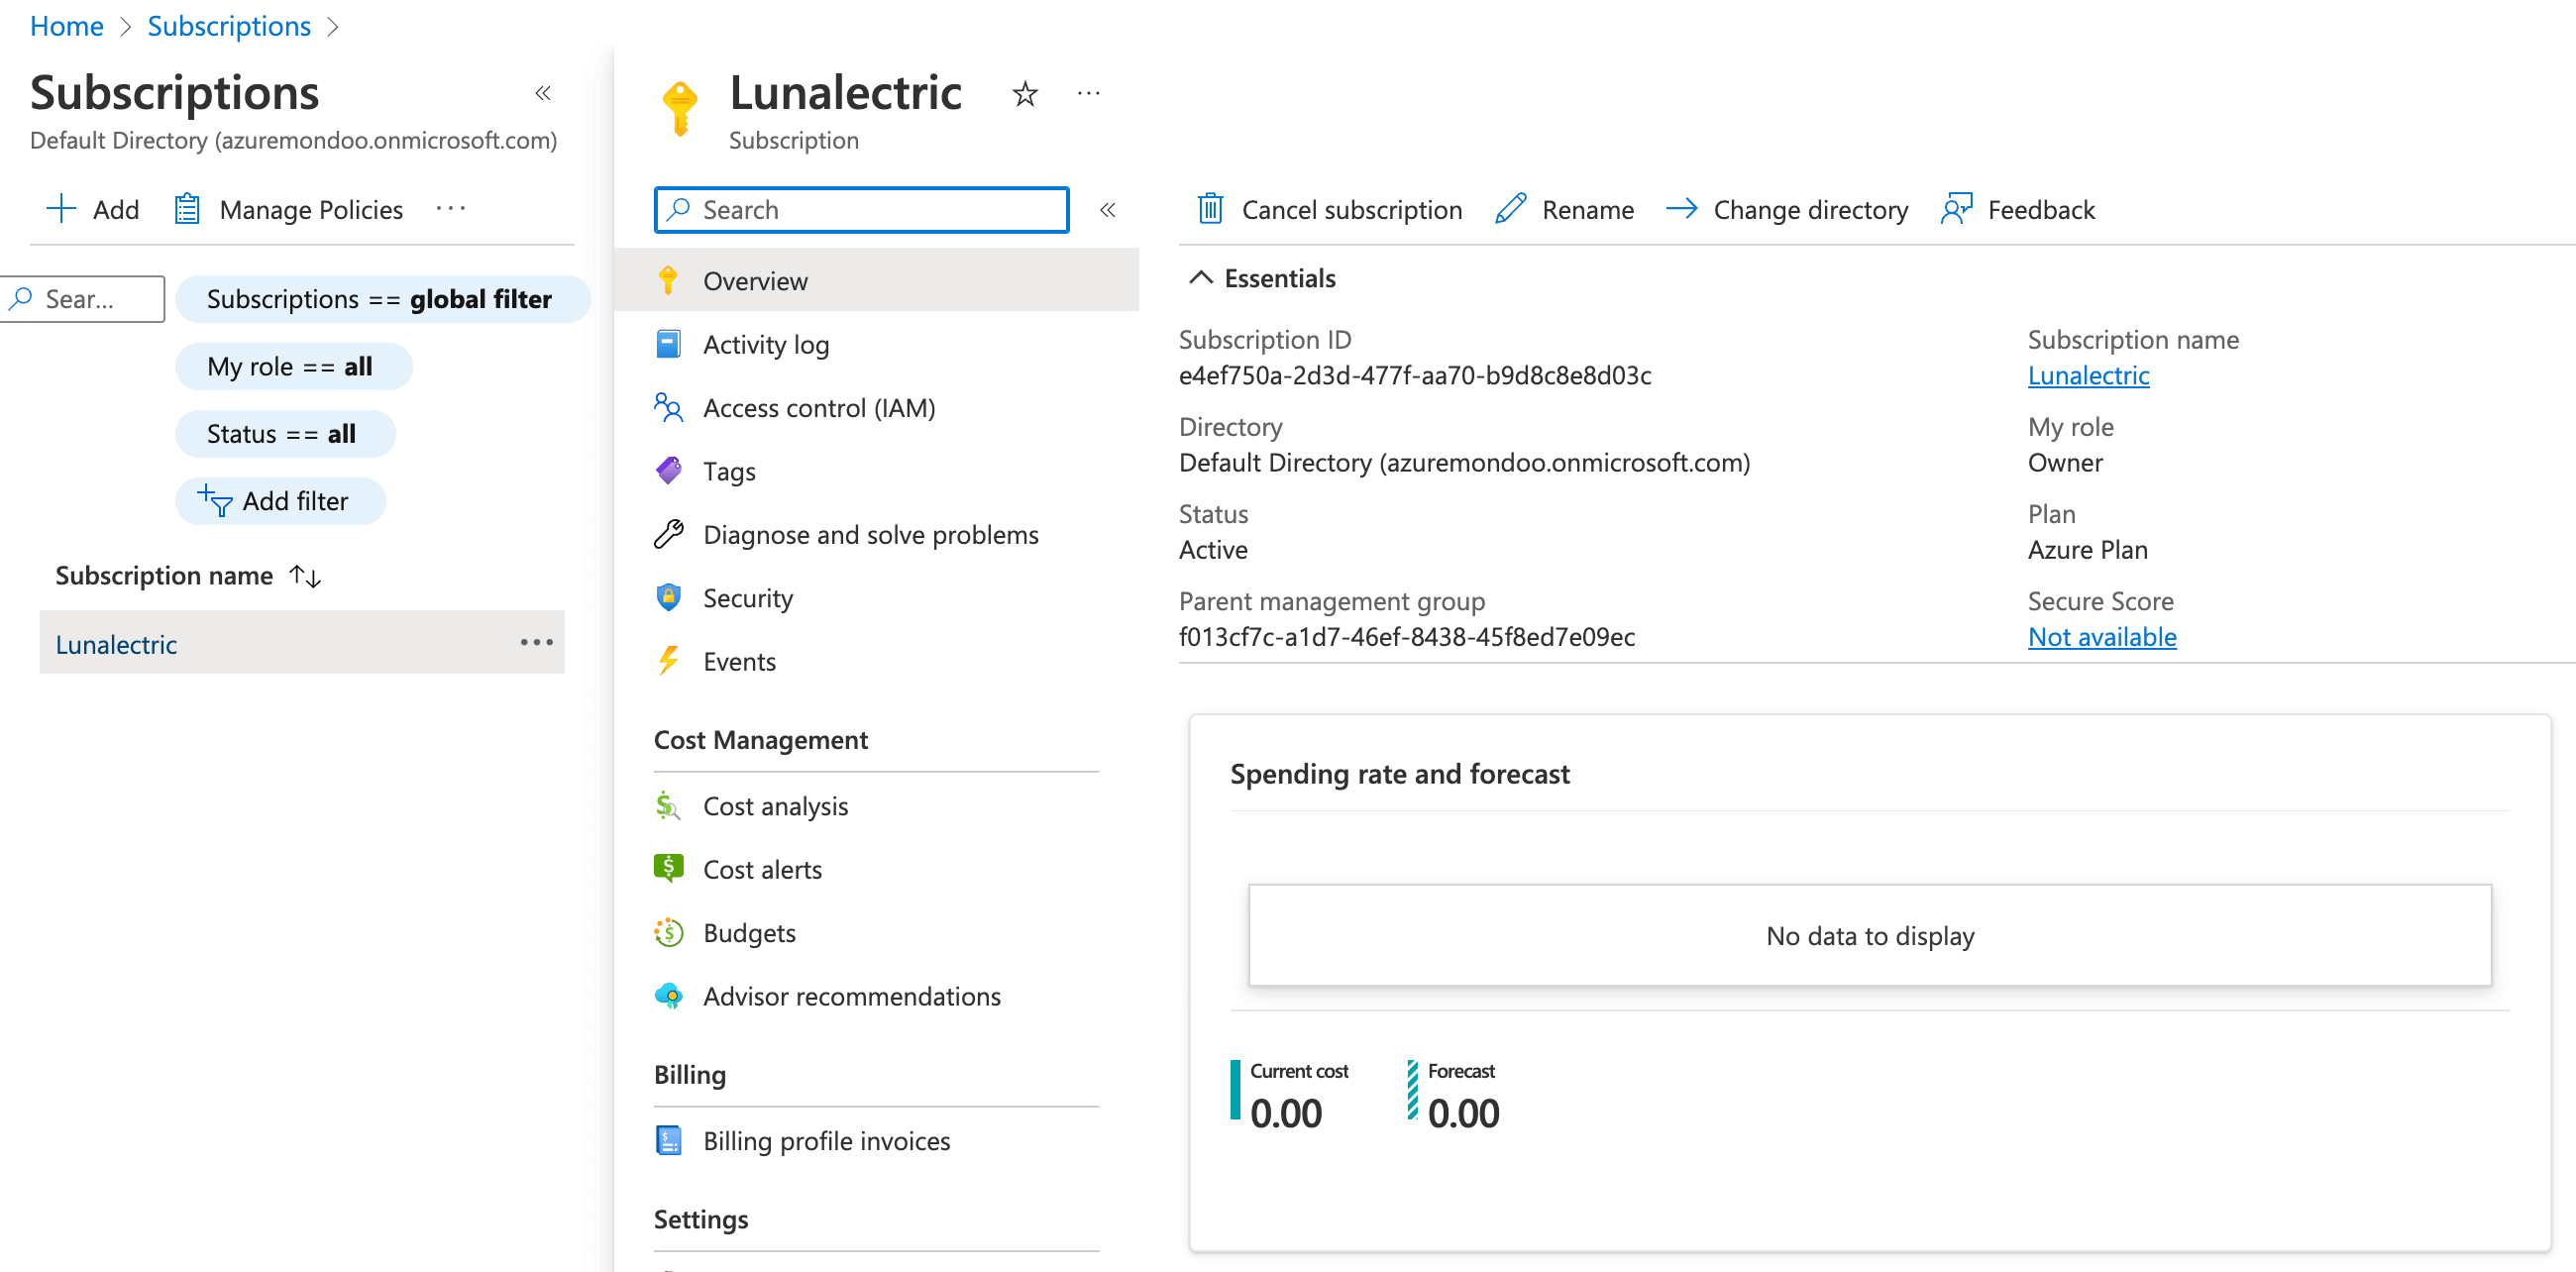
From the Azure portal home, select Subscriptions.

-
Select the subscription you want to integrate with Mondoo.
-
In the sidebar under the subscription name, select Access control (IAM).
-
Select the Add role assignment button.
-
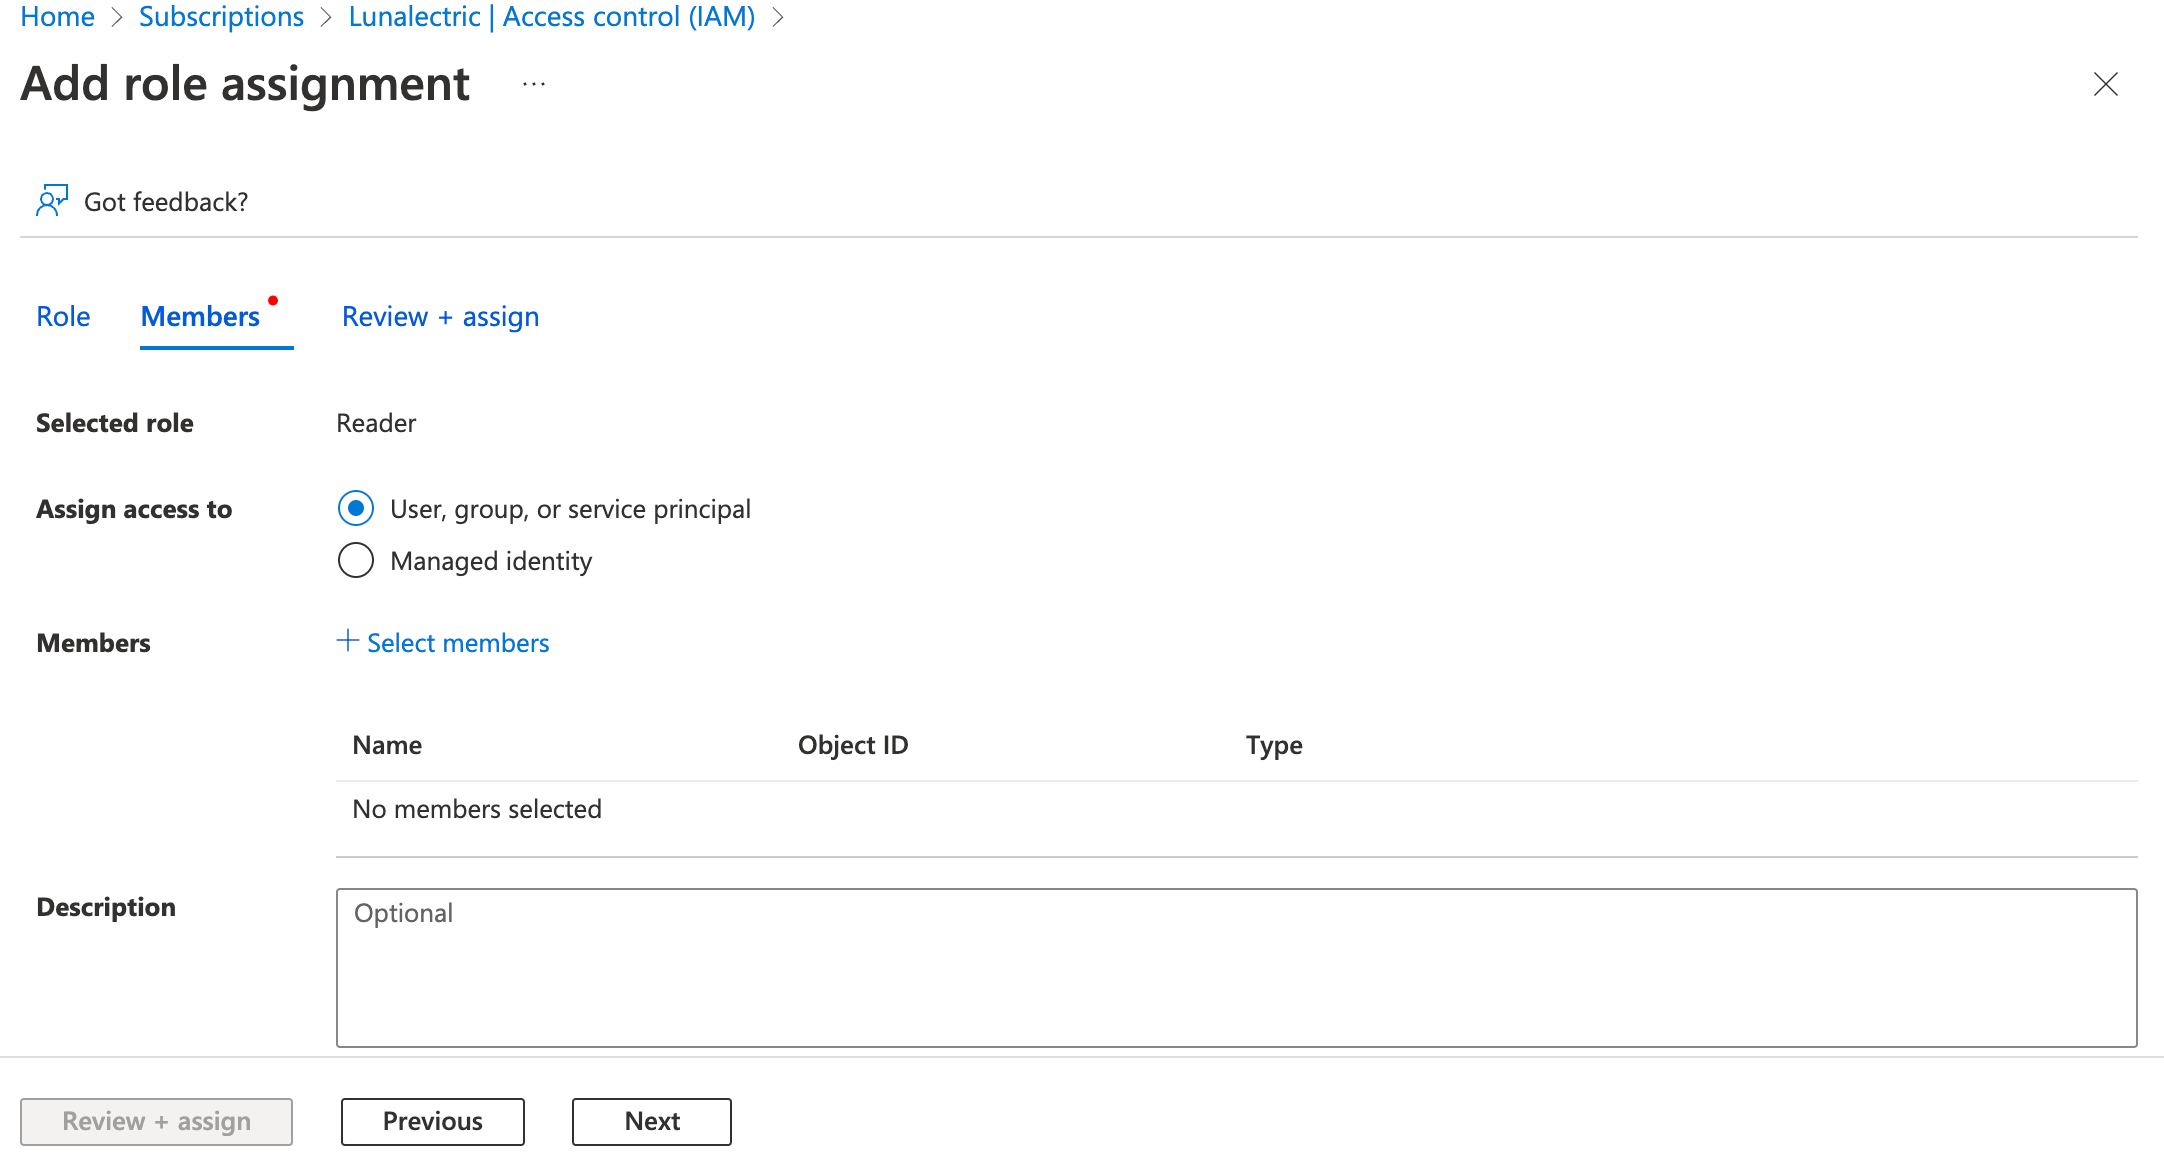
Select the Reader role and then select the Members tab (or Next button).
-
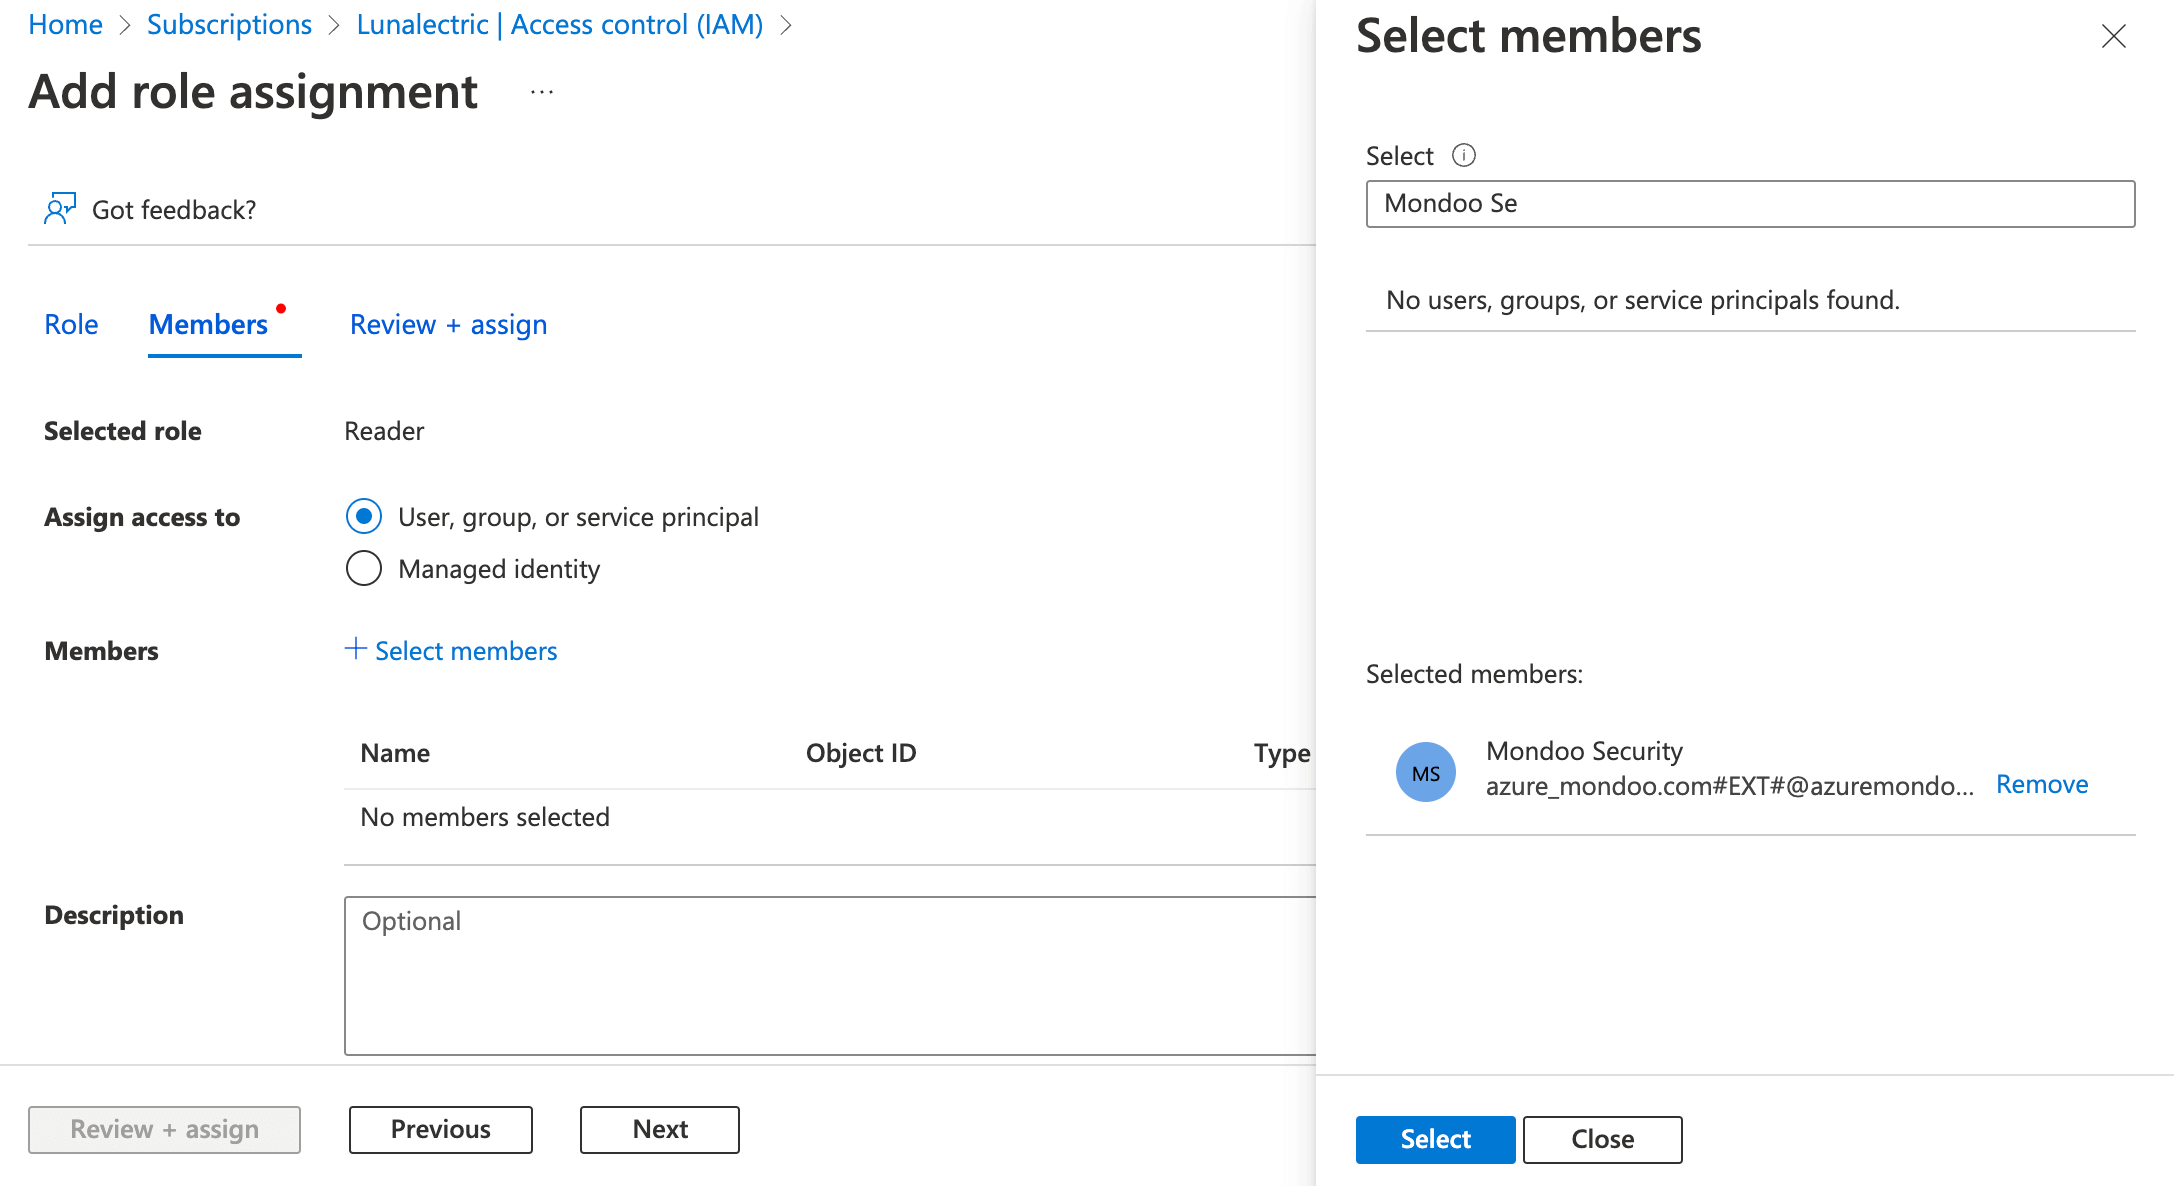
Select + Select Members, find and select your Mondoo app registration, and select the Select button.
-
Select the Review + assign button (or Next button), check your work, and then select the Review + assign button again to assign the Reader role to your Mondoo app registration.
-
Repeat steps 4-7 and this time choose the "Key Vault Reader" role in step 5.
Keep the Access control (IAM) page open as you continue to Step D.
Step D: Grant web app READ permissions to the app
Grant web app permissions by creating a custom RBAC role for Mondoo and assigning the custom role to your new app registration.
-
In the sidebar under the subscription name, select Overview.
-
Copy the subscription ID and save it somewhere handy.
-
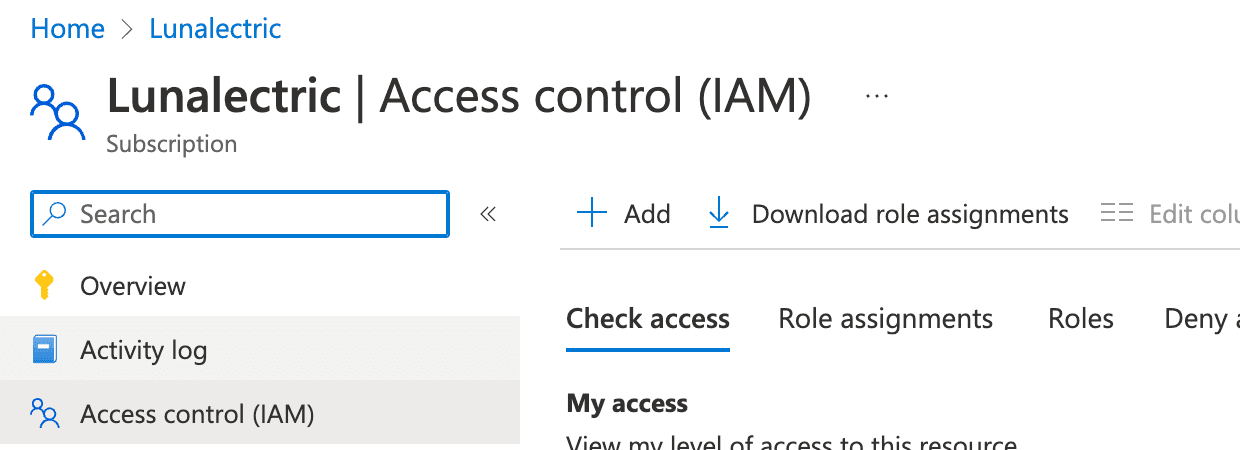
In the sidebar under the subscription name, select Access control (IAM).
-
On the subscription's Access control (IAM) page toolbar, select + Add and select Add custom role.
-
Name the new role
mondoo-role, provide a description, and then select the JSON tab. -
On the JSON tab, select the Edit button and delete all existing content from the edit box.
-
Copy this JSON content and paste it into the edit box on the JSON tab:
{
  "Name": "mondoo-role",
  "IsCustom": true,
  "description": "Custom role for Mondoo integration",
  "assignableScopes": ["/subscriptions/YOUR-SUBSCRIPTION-ID"],
  "actions": [
    "Microsoft.Authorization/*/read",
    "Microsoft.ResourceHealth/availabilityStatuses/read",
    "Microsoft.Insights/alertRules/*",
    "Microsoft.Resources/deployments/*",
    "Microsoft.Resources/subscriptions/resourceGroups/read",
    "Microsoft.Support/*",
    "Microsoft.Web/listSitesAssignedToHostName/read",
    "Microsoft.Web/serverFarms/read",
    "Microsoft.Web/sites/config/read",
    "Microsoft.Web/sites/config/web/appsettings/read",
    "Microsoft.Web/sites/config/web/connectionstrings/read",
    "Microsoft.Web/sites/config/appsettings/read",
    "Microsoft.web/sites/config/snapshots/read",
    "Microsoft.Web/sites/config/list/action",
    "Microsoft.Web/sites/read",
    "Microsoft.KeyVault/checkNameAvailability/read",
    "Microsoft.KeyVault/deletedVaults/read",
    "Microsoft.KeyVault/locations/*/read",
    "Microsoft.KeyVault/vaults/*/read",
    "Microsoft.KeyVault/operations/read",
    "Microsoft.Compute/virtualMachines/runCommands/read",
    "Microsoft.Compute/virtualMachines/runCommands/write",
    "Microsoft.Compute/virtualMachines/runCommand/action",
    "Microsoft.HybridCompute/machines/read",
    "Microsoft.HybridCompute/machines/extensions/read"
  ],
  "notActions": [],
  "dataActions": [
    "Microsoft.KeyVault/vaults/*/read",
    "Microsoft.KeyVault/vaults/secrets/readMetadata/action"
  ],
  "notDataActions": []
}
To integrate with more than one subscription, list them:
"assignableScopes": [
  "/subscriptions/YOUR-SUBSCRIPTION-ID-1",
  "/subscriptions/YOUR-SUBSCRIPTION-ID-2",
  "/subscriptions/YOUR-SUBSCRIPTION-ID-3"
]
To integrate at the management group level, copy this JSON content and paste it into the edit box on the JSON tab:
{
  "properties": {
    "roleName": "mondoo-role",
    "description": "Custom role for Mondoo integration",
    "assignableScopes": [
      "/providers/Microsoft.Management/managementGroups/YOUR-MANAGEMENT-GROUP-ID"
    ],
    "permissions": [
      {
        "actions": [
          "Microsoft.Authorization/*/read",
          "Microsoft.ResourceHealth/availabilityStatuses/read",
          "Microsoft.Resources/subscriptions/resourceGroups/read",
          "Microsoft.Web/listSitesAssignedToHostName/read",
          "Microsoft.Web/serverFarms/read",
          "Microsoft.Web/sites/config/read",
          "Microsoft.Web/sites/config/web/appsettings/read",
          "Microsoft.Web/sites/config/web/connectionstrings/read",
          "Microsoft.Web/sites/config/appsettings/read",
          "microsoft.web/sites/config/snapshots/read",
          "Microsoft.Web/sites/config/list/action",
          "Microsoft.Web/sites/read",
          "Microsoft.Web/sites/*/read",
          "Microsoft.HybridCompute/machines/read",
          "Microsoft.HybridCompute/machines/extensions/read"
        ],
        "notActions": [],
        "dataActions": [],
        "notDataActions": []
      }
    ]
  }
}
For YOUR-MANAGEMENT-GROUP-ID, substitute the name of the management group you want to monitor. If you don't have management groups, you can use your tenant ID because your tenant is your root management group.
-
Select the Save button.
-
Select the Review + create button (or the Next button), check your work, and then select the Review + create button again.
-
Assign the created Custom role to the app: On the subscription's Access control (IAM) page toolbar, select + Add and select Add role assignment.
-
Search for and select the role you just created,
mondoo-role. -
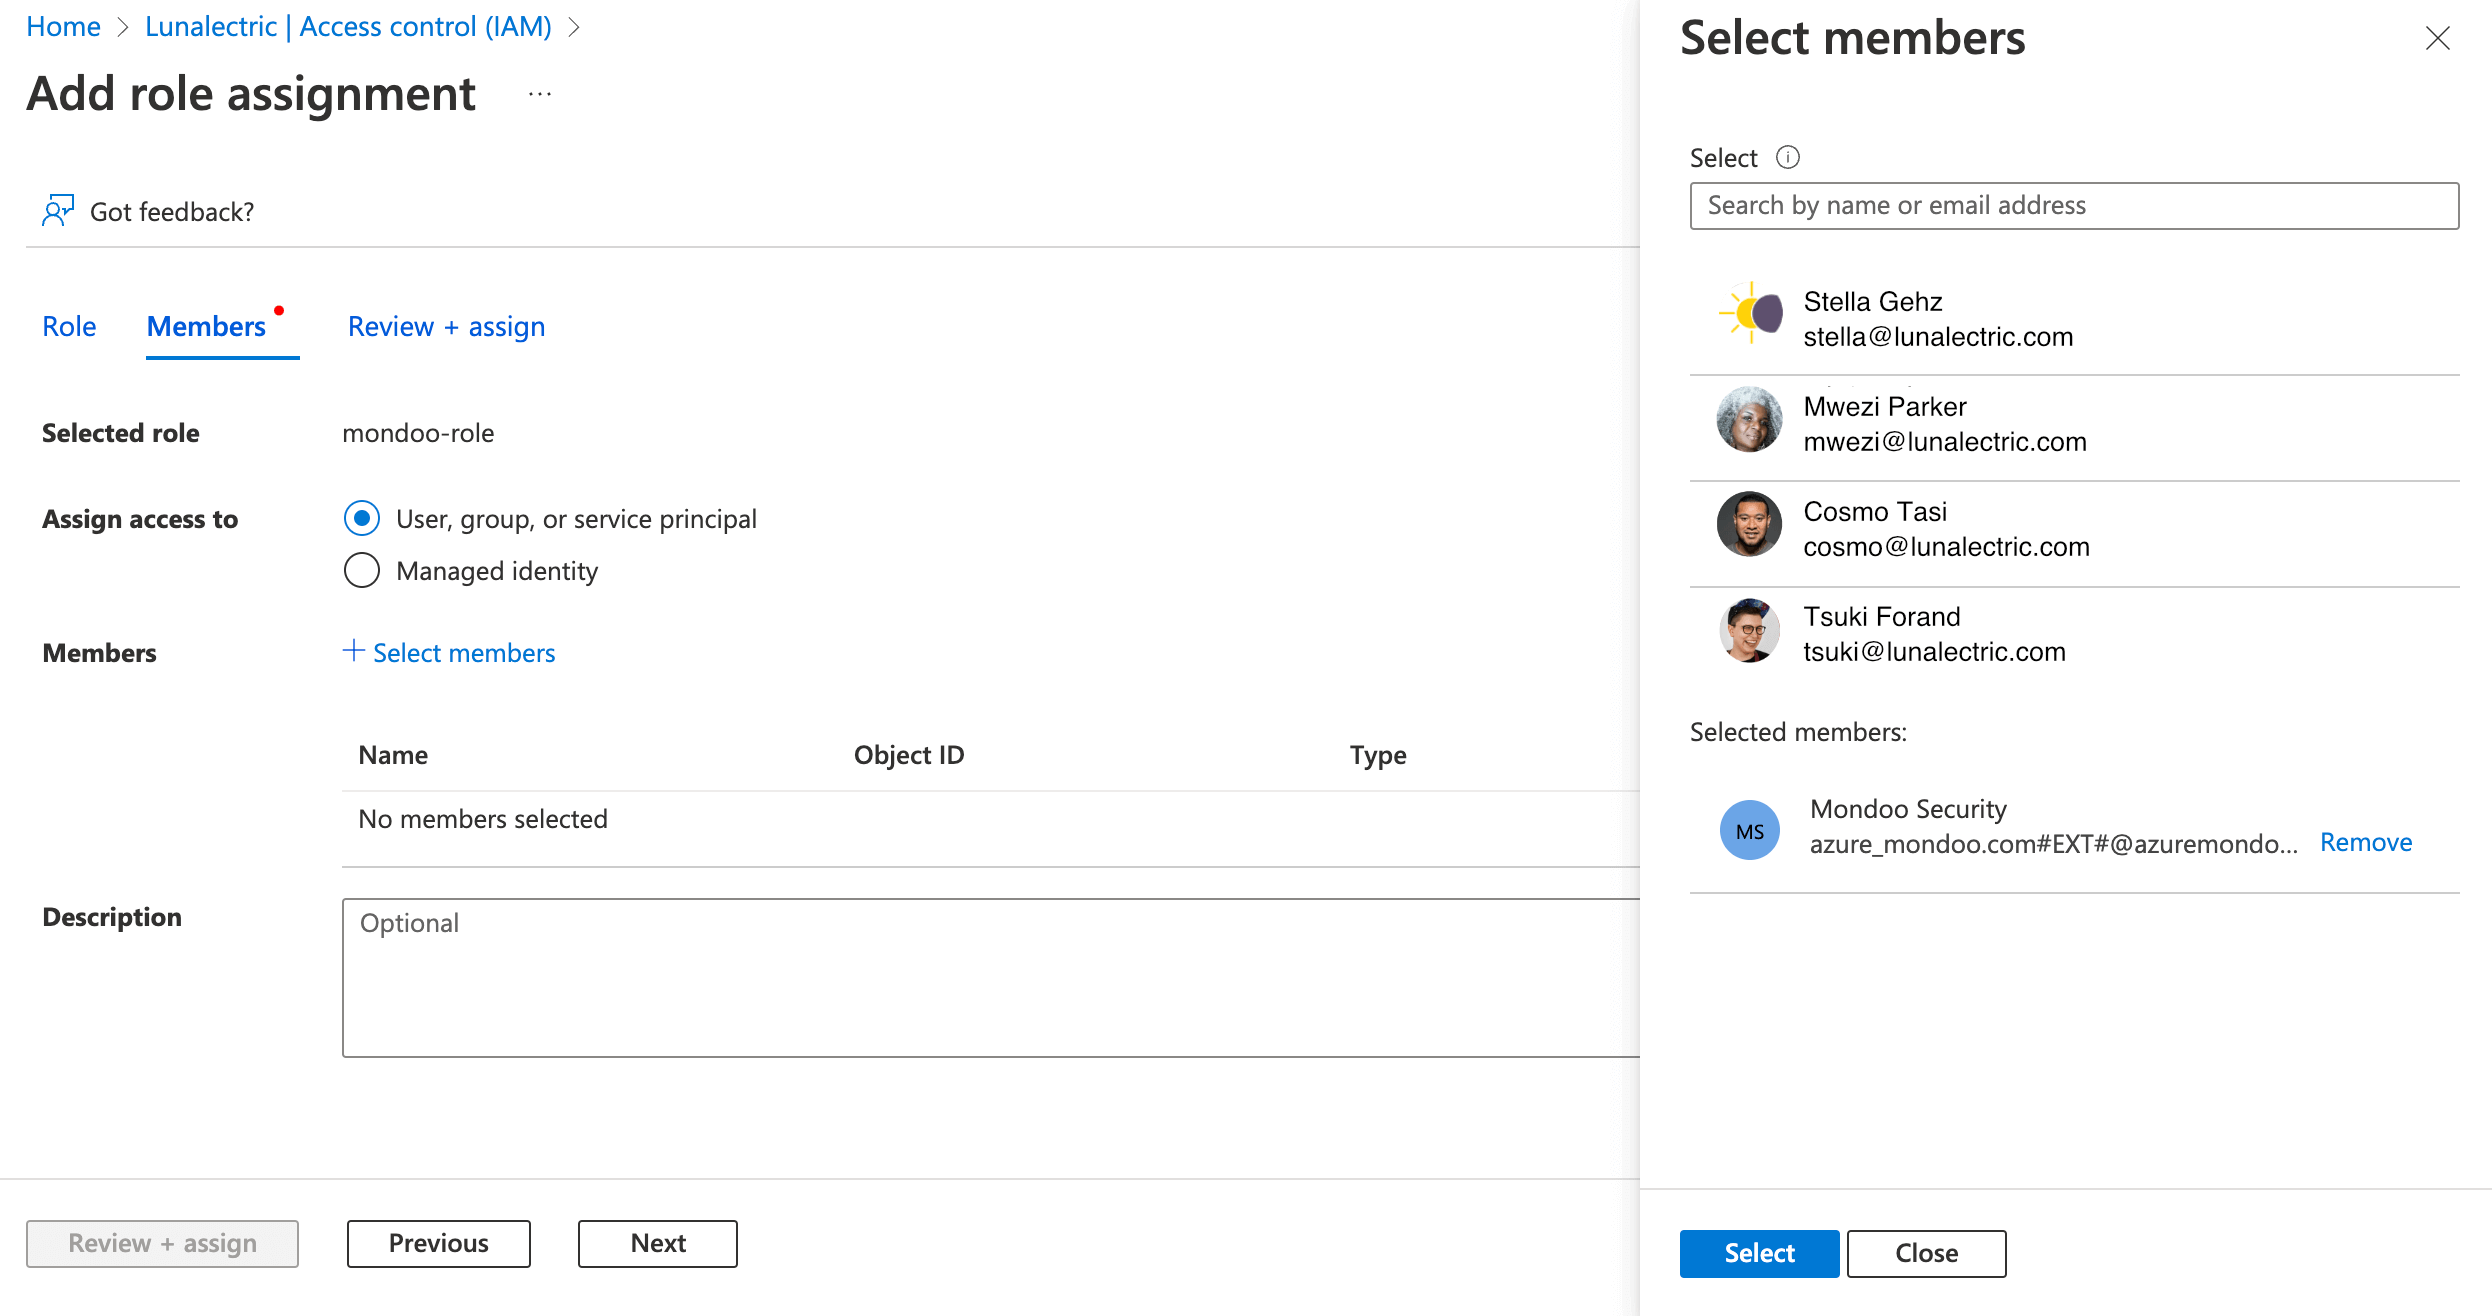
Select the Members tab and select User, group, or service principal.
-
Select the + Select Members link, find and select your Mondoo app registration, and select the Select button.
-
Select the Review + assign button to check the assignment. Select the Review + assign button again to assign the
mondoo-rolerole to your Mondoo app registration. -
Make sure that you have two RBAC roles for the app you created: On the subscription's Access control (IAM) page toolbar, select Check Access.
-
Keep "User, group, or service principal" selected and type the name you gave the app, such as
mondoo-security. -
Select the app. Verify that you see two roles: Reader and the custom role that you created.
It can take a few minutes for the roles you assigned to take effect.
Step E: Grant permissions to access Azure key vault
There are two permission models for key vaults: role-based access control (RBAC) and key vault access policy.
See what permission model your key vault uses: In the Azure portal, view the key vault's Access configuration settings. (You can easily change it to RBAC.)
If you are using RBAC for the key vault, there is no need for further actions; the READ permissions on the key vault will be applied by the "Key Vault Reader" subscription permissions applied in Step C.
If you use the legacy access policy permission model for key vaults, this step is required.
A key vault access policy determines whether a given security principal (a user, application or user group) can perform different operations on key vault secrets, keys, and certificates.
-
From the Azure portal home, select Key vaults.
-
Select a key vault from the list.
-
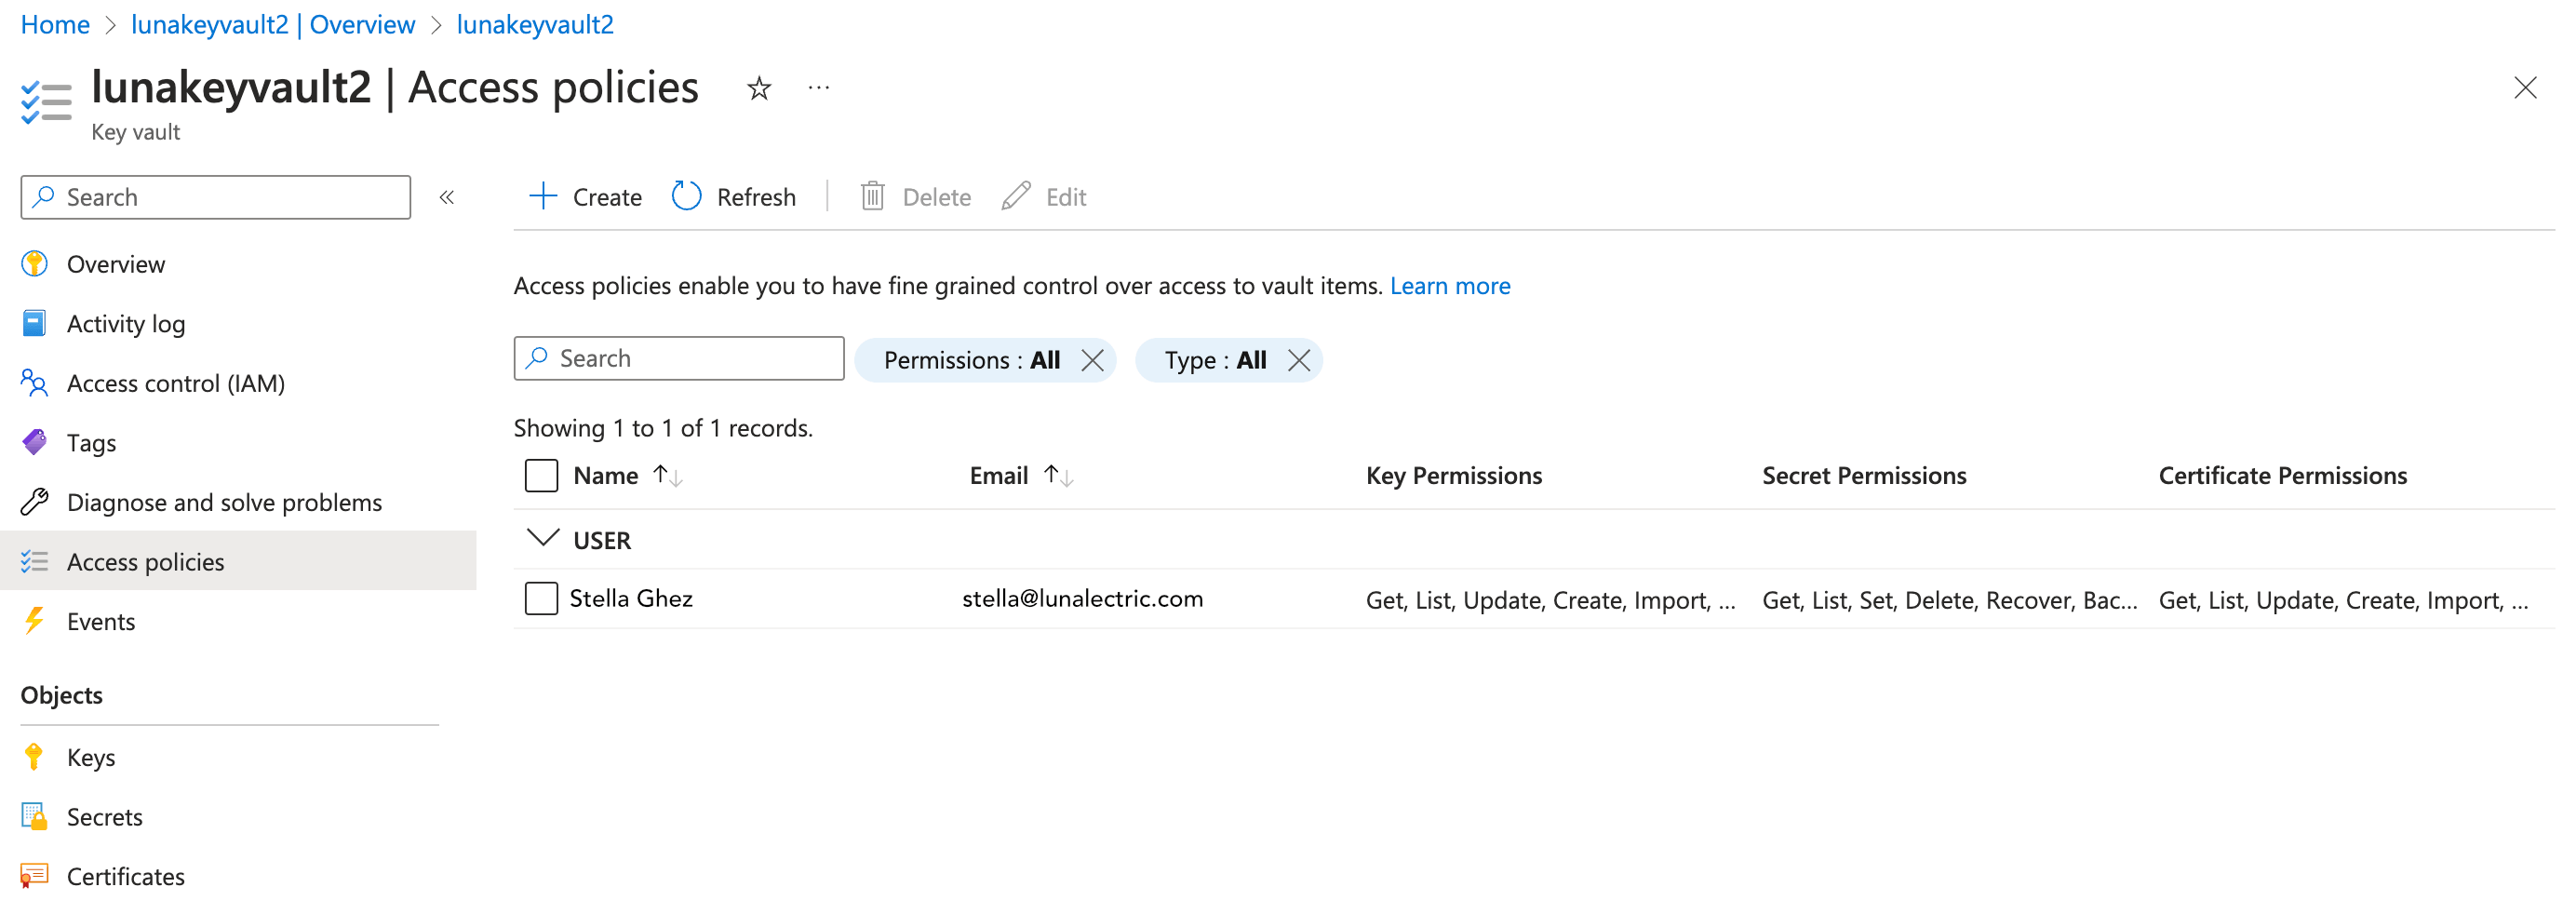
In the sidebar under the key vault name, select Access policies.
-
In the toolbar, select + Create.
-
Configure the permissions:
-
Under Key permissions, select Get and List.
-
Under Secret permissions, select Get and List.
-
Under Certificate permissions, select Get and List.
-
-
Select the Next button.
-
From the list, select the app registration you created.
-
Select the Next button and select the Next button again to skip the Application (optional) step.
-
Review the access policy and then select the Create button.
Step F: Create a client secret
Mondoo authenticates to the app registration with a client secret. Create one now and copy its value; you enter it when you add the integration in the Mondoo App.
-
From the Azure portal home, select Microsoft Entra ID.
-
In the navigation sidebar, select App registrations.
-
Select the app you created.
-
In the sidebar under the app name, select Certificates & secrets.
-
Select Client secrets and then select + New client secret.
-
Enter a description (such as
Mondoo), choose an expiration, and then select the Add button. -
Copy the secret's Value immediately and store it somewhere safe.
Azure shows the secret value only once, right after you create it. If you navigate away before copying it, you must create a new secret.
Add a new Azure integration in the Mondoo App
After you've created and granted permissions to a new app registration, you can create a Mondoo Azure integration. You need some values from the app registration you created in the instructions above.
-
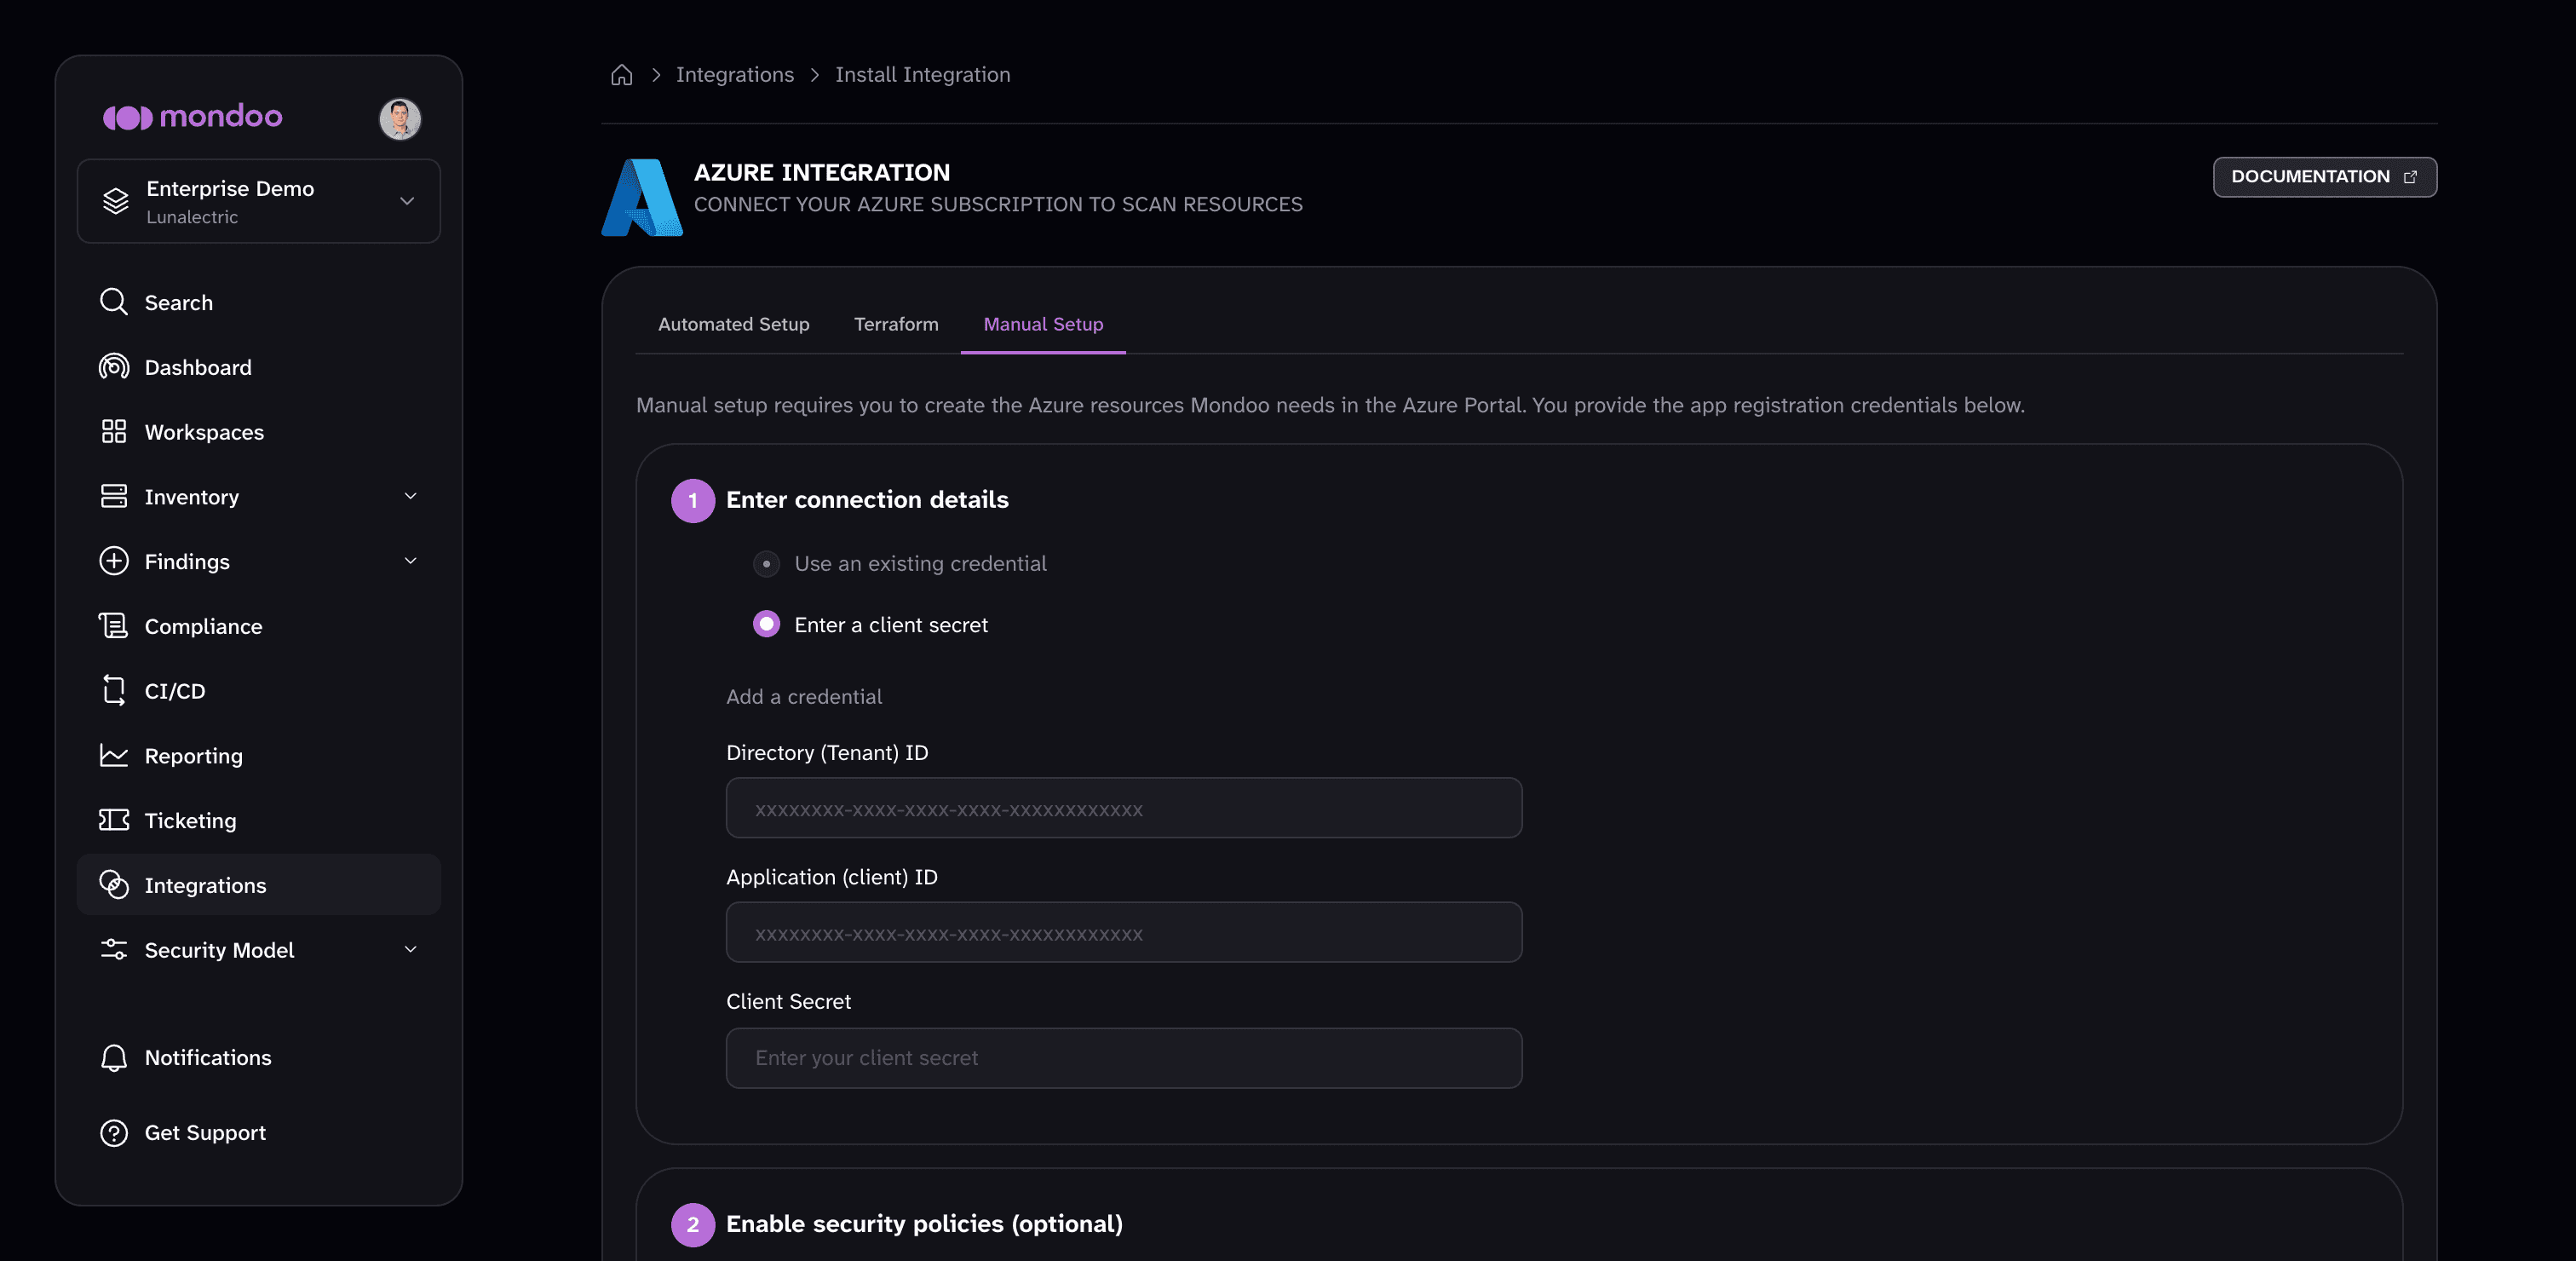
In the Mondoo App, navigate to the space where you want to add the integration. In the side navigation bar, select Integrations. In the top right, select INSTALL. On the Install Integration page, find Azure by browsing or searching by name, then select it. Select the Manual Setup tab.
-
Under Enter connection details, select Enter a client secret, then:
-
In the Directory (Tenant) ID box, enter the value from the app registration's Directory (tenant) ID.
-
In the Application (client) ID box, enter the value from the app registration's Application (client) ID.
-
In the Client Secret box, enter the secret value you copied in Step F.
If you already saved this app registration's client secret or certificate as a credential in the space's Settings > Credentials, select Use an existing credential and choose it instead.
-
-
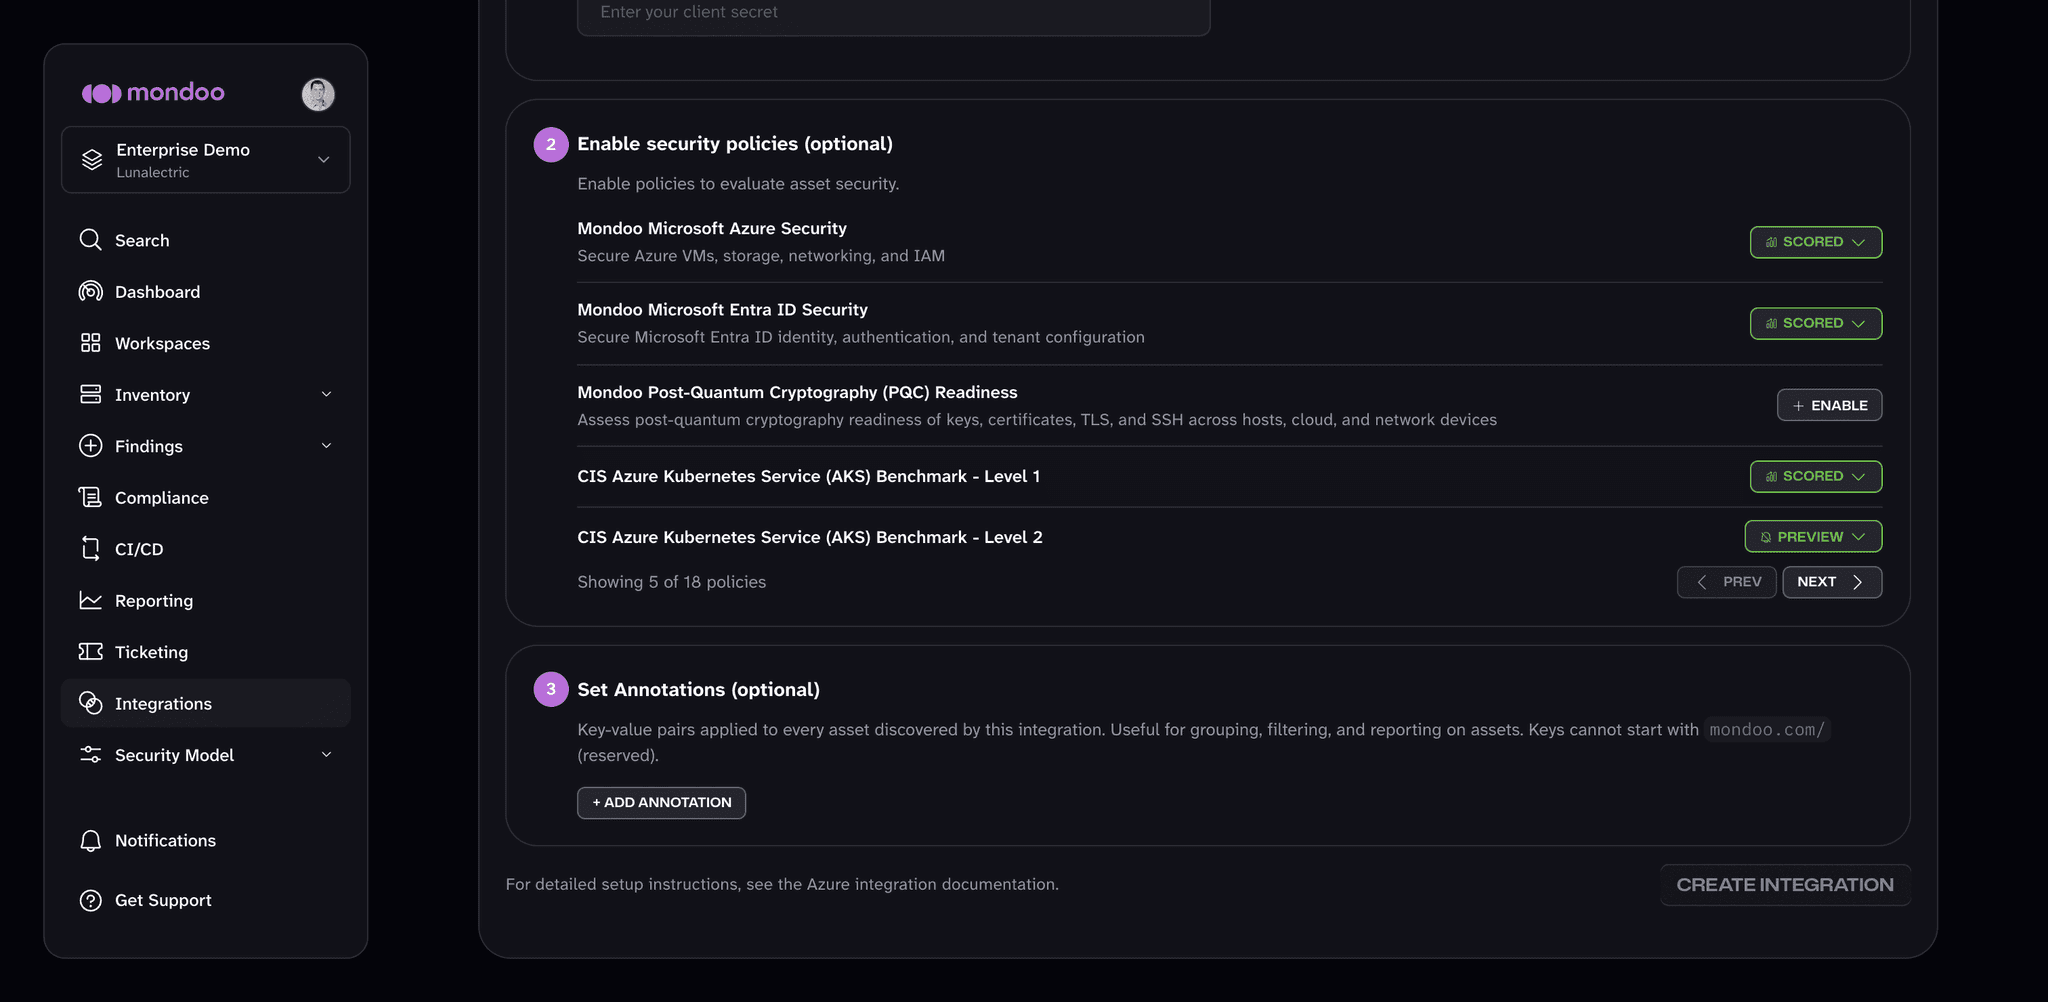
(Optional) Under Enable security policies, enable the policies on which you want to base assessments of your Azure environment. To learn more, read Manage Policies.
-
(Optional) Under Set Annotations (optional), select + ADD ANNOTATION to add key-value pairs to apply to every asset this integration discovers.
-
Select the CREATE INTEGRATION button.
Mondoo begins scanning the Azure subscriptions where you granted the app registration Reader access (Step C). To turn on VM scanning or limit scanning to an allow list or deny list of subscriptions, edit the integration after you create it and use Choose scan targets. When the first scan completes, you can see results on the INVENTORY page. To learn more, read Monitor Your Infrastructure Security.
If your integration is unsuccessful, read Troubleshoot an Azure Configuration.
Renew the client secret
The client secret you created has a limited lifetime (you set its expiration in Step F). When it expires, the integration stops functioning. Before that happens, create a new client secret and update the integration:
-
In the Azure portal, navigate to the app registration you created for Mondoo. In the sidebar under the app name, select Certificates & secrets, select Client secrets, and then select + New client secret.
-
Enter a description, choose an expiration, and select Add. Copy the new secret's Value immediately.
-
In the Mondoo App, select Integrations in the side navigation bar, select the Microsoft Azure card, and open your Azure integration. Select the edit (pencil) icon.
-
Update the secret:
- If the edit page has a Client secret (optional update) step, paste the new secret there and select SAVE CHANGES.
- If the edit page's Authentication step says a credential manages the app registration, open that credential in Settings > Credentials, select Rotate, and enter the new secret.
The Azure integration starts using the new secret to authenticate with Azure.