Scan in GitLab CI/CD
Integrate Mondoo security scans with your GitLab projects using GitLab's built-in runner functionality. With this integration, you'll get Mondoo security scans for Kubernetes manifests, Terraform configuration files, and Docker images.
Configure GitLab CI/CD security
To set up a GitLab CI/CD integration with Mondoo:
-
Create Mondoo credentials
-
Store those credentials in GitLab
Create credentials in Mondoo
To fetch policies and send scan results to Mondoo Platform, first configure a Mondoo service account for use in your CI/CD pipeline:
-
In the Mondoo Console side navigation bar, under INTEGRATIONS, select Add New Integration.
-
Under CI/CD, select GitLab CI/CD.
-
Copy the value in the Copy the Mondoo Platform credentials box to use it as a variable in your pipeline.
-
Select the START SCANNING button.
The credential is a base64-encrypted code that contains all the information needed to send the results of the scan to Mondoo. You can decrypt and check the content easily using this command:
echo <Credentials> | base64 -d
Securely store credentials in GitLab
-
In the GitLab console, select the repository you want to scan with Mondoo.
-
Go to Settings -> CI/CD and expand the Variables section.
-
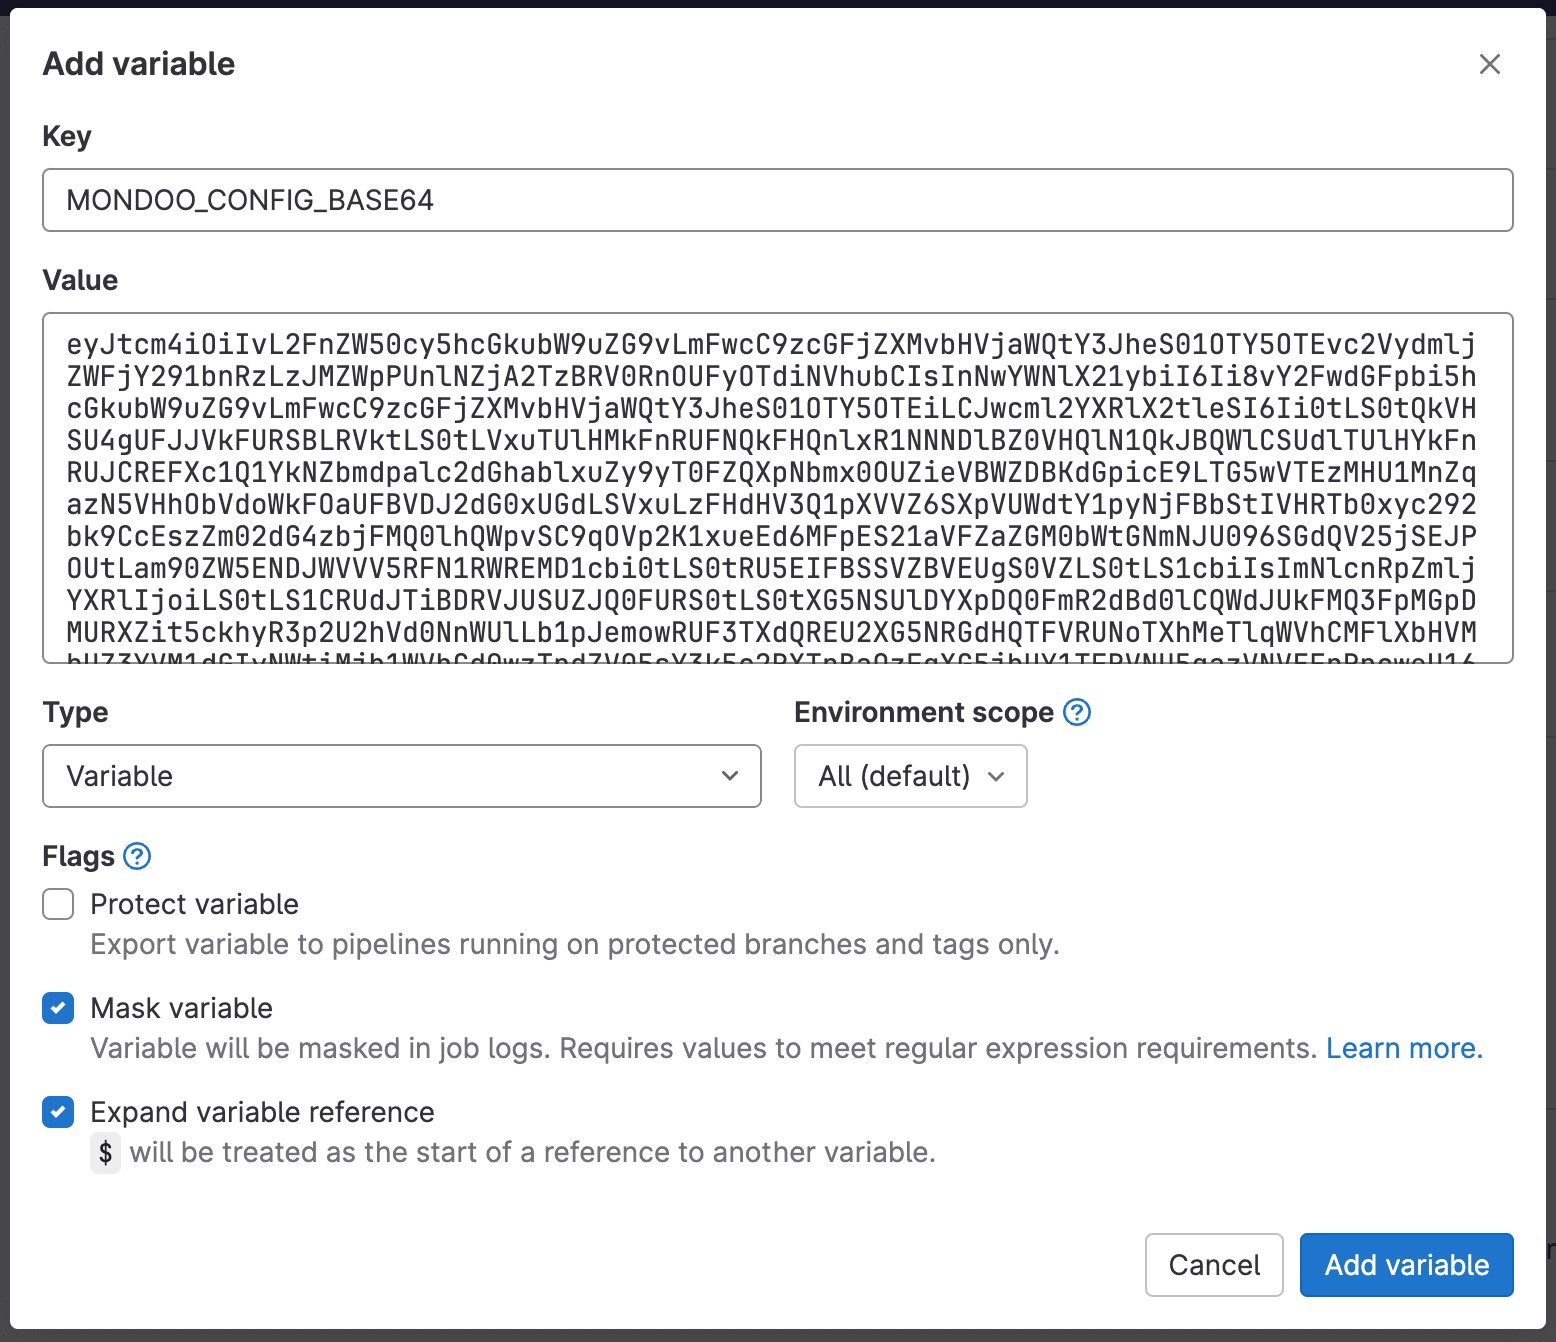
Select Add variable.
-
In the Add Variable dialog box, name the key
MONDOO_CONFIG_BASE64. -
Paste the Base64-encoded credential you downloaded from Mondoo.com into the Value field.
-
Keep the default values for Type and Environment scope.
-
Be sure to uncheck Protect variable so that this secret can be used for tests running in merge requests.
-
Check Mask variable to hide this secret in logs.
-
Select Add variable.
Create the GitLab pipeline config
Now that you have Mondoo credentials for running CI security scans, you can set up a GitLab Pipeline by creating a .gitlab-ci.yml configuration file.
Every release of cnspec is published as a Docker image to Docker Hub. Because GitLab makes heavy use of Docker containers as a runtime environment, it is easiest to use Mondoo's Docker image to run your scans.
This example creates a dummy GitLab pipeline configuration with two jobs, build-docker and mondoo, as well as two stages, build and test:
stages:
    - build
    - test

  # Build docker image
  build-docker:
    image: docker:latest
    stage: build
    services:
      - docker:dind
    script:
      - docker build . --tag mondoo_test_image

  # Scan docker image
  mondoo-cnspec:
    stage: test
    image:
      name: mondoo/cnspec:latest
       entrypoint: [""]
    script:
      - mkdir -p /root/.docker/ && echo "{"auths":{"$CI_REGISTRY":{"username":"$CI_REGISTRY_USER","password":"$CI_REGISTRY_PASSWORD"}}}" > /root/.docker/config.json
      # be sure to change the score-threshold value to control the minimum accepted asset score before CI jobs fail
      - cnspec scan container ${CI_REGISTRY_IMAGE}:${CI_COMMIT_REF_SLUG} --score-threshold 90
    dependencies:
      - build-docker
If medium asset scores are allowed, i.e. if the pipeline should still turn green with a medium asset score, then set the --score-threshold to 40.
JUnit report
If you prefer to store the report as a JUnit file to use GitLab's JUnit Report view feature, you can use:
mondoo:
  stage: test
  image:
    name: mondoo/cnspec:latest
    entrypoint: [""]
  script:
    - mkdir -p /root/.docker/ && echo "{\"auths\":{\"$CI_REGISTRY\":{\"username\":\"$CI_REGISTRY_USER\",\"password\":\"$CI_REGISTRY_PASSWORD\"}}}" > /root/.docker/config.json
    - cnspec scan container ${CI_REGISTRY_IMAGE}:latest --score-threshold 90  --output junit > mondoo-junit.xml
  artifacts:
    paths:
      - mondoo-junit.xml
    expire_in: 1 week
    reports:
      junit: mondoo-junit.xml
  # allow_failure: true
  dependencies:
    - build
Get more example pipeline configs
You can copy example GitLab pipeline configs from the Mondoo Console.
-
In the Mondoo Console side navigation bar, under INTEGRATIONS, select Add New Integration.
-
Under CI/CD, select GitLab CI/CD.
-
Scroll to step 3. Select the tab for the config you want to copy.
-
In the top-right corner of the sample config, select the copy icon to copy the config to your clipboard.