Scan in Azure Pipelines
Integrate Mondoo security with your Azure Pipelines to scan Kubernetes manifests, Terraform configuration files, and Docker images for common misconfigurations and CVEs.
For an overview of using Mondoo in your CI/CD workflows, read Integrate Mondoo with CI/CD Platforms.
Configure Azure Pipeline security
To set up an Azure Pipeline integration with Mondoo:
-
Create Mondoo credentials
-
Store those credentials in the Azure Pipeline
Create credentials in Mondoo
To fetch policies and send scan results to Mondoo Platform, first configure a Mondoo service account for use in your CI/CD pipeline:
-
In the Mondoo Console side navigation bar, under INTEGRATIONS, select Add New Integration.
-
Under CI/CD, select Azure Pipelines.
-
Copy the value in the Copy the Mondoo Platform credentials box to use it as a variable in your pipeline.
-
Select the START SCANNING button.
The credential is a base64-encrypted code that contains all the information needed to send the results of the scan to Mondoo. You can decrypt and check the content easily using this command:
echo <Credentials> | base64 -d
Securely store credentials in an Azure Pipeline
Configure your Azure Pipelines to store the Mondoo credentials:
-
Open the pipeline where the Mondoo scan will run. Near the top-right corner, select Edit.

-
Near the top-right corner, select Variables.

-
Add a new variable named MONDOO_CONFIG_BASE64 with the base64 value you copied in the steps above.
-
Check Keep this value secret and Let users override this value when running this pipeline and then select OK.
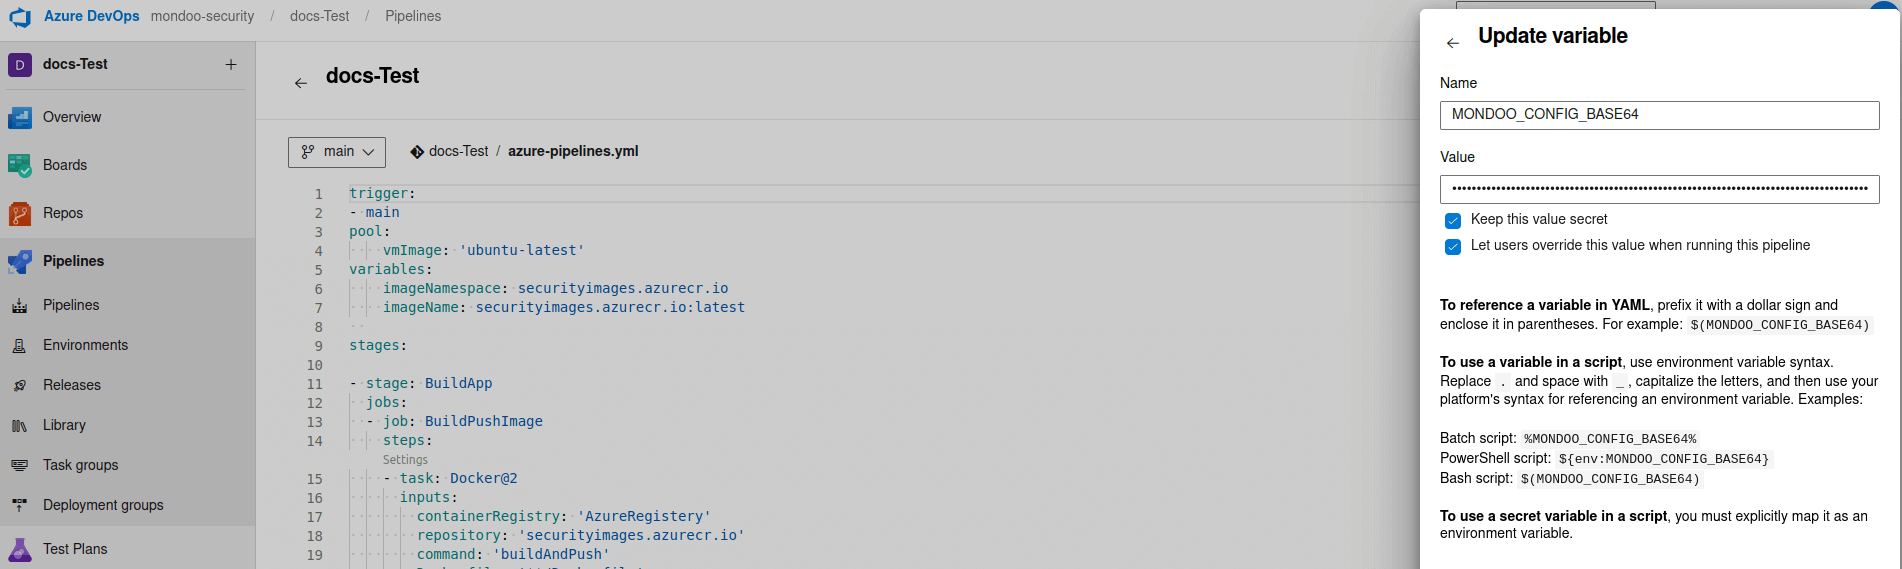
To learn more about setting up secrets, see the Azure Pipelines secret documentation.
Example configuration and scan
To be sure the images you create in a pipeline don't have any security vulnerabilities, load all images you create in the pipeline (pull them from the registry) and scan them with cnspec using relevant policies. cnspec explores the layers of the image, searching for issues that put you at risk.
This example has two stages:
-
In the first stage, BuildApp, you build an application by calling the Dockerfile and pushing it to the Azure Container Registry. This example pushes the image to the Azure Container Registry, but you can use any registry, such as Docker Hub. To use the Azure Container Registry, this example creates a resource in the Azure portal called container registry. It's a private registry.
-
The second stage, ScanWithCnspec, installs cnspec using an automated script for installing cnspec on different Linux distributions. It then uses cnspec to scan the Docker image created in the previous stage. It's important to pull the Docker image from the registry (in this example, the Azure Container Registry, which is private).
The pipeline must have access to the image (have adequate permissions) so it can pull and scan the image with cnspec. There are two approaches:
- **Directly from the pipeline login to the registry - ** Because this example uses Azure Container Registry with multi-factor authentication activated, it relies on a service principal by registering an application in Azure. To learn how to register an app in Azure, read the Azure documentation) and the Mondoo Azure manual app registration option documentation. It's easier to set up a client secret for the created application instead of a certificate.
You then execute this login command in the pipeline:
docker login securityimages.azurecr.io --username <Application (client) ID> --password <Client Secret>
- Using Service connections in the project settings of the pipeline - We first create a service connection (Learn how) and then choose the Docker task, selecting
loginas the command. Example results in the pipeline:
task: Docker@2
inputs:
  containerRegistry: "AzureRegistry"
  command: "login"
This example also defines an extra task in the second stage called PublishTestResults@2. It specifies the format of the results files you want to publish (in this case, JUnit).
trigger:
  - main
pool:
  vmImage: "ubuntu-latest"
variables:
  imageNamespace: securityimages.azurecr.io
  imageRepo: mondoo-app-docker

stages:
  - stage: BuildApp
    jobs:
      - job: BuildPushImage
        steps:
          - task: Docker@2
            inputs:
              containerRegistry: "AzureRegistry"
              repository: "$(imageRepo)"
              command: "buildAndPush"
              Dockerfile: "**/Dockerfile"
              tags: latest

  - stage: ScanWithCnspec
    jobs:
      - job: ScanImage
        steps:
          - script: |
              bash -c "$(curl -sSL https://install.mondoo.com/sh)"
              cnspec version
            displayName: "Install cnspec"

          - script: |
              docker login securityimages.azurecr.io --username <Application (client) ID> --password <Client Secret>
            displayName: "Login to Azure Container Registry"

          - script: |
              # be sure to change the score-threshold value to control the minimum accepted asset score before CI jobs fail
              cnspec scan docker image $(imageNamespace)/$(imageRepo):latest --score-threshold 100 --output junit > TEST-cnspec.xml
            displayName: "Scan Docker Image with cnspec"
            env:
              MONDOO_CONFIG_BASE64: $(MONDOO_CONFIG_BASE64)

          - task: PublishTestResults@2
            inputs:
              testResultsFormat: "JUnit"
              testResultsFiles: "**/TEST-*.xml"
              mergeTestResults: true
              testRunTitle: "cnspec"
            condition: succeededOrFailed()
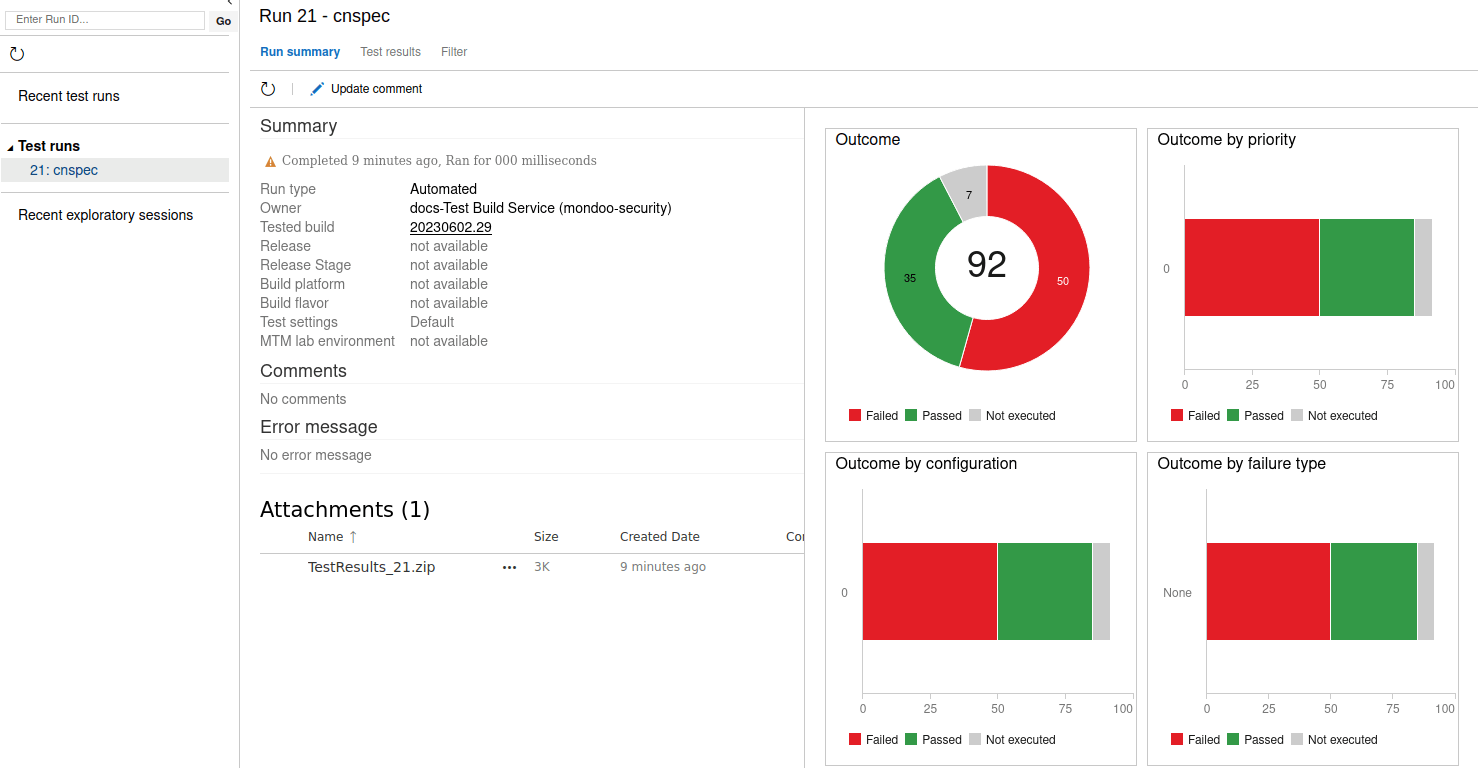
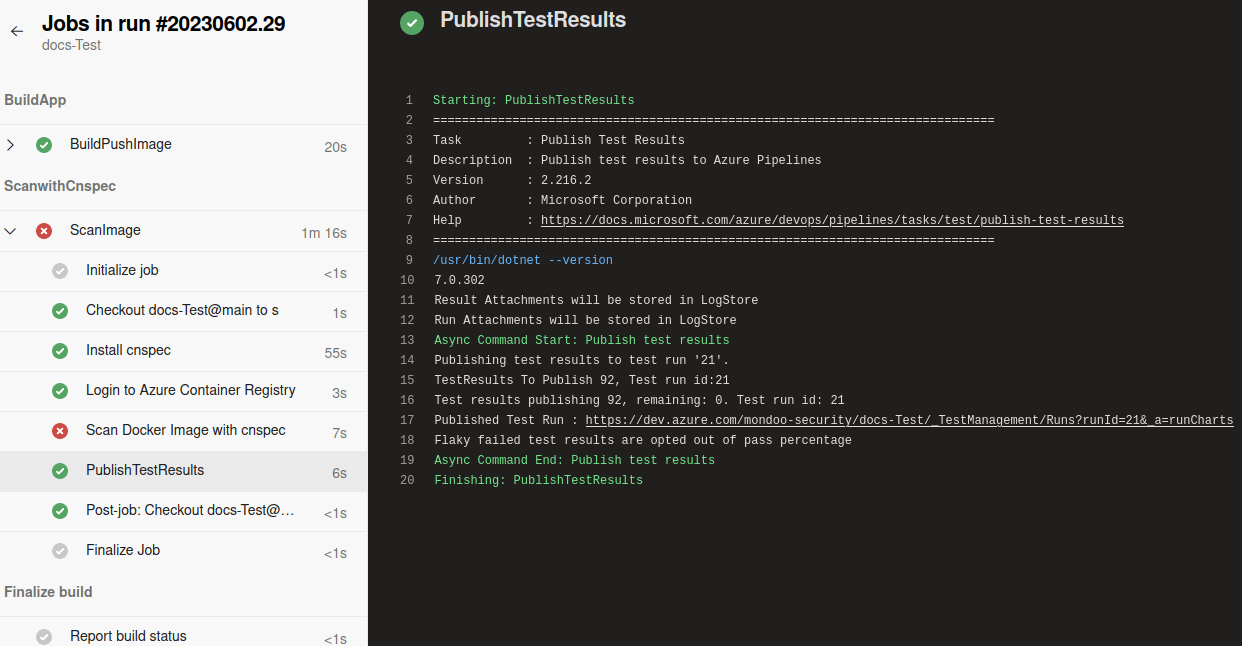
Because cnspec uses a score threshold of 100, the pipeline fails if cnspec finds any security issues. It generates a link to the XML file, which shows the result of the scan.
In this example, cnspec found security issues and the scan failed, with only 38% of the test passing:

By inspecting the job in the PublishTestResults, this example provides a link referring to the results (https://dev.azure.com/mondoo-security/docs-Test/_TestManagement/Runs?runId=21&_a=runCharts):
Selecting the link shows the results in more detail: