Grant Keyless Non-Human Access to Mondoo
Use workload identity federation (WIF) to give external workloads secure, keyless access to Mondoo at the space, organization, or platform level. WIF eliminates the need for stored credentials by letting apps, services, and automation authenticate through trusted identity providers.
Workload identity federation (WIF) gives non-human users keyless access to Mondoo. Instead of storing and rotating service account credentials, external workloads (apps, services, infrastructure as code, and scripts) authenticate through a trusted identity provider and exchange its token for Mondoo access. There are no long-lived secrets to store, rotate, or leak.
What is a WIF provider?
A WIF provider is an external identity service that allows workloads running outside of Mondoo to authenticate and access your Mondoo data without the burden of service account key credentials. Example workloads include infrastructure as code, apps, services, and automation tools. These external workloads use a WIF provider to exchange an external identity token for a Mondoo service account access token, giving them access without the risk and hassle of storing and maintaining credentials.
Why use a WIF provider?
For a workload to access Mondoo, it must authenticate. Traditionally a service account with public and private key credentials provides this authentication. These credentials pose a security risk; anyone with access to them can authenticate with Mondoo. You must store them securely, rotate them regularly, and carefully manage their distribution.
With WIF, an external workload authenticates with Mondoo without storing any keys. When a workload needs access, it sends a trusted identity token (from the WIF provider) to Mondoo and retrieves a Mondoo access token. This process eliminates the need to manually manage credentials and lowers the risk of stolen keys.
With WIF you can:
-
Improve security: You don't have to rely on long-lived, static service account keys that can be compromised.
-
Reduce maintenance: There's no need to manage and rotate service account keys.
-
Use what you already have: Tap into your existing identity infrastructure for authentication instead of adding and maintaining yet another account.
Which WIF providers does Mondoo support?
Mondoo trusts these WIF providers for authentication:
| Provider | Issuer URI | Token type |
|---|---|---|
| AWS | https://sts.amazonaws.com | Pre-signed STS GetCallerIdentity |
| Azure (Microsoft Entra ID) | https://sts.windows.net/TENANT_ID | OIDC JWT |
| GitHub Actions | https://token.actions.githubusercontent.com | OIDC JWT |
| Google Cloud | https://accounts.google.com | OIDC JWT |
| Any OIDC provider | Provider's issuer URL | OIDC JWT |
Any identity provider that implements the OpenID Connect Discovery 1.0 specification is supported, as long as it serves a valid /.well-known/openid-configuration endpoint over HTTPS.
Where can you configure WIF?
You can set up WIF identity providers at three levels:
-
Space level: The identity provider grants access to a single space. This is the most restrictive option and is ideal for workloads that only need to interact with one space.
-
Organization level: The identity provider grants access across all spaces within an organization. Use this when a workload needs to operate across multiple spaces.
-
Platform level: The identity provider grants access across the entire Mondoo Platform. This is typically reserved for administrative automation.
When you create an identity provider, the scope is determined by where you navigate in the Mondoo App (space settings vs. organization settings) or by the scopeMrn you provide in the API.
What roles can you assign?
When you create a WIF identity provider, you can assign one or more roles to control what the authenticated workload can do:
| Role | Description |
|---|---|
| Agent | Can report scan results (default) |
| Viewer | Read-only access |
| Editor | Read/write access |
| Owner | Full access including IAM management |
You cannot create an identity provider with roles that exceed your own permissions in the target scope.
How does a workload use a WIF provider to authenticate with Mondoo?
The process of authenticating an external workload with Mondoo using a WIF provider is a series of requests and token exchanges:
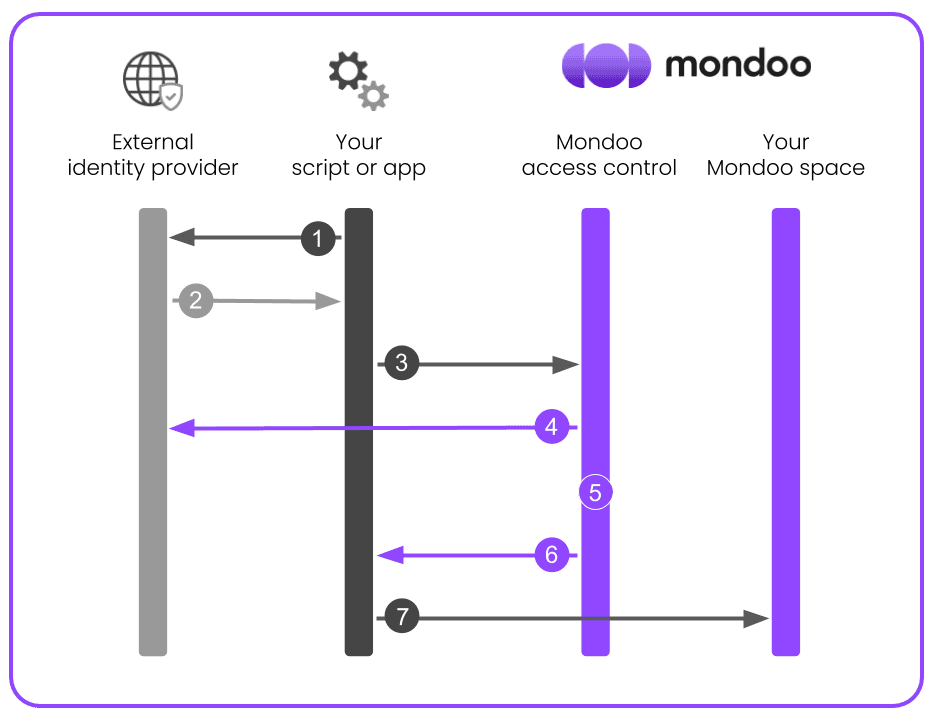
-
The external workload requests a token from the WIF provider (such as Google, Azure, GitHub, or AWS).
-
The WIF provider issues a token to the external workload.
-
The external workload requests an access token from Mondoo, providing the WIF-issued token for authentication.
-
Mondoo validates the external WIF-issued token against the provider's public keys (for OIDC) or by executing a pre-signed request against AWS STS (for AWS).
-
Mondoo determines what scope the external workload is allowed to access.
-
Mondoo issues a time-limited access token to the external workload.
-
The external workload accesses Mondoo, authenticated as a service principal.
Claim mappings
Claim mappings let you verify additional identity claims beyond the subject. Each mapping is a key-value pair that must match a claim in the token presented during authentication.
OIDC providers (including GCP, Azure, GitHub, and custom providers) use the jwt_claims.* prefix:
jwt_claims.repository = myorg/myrepo
jwt_claims.environment = production
jwt_claims.kubernetes.io/namespace = default
AWS uses the aws_claims.* prefix:
aws_claims.account = 123456789012Mondoo as an OIDC identity provider
In addition to accepting tokens from external identity providers (the WIF flow described on this page), Mondoo itself acts as an OpenID Connect (OIDC) identity provider. This capability is what allows external services (such as GCP Workload Identity Federation) to trust and validate tokens that Mondoo issues.
This is used in Mondoo's BigQuery and Cloud Storage export integrations, where Mondoo authenticates to GCP by presenting a short-lived OIDC token that GCP validates against Mondoo's public signing keys.
OIDC discovery endpoints
Each Mondoo environment exposes standard OIDC discovery endpoints:
| Endpoint | Description |
|---|---|
<issuer>/.well-known/openid-configuration | The OIDC discovery document. Contains the issuer URI, JWKS URI, supported signing algorithms, and other metadata. |
<issuer>/.well-known/jwks.json | The JSON Web Key Set (JWKS). Contains the public keys that external services use to verify Mondoo-signed tokens. |
Replace <issuer> with the Mondoo STS endpoint for your environment:
| Environment | Issuer URL |
|---|---|
| Mondoo (US) | https://sts.us.mondoo.com |
| Mondoo (EU) | https://sts.eu.mondoo.com |
| Mondoo Edge | https://sts.edge.mondoo.com |
| Dedicated deployment | https://sts.mondoo.CUSTOMER.com |
For example, for the US environment:
- Discovery document:
https://sts.us.mondoo.com/.well-known/openid-configuration - JWKS:
https://sts.us.mondoo.com/.well-known/jwks.json
How external services use these endpoints
When you configure an external service (such as a GCP Workload Identity Pool) to trust Mondoo as an OIDC provider, the external service:
- Fetches Mondoo's OIDC discovery document to learn where to find the signing keys.
- Fetches the JWKS to obtain Mondoo's current public signing keys.
- When Mondoo presents a token, the external service validates the token's signature against those public keys, verifies the issuer, audience, and expiration claims, and grants access if validation succeeds.
This is all handled automatically by the external service (such as GCP). You only need to provide the correct issuer URL when configuring the trust relationship.
Security notes
-
Token exchange is unauthenticated. Security relies on the cryptographic verification of the presented token against the identity provider's public keys (OIDC) or AWS STS (AWS).
-
OIDC tokens must have more than 3 minutes until expiration to prevent near-expiry race conditions.
-
AWS tokens are validated by executing the pre-signed request against AWS STS. The URL must target
sts.amazonaws.comor a regional STS endpoint (sts.<region>.amazonaws.com). -
Privilege escalation is prevented. You cannot create an identity provider with roles that exceed your own permissions.
-
Credentials are short-lived. Issued credentials expire according to the identity provider's expiration setting (maximum 24 hours).
Set up keyless authentication for workloads
Setting up WIF authentication for Mondoo involves these steps:
-
Create a WIF identity provider in Mondoo.
-
Request a token from the WIF provider.
-
Exchange the token for a service account to give your workload access.
Use WIF with cnspec
cnspec has built-in support for WIF. When you run cnspec on a supported cloud platform (GCP, Azure, or GitHub Actions), it automatically detects the environment, fetches an identity token from the local metadata service, and exchanges it for temporary Mondoo credentials, with no manual token handling required.
When you create a WIF identity provider in Mondoo, the response includes a JSON configuration file. Save this file and pass it to cnspec using the --config flag:
cnspec scan --config wif-config.json
cnspec shell --config wif-config.json
You can also set the config via the MONDOO_CONFIG_PATH environment variable:
export MONDOO_CONFIG_PATH=/path/to/wif-config.json
cnspec scan
The WIF config file uses this format:
{
  "type": "external_account",
  "universeDomain": "https://us.api.mondoo.com",
  "audience": "//captain.api.mondoo.app/spaces/YOUR_SPACE_ID",
  "issuerUri": "https://accounts.google.com",
  "subjectTokenType": "urn:ietf:params:oauth:token-type:jwt",
  "scopes": ["//iam.api.mondoo.app/roles/agent"]
}
cnspec detects the "type": "external_account" field and automatically:
- Try fetching an identity token from the GCP metadata service.
- If that fails, try the Azure Instance Metadata Service (IMDS).
- If that fails, try GitHub Actions' OIDC token endpoint.
- Exchange the token with Mondoo for temporary credentials.
This means the same WIF config file works across all three environments without changes.
Exchange tokens manually
If you need to exchange tokens outside of cnspec (for example, from a custom application or script), you can call the token exchange endpoint directly:
curl -X POST -H "Content-Type: application/json; charset=utf-8" \
    <UNIVERSE_DOMAIN>/SecureTokenService/ExchangeExternalToken -d '{
      "audience": "//captain.api.mondoo.app/spaces/<SPACE-ID>",
      "issuer_uri": "<WIF-ISSUER-URI>",
      "jwt_token": "<WIF-ISSUED-TOKEN>"}'
For <UNIVERSE_DOMAIN>, substitute the universe domain value that Mondoo provides when you create the identity provider (for example, https://us.api.mondoo.com).
The audience value determines the scope of access. Use a space MRN (//captain.api.mondoo.app/spaces/<SPACE-ID>) for space-level access or an organization MRN for organization-level access.
Select your WIF provider for detailed instructions on obtaining the identity token:
Set up keyless authentication with GCP
Prerequisites
-
Sufficient GCP privileges to create and manage service accounts
-
Editor or Owner privileges in the Mondoo space, organization, or platform to which your workload needs access
Step A: Prepare your GCP environment for WIF
-
Create a GCP service account. To learn how, read Create service accounts.
-
Go the Service account details page and note the service account's unique ID. You need this value when you configure the workload identity provider.
-
Assign the managed identity to a virtual machine or another resource where your workload runs. To learn how, read Create a VM and attach the service account.
Step B: Create a new workload identity provider in Mondoo
-
In the Mondoo App, navigate to the space or organization in which you want to set up keyless access for non-human users.
-
In the left navigation, select Settings. Then select the Workload Identity tab.
-
Select the ADD IDENTITY PROVIDER button or the plus (+) symbol near the top-right corner of the tab and select Google.
-
In the Issuer URL box, keep the default
https://accounts.google.com. -
In the Subject box, enter the unique ID of the GCP service account you created in Step A.
-
In the Expiration time list, choose the duration of sessions authenticated with this WIF provider.
-
In the Name and Description boxes, provide a short name and longer description that help you and your teammates recognize the source and purpose of the provider.
-
Select the ADD IDENTITY PROVIDER button.
Mondoo generates and displays the configuration values that you need to give your workload access.
Step C: Exchange your token for access
Fetch the local token:
curl -H "Metadata-Flavor: Google" "http://metadata.google.internal/computeMetadata/v1/instance/service-accounts/default/identity?audience=test"Make a curl call to exchange a local token for a short-lived Mondoo service account:
curl --request POST \
  --url 'UNIVERSE_DOMAIN/SecureTokenService/ExchangeExternalToken?=' \
  --header 'content-type: application/json' \
  --data '{
  "audience": "AUDIENCE",
  "issuer_uri": "ISSUER",
  "jwt_token": "TOKEN"
}'| For... | Substitute... |
|---|---|
| AUDIENCE | The audience value Mondoo provided when you followed the instructions in Step B above |
| ISSUER | The issuer value Mondoo provided when you followed the instructions in Step B above |
| TOKEN | The token fetched using the curl command above |
This call returns a Mondoo service account in the form of a base64_credential value, which your workload can use to access Mondoo by setting MONDOO_CONFIG_BASE64 to the returned value.
Set up keyless authentication with Azure (Microsoft Entra ID)
Prerequisites
-
Sufficient Microsoft Entra ID privileges to create and manage service principals
-
Editor or Owner privileges in the Mondoo space, organization, or platform to which your workload needs access
Step A: Prepare your Microsoft environment for WIF
-
Register a Microsoft Entra app and create a service principal. You can use the default Application (client) ID or specify a custom URI. Be sure to note the Application ID URI. You need this value when you configure the workload identity provider.
-
Create a managed identity. Be sure to note its Object ID. You need this value when you configure the workload identity provider.
-
Assign the managed identity to a virtual machine or another resource where your workload runs. To learn how, read User-assigned managed identity.
Step B: Create an identity provider in Mondoo
-
In the Mondoo App, navigate to the space or organization in which you want to set up keyless access for non-human users.
-
In the left navigation, select Settings. Then select the Workload Identity tab.
-
Select the ADD IDENTITY PROVIDER button or the plus (+) symbol near the top-right corner of the tab and select Azure.
-
In the Issuer URL box, enter
https://sts.windows.net/YOUR_TENANT_ID. For YOUR_TENANT_ID, substitute the tenant ID of the Microsoft directory in which you created the service principal. -
In the Subject box, enter the Application ID URI from Step A.
-
In the Expiration time list, choose the duration of sessions authenticated with this WIF provider.
-
In the Name and Description boxes, provide a short name and longer description that help you and your teammates recognize the source and purpose of the identity provider.
-
Select the ADD IDENTITY PROVIDER button.
Mondoo generates and displays the configuration values that you need to give your workload access to your Mondoo space.
Step C: Exchange your token for access to the Mondoo space
Fetch the local token:
curl http://localhost:50342/oauth2/token --data "resource=https://management.azure.com/" -H Metadata:true -s | jq -r ".access_token"Make a curl call to exchange a local token for a short-lived Mondoo service account:
curl --request POST \
  --url 'UNIVERSE_DOMAIN/SecureTokenService/ExchangeExternalToken?=' \
  --header 'content-type: application/json' \
  --data '{
  "audience": "AUDIENCE",
  "issuer_uri": "ISSUER",
  "jwt_token": "TOKEN"
}'| For... | Substitute... |
|---|---|
| AUDIENCE | The audience value Mondoo provided when you followed the instructions in Step B above |
| ISSUER | The issuer value Mondoo provided when you followed the instructions in Step B above |
| TOKEN | The Microsoft-issued, locally available token |
This call returns a Mondoo service account in the form of a base64_credential value, which your workload can use to access Mondoo by setting MONDOO_CONFIG_BASE64 to the returned value.
Set up keyless authentication with AWS
AWS workloads authenticate using a pre-signed STS GetCallerIdentity request instead of an OIDC JWT. No raw credentials are transmitted to Mondoo.
Prerequisites
-
An AWS IAM role or user whose identity you want to use for authentication
-
Editor or Owner privileges in the Mondoo space, organization, or platform to which your workload needs access
Step A: Create an identity provider in Mondoo
-
In the Mondoo App, navigate to the space or organization in which you want to set up keyless access for non-human users.
-
In the left navigation, select Settings. Then select the Workload Identity tab.
-
Select the ADD IDENTITY PROVIDER button or the plus (+) symbol near the top-right corner of the tab and select AWS.
-
In the Issuer URL box, keep the default
https://sts.amazonaws.com. -
In the Subject box, enter the ARN of the AWS identity that your workload uses. Use these patterns:
Caller type Subject pattern IAM User arn:aws:iam::123456789012:user/UserNameIAM Role (direct) arn:aws:iam::123456789012:role/RoleNameAssumed role (any session) arn:aws:sts::123456789012:assumed-role/RoleName/*Assumed role (specific session) arn:aws:sts::123456789012:assumed-role/RoleName/SessionNameIAM and STS ARNs omit the region field, resulting in consecutive colons (for example,
arn:aws:iam::<ACCOUNT>:role/...). This is the correct format.For assumed roles, use the
/*wildcard because session names change with each invocation. -
In the Expiration time list, choose the duration of sessions authenticated with this identity provider.
-
Optionally, add claim mappings to restrict access further. AWS supports these claim keys:
Key Description aws_claims.accountAWS account ID aws_claims.arnFull ARN of the caller aws_claims.useridUnique identifier of the caller -
In the Name and Description boxes, provide a short name and longer description that help you and your teammates recognize the source and purpose of the identity provider.
-
Select the ADD IDENTITY PROVIDER button.
Mondoo generates and displays the configuration values that you need to give your workload access.
Step B: Exchange your token for access
AWS authentication uses a pre-signed GetCallerIdentity request rather than a JWT. The process works like this:
-
Your workload signs a
GetCallerIdentityrequest using AWS Signature V4 with its locally available credentials. -
The serialized signed request is sent to Mondoo (no raw credentials are transmitted).
-
Mondoo executes the signed request against AWS STS to verify the caller's identity.
-
The returned ARN is matched against the identity provider's subject.
Despite the field name jwt_token, the value for AWS is not a JWT. Instead, it contains a JSON-serialized pre-signed request:
{
  "url": "https://sts.amazonaws.com/?Action=GetCallerIdentity&Version=2011-06-15",
  "method": "POST",
  "headers": [
    {
      "key": "Authorization",
      "value": "AWS4-HMAC-SHA256 Credential=AKIA.../us-east-1/sts/aws4_request, SignedHeaders=host;x-amz-date, Signature=..."
    },
    { "key": "host", "value": "sts.amazonaws.com" },
    { "key": "x-amz-date", "value": "20240101T000000Z" },
    { "key": "x-amz-security-token", "value": "FwoGZXIvY..." }
  ]
}
The x-amz-security-token header is only present when using temporary credentials (assumed roles, instance profiles).
Make a curl call to exchange the pre-signed request for a short-lived Mondoo service account:
curl --request POST \
  --url 'UNIVERSE_DOMAIN/SecureTokenService/ExchangeExternalToken' \
  --header 'content-type: application/json' \
  --data '{
  "audience": "AUDIENCE",
  "issuer_uri": "https://sts.amazonaws.com",
  "jwt_token": "PRE_SIGNED_REQUEST_JSON"
}'| For... | Substitute... |
|---|---|
| UNIVERSE_DOMAIN | The universeDomain value Mondoo provided when you created the identity provider |
| AUDIENCE | The audience value Mondoo provided when you created the identity provider |
| PRE_SIGNED_REQUEST_JSON | The JSON-serialized pre-signed GetCallerIdentity request |
This call returns a Mondoo service account in the form of a base64_credential value, which your workload can use to access Mondoo by setting MONDOO_CONFIG_BASE64 to the returned value.
Set up keyless authentication with GitHub
To configure keyless authentication to Mondoo using GitHub as your WIF provider, you use a GitHub Actions workflow in a GitHub repository. Choose an existing repository in your GitHub organization or create a new one just for this purpose.
Prerequisites
-
Sufficient privileges in your GitHub repository to create and manage GitHub Actions workflows
-
Editor or Owner privileges in the Mondoo space, organization, or platform to which your workload needs access
Step A: Create a workload identity provider in Mondoo
-
In the Mondoo App, navigate to the space or organization in which you want to set up keyless access for non-human users.
-
In the left navigation, select Settings. Then select the Workload Identity tab.
-
Select the ADD IDENTITY PROVIDER button or the plus (+) symbol near the top-right corner of the tab and select GitHub.
-
In the Issuer URL box, keep the default
https://token.actions.githubusercontent.com. -
In the Subject box, enter the organization and repository where you plan to create your GitHub Actions workflow.
-
In the Expiration time list, choose the duration of sessions authenticated with this WIF provider.
-
In the Name and Description boxes, provide a short name and longer description that help you and your teammates recognize the source and purpose of the workload identity provider.
-
Select the ADD IDENTITY PROVIDER button.
Mondoo generates and displays the configuration values that you need to give your workload access.
Step B: Create a GitHub Actions workflow
Create a GitHub Actions workflow in the repository you chose.
Set the id-token value to write.
Write the configuration values from Step A into a file, for example config.json.
Configure the workflow to run these commands:
export MONDOO_CONFIG_PATH=/path/to/config.json
cnspec status
if [ $(echo $?) != 0 ]; then echo "failed to reach mondoo"; exit 1; fi
# run the scan
cnspec scan| For... | Substitute... |
|---|---|
| AUDIENCE | The audience value Mondoo provided when you followed the instructions in Step A above |
| ISSUER | The issuer value Mondoo provided when you followed the instructions in Step A above |
Set up keyless authentication with a custom OIDC provider
Any identity provider that implements the OpenID Connect Discovery 1.0 specification can be used as a WIF provider with Mondoo.
Requirements for custom OIDC providers
Your OIDC provider must meet these requirements:
-
The issuer URL must use HTTPS and serve a valid
/.well-known/openid-configurationendpoint. -
The discovery document must include
issuer,jwks_uri,response_types_supported,subject_types_supported, andid_token_signing_alg_values_supported. -
The JWKS endpoint must serve the public keys used to sign tokens.
Prerequisites
-
Access to configure your OIDC provider and obtain tokens
-
Editor or Owner privileges in the Mondoo space, organization, or platform to which your workload needs access
Step A: Create an identity provider in Mondoo
-
In the Mondoo App, navigate to the space or organization in which you want to set up keyless access for non-human users.
-
In the left navigation, select Settings. Then select the Workload Identity tab.
-
Select the ADD IDENTITY PROVIDER button or the plus (+) symbol near the top-right corner of the tab and select Custom OIDC.
-
In the Issuer URL box, enter your OIDC provider's issuer URL (for example,
https://login.example.com). -
In the Subject box, enter the expected
subclaim value from the tokens your provider issues. -
In the Expiration time list, choose the duration of sessions authenticated with this identity provider.
-
Optionally, add claim mappings to verify additional identity claims beyond the subject. Use the
jwt_claims.*prefix to match claims in the token:jwt_claims.email = user@example.com jwt_claims.groups = engineering -
Optionally, configure allowed audiences to restrict which audience values are accepted in the token.
-
In the Name and Description boxes, provide a short name and longer description that help you and your teammates recognize the source and purpose of the identity provider.
-
Select the ADD IDENTITY PROVIDER button.
Mondoo generates and displays the configuration values that you need to give your workload access.
Step B: Exchange your token for access
-
Obtain an OIDC token from your identity provider. The token must have at least 3 minutes until expiration.
-
Make a curl call to exchange the token for a short-lived Mondoo service account:
curl --request POST \
  --url 'UNIVERSE_DOMAIN/SecureTokenService/ExchangeExternalToken' \
  --header 'content-type: application/json' \
  --data '{
  "audience": "AUDIENCE",
  "issuer_uri": "ISSUER",
  "jwt_token": "TOKEN"
}'| For... | Substitute... |
|---|---|
| UNIVERSE_DOMAIN | The universeDomain value Mondoo provided when you created the identity provider |
| AUDIENCE | The audience value Mondoo provided when you created the identity provider |
| ISSUER | Your OIDC provider's issuer URL |
| TOKEN | The OIDC token from your identity provider |
This call returns a Mondoo service account in the form of a base64_credential value, which your workload can use to access Mondoo by setting MONDOO_CONFIG_BASE64 to the returned value.
GraphQL API
You can also manage WIF identity providers programmatically using the Mondoo GraphQL API.
Create an identity provider
mutation CreateWIFAuthBinding($input: CreateWIFAuthBindingInput) {
  createWIFAuthBinding(input: $input) {
    binding {
      mrn
      name
      description
      scope
      roles
      expiration
      issuerUri
      subject
      mappings {
        key
        value
      }
      allowedAudiences
      createdAt
      lastUsed
    }
    config {
      universeDomain
      type
      audience
      subjectTokenType
      scopes
      issuerUri
    }
  }
}
Input fields:
| Field | Type | Required | Description |
|---|---|---|---|
scopeMrn | String | Yes | Space, organization, or platform MRN the binding applies to |
name | String | Yes | Human-readable name for this identity provider |
description | String | No | Optional description |
roles | [String] | No | Role MRNs to assign (defaults to Agent) |
expiration | Int | No | Credential lifetime in seconds, 1–86400 (defaults to 3600) |
issuerUri | String | Yes | Identity provider URI (see supported providers table) |
subject | String | Yes | Expected subject identifier from the provider |
mappings | [KeyValueInput] | No | Additional claims to verify |
allowedAudiences | [String] | No | Restrict accepted audience values in the token (OIDC only) |
The config object in the response provides the information the external workload needs to perform the token exchange.
List identity providers
query ListWIFAuthBindings($scopeMrn: String!, $orderBy: WIFAuthBindingOrder) {
  listWIFAuthBindings(scopeMrn: $scopeMrn, orderBy: $orderBy) {
    bindings {
      mrn
      name
      issuerUri
      subject
      roles
      expiration
      createdAt
      lastUsed
    }
  }
}
Get an identity provider
query GetWIFAuthBinding($mrn: String!) {
  getWIFAuthBinding(mrn: $mrn) {
    binding {
      mrn
      name
      description
      scope
      roles
      expiration
      issuerUri
      subject
      mappings {
        key
        value
      }
      allowedAudiences
      createdAt
      createdBy
      lastUsed
    }
    config {
      universeDomain
      type
      audience
      subjectTokenType
      scopes
      issuerUri
    }
  }
}
Remove an identity provider
mutation RemoveWIFAuthBinding($mrn: String!) {
  removeWIFAuthBinding(mrn: $mrn) {
    mrn
  }
}
Removing an identity provider also deletes its associated service account.
Token exchange endpoint
External workloads exchange tokens using an unauthenticated API call:
Endpoint: POST /SecureTokenService/ExchangeExternalToken
Request:
{
  "issuer_uri": "https://token.actions.githubusercontent.com",
  "audience": "//captain.api.mondoo.app/spaces/your-space-id",
  "jwt_token": "<token from identity provider>"
}
Response:
{
  "base64_credential": "<base64-encoded Mondoo service account credential>"
}
The base64_credential decodes to a JSON object containing mrn, space_mrn, private_key, certificate, and api_endpoint: the same format as a standard Mondoo service account credential file.