Ansible and Mondoo
How to use Ansible with Mondoo to scan your Windows and Linux hosts for security misconfigurations and vulnerabilities.
If you already use Ansible to manage your infrastructure, you can use it to deploy and manage Mondoo security scanning across your hosts. This lets you leverage your existing automation workflows while adding continuous security monitoring. There are two primary ways to use Mondoo and Ansible together:
-
Continuously assess host configuration: Use Ansible to:
-
Install and configure cnspec on supported Linux and Windows hosts
-
Register hosts with Mondoo Platform
-
Configure hosts to continuously scan with Mondoo policies and report results to Mondoo Platform
-
-
Scan Ansible inventories on demand: Perform on-demand scans of Ansible inventories without installing cnspec as a service on the host.
Hosts from your Ansible inventory authenticate with your Mondoo Platform account so that cnspec can retrieve policies you've enabled. cnspec sends scan results from the host to Mondoo Platform, where you can see asset scores and reports.
If you install cnspec on machines that can't download and install updates (because they're air-gapped or don't give cnspec write access), you must deploy cnspec providers. To learn more, read Manage cnspec Providers.
Requirements
-
In your Mondoo Platform account, enable all the policies you want to run against your Ansible inventory. To learn how to enable policies, read Manage Policies.
-
You must have root or administrator access on each host in the Ansible inventory you want to scan.
-
You must have Ansible installed on your workstation. For installation instructions, read the Ansible documentation.
-
All hosts in your inventory must allow outbound traffic on port 443 (HTTPS) to Mondoo Platform at
https://us.api.mondoo.com:443(IP address34.160.242.34) and to the ingest endpointhttps://ingest.us.mondoo.com:443to send results to your account.
Run continuous configuration assessments with Mondoo and Ansible
Use Ansible to install and configure cnspec on supported Linux and Windows hosts so that Mondoo runs continuously as a service.
Mondoo maintains and publishes an official Mondoo/cnspec role, which is available on Ansible Galaxy. The code for the role is open source and available in our GitHub repo.
Mondoo's Ansible role lets you:
-
Install cnspec on supported Linux and Windows hosts
-
Register hosts on Mondoo Platform
-
Configure cnspec to run as a service at system startup
-
Run continuous security assessments of the host
Once configured, cnspec authenticates with Mondoo Platform every 60 minutes, running every enabled policy. It sends results from the scan to Mondoo Platform so you can see the generated scores and reports in the Mondoo App.
Set up continuous configuration assessments with Mondoo and Ansible
This section covers how to set up continuous configuration assessments on Linux and Windows hosts with Ansible. After completing these steps, your Ansible-managed hosts will run cnspec as a service, registered with your Mondoo Platform account, continuously scanning with Mondoo policies and reporting findings to Mondoo Platform.
Step 1: Generate a registration token
The Mondoo Ansible role provides a registration_token variable to specify a Mondoo registration token to use to register the client with Mondoo Platform.
-
In the Mondoo App, navigate to the space where you want to add the integration. In the side navigation bar, select Integrations. In the top right, select INSTALL.
-
Under Server & Endpoint Security, select Linux or Windows (or search by name).
-
In the install command, copy the value of
MONDOO_REGISTRATION_TOKEN.
The registration token on the integration page expires after 10 minutes. For a token that lasts longer, select Settings > Registration Tokens in the side navigation, then select GENERATE TOKEN and choose an expiration. To learn more, read Create and Manage Registration Tokens.
Step 2: Install the Mondoo role and create a playbook
Install the Mondoo Ansible role from Ansible Galaxy on your local workstation and create an Ansible playbook to call that role on your inventory:
-
Download the Ansible Mondoo role to your workstation:
Download Mondoo role on your workstation ansible-galaxy install mondoo.client -
Create a
playbook.yamlfile to run the Ansible Mondoo role on your inventory of hosts. You must update theregistration_tokenvalue with your registration token from Step 1: Generate a registration token above. This example has both Linux and Windows hosts. If you're only using one of these platforms, remove the unneeded section:Example playbook.yml --- - hosts: mondoo_linux_clients become: yes roles: - role: mondoo.client vars: registration_token: "PASTE MONDOO REGISTRATION TOKEN" - hosts: mondoo_windows_clients roles: - role: mondoo.client vars: registration_token: "PASTE MONDOO REGISTRATION TOKEN" force_registration: false -
Save the
playbook.yamlfile.
Step 3: Run Ansible
You should already have a hosts.ini file with your Ansible inventory. This is an example hosts.ini with both Linux and Windows hosts:
# Linux Hosts
[mondoo_linux_clients]
3.92.154.110 ansible_user=admin
3.95.154.111 ansible_user=ec2-user
3.82.22.136 ansible_user=ec2-user
54.211.122.215 ansible_user=ec2-user
54.209.155.66 ansible_user=ubuntu
54.146.154.182 ansible_user=ubuntu

# Windows Hosts
[mondoo_windows_clients]
# Windows Hosts WinRM
3.85.201.162 ansible_port=5986 ansible_connection=winrm ansible_user=Administrator ansible_password=changeme ansible_shell_type=powershell ansible_winrm_server_cert_validation=ignore
54.66.89.204 ansible_port=5986 ansible_connection=winrm ansible_user=Administrator ansible_password=changeme ansible_shell_type=powershell ansible_winrm_server_cert_validation=ignore
# Windows Hosts SSH
3.235.247.76 ansible_port=22 ansible_connection=ssh ansible_user=Administrator ansible_password=changeme ansible_shell_type=cmd
Run Ansible against your inventory:
ansible-playbook -i hosts.ini playbook.ymlStep 4: View scan reports in the Mondoo App
Once Ansible runs the playbook.yaml against your inventory, you can view the scan results in Mondoo Platform.
-
In the Mondoo App side navigation bar, under Inventory, select Assets. All your assets should now be reported and have asset scores for the policies executed.
-
To view detailed results and the policies that ran on an asset, select the asset in the list. If you don't see the asset you want, use the search bar to filter assets.
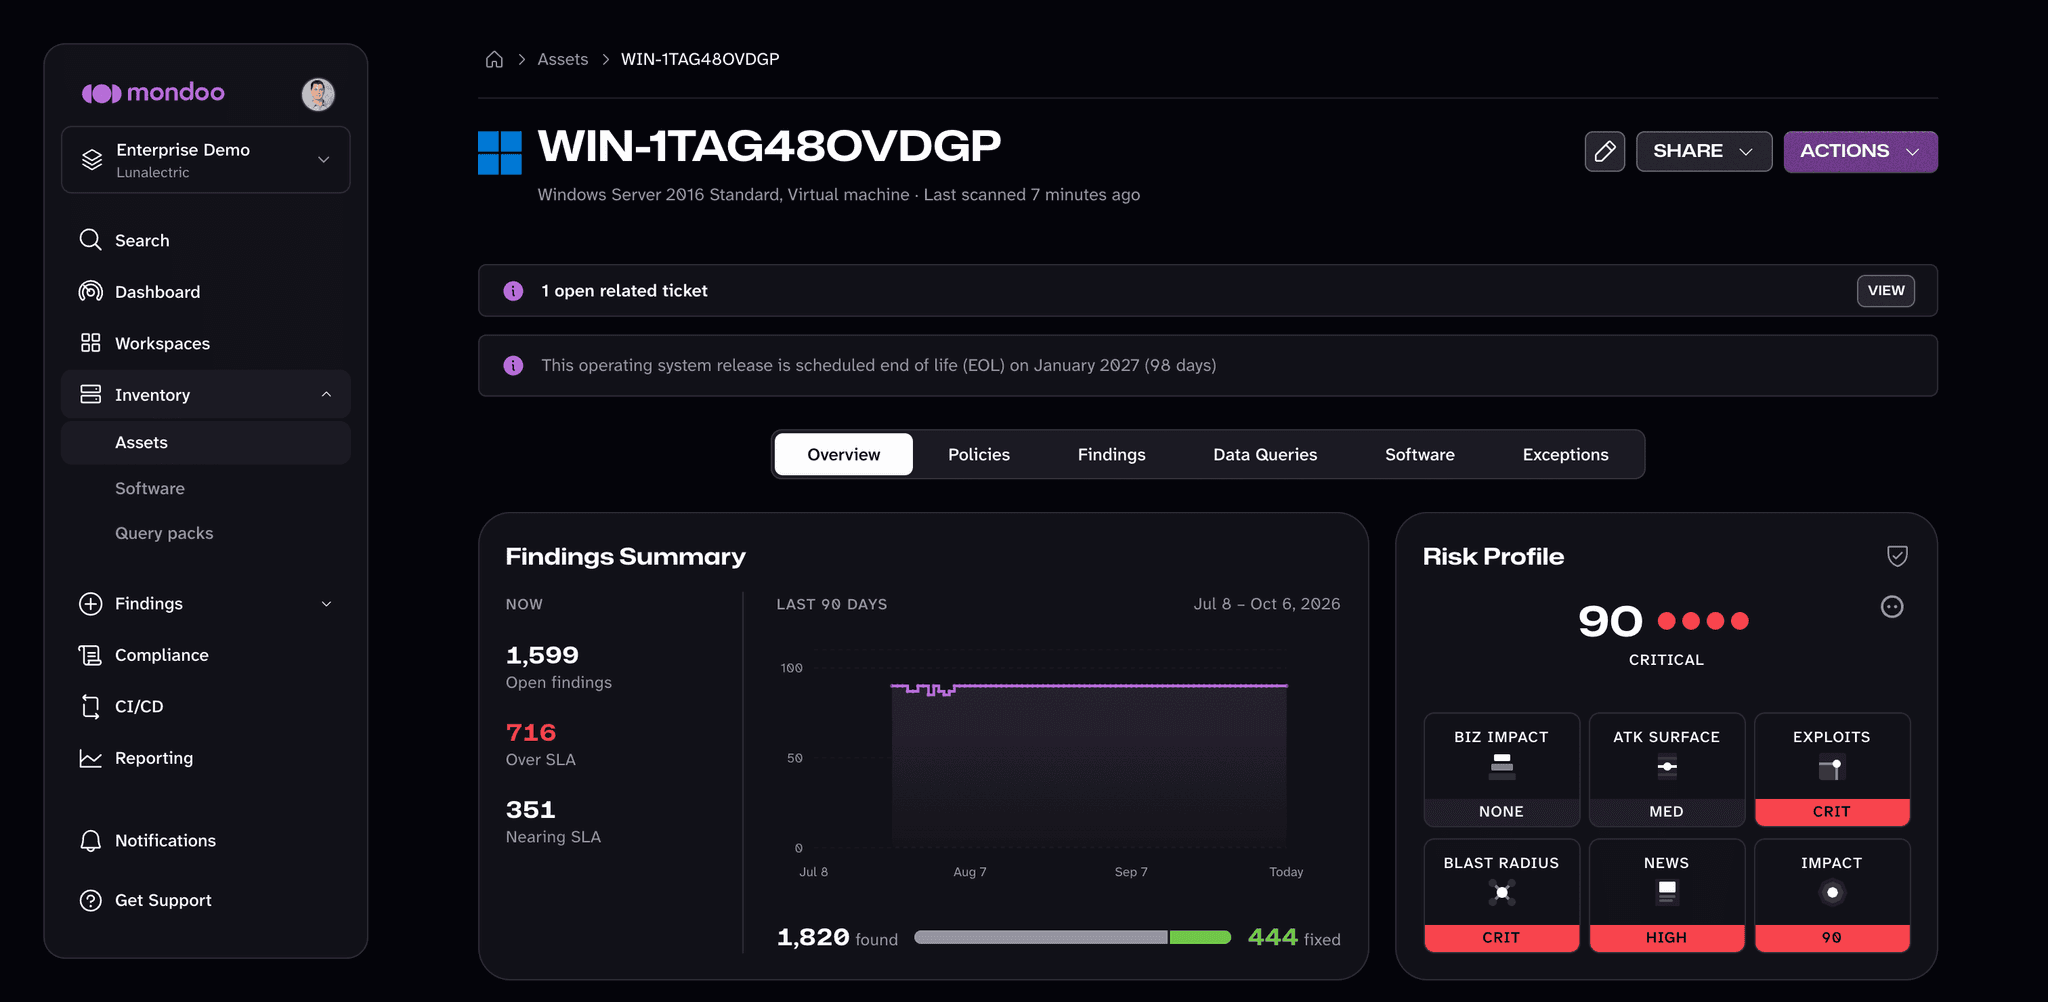
The Policies, Findings, Data Queries, and Software tabs let you dive into greater detail.
To learn more about how Mondoo generates asset scores, read Manage Policies.
cnspec is now running as a service on your Ansible inventory. It continues to scan your assets every 60 minutes and report findings back to your account.
Scan Ansible inventories on demand
While you can easily configure Mondoo's cnspec to run as a service to continuously scan your infrastructure, there may be times when you just want to scan an Ansible inventory without having to install and configure cnspec on your infrastructure.
Mondoo supports on-demand scanning of an Ansible inventory in two ways:
-
Parse the output of the
ansible-inventorycommand and scan with Mondoo. -
Create an Ansible task that uses cnspec to scan your infrastructure.
With both of these approaches, your assets:
-
Authenticate with your Mondoo Platform account using the cnspec configuration on your local workstation
-
Run any policies enabled in that space
-
Return the results to Mondoo Platform so you can view reports and asset scores for all assets in the Mondoo App.
By default, cnspec scans the hosts in an Ansible inventory one at a time, so on-demand scans of
large inventories take a while. To scan several hosts at once, add --parallelism with the number
of hosts to scan in parallel, for example --parallelism 4.
Scan the output of the ansible-inventory command
Step 1: Set up or validate your Ansible inventory
An Ansible inventory is a list of hosts typically stored in one of two common formats: ini and yaml. These examples illustrate their structure. The ini format allows grouping and easy configuration of additional properties.
[workers]
34.243.41.251 ansible_user=ec2-user
instance1 ansible_host=18.203.250.158 ansible_user=ubuntu
The same structure in yaml:
all:
  children:
    ungrouped: {}
    workers:
      hosts:
        34.243.41.251:
          ansible_user: ec2-user
        instance1:
          ansible_host: 18.203.250.158
          ansible_user: ubuntu
You can validate connectivity with the Ansible inventory by running this command:
ansible all -i hosts.ini -m pingExample output
instance1 | SUCCESS => {
    "ansible_facts": {
        "discovered_interpreter_python": "/usr/bin/python"
    },
    "changed": false,
    "ping": "pong"
}
34.243.41.251 | SUCCESS => {
    "ansible_facts": {
        "discovered_interpreter_python": "/usr/bin/python"
    },
    "changed": false,
    "ping": "pong"
}
Step 2: Scan the Ansible inventory
The method for scanning an Ansible inventory depends on whether your shell supports |.
Option A: Pipe the Ansible inventory to cnspec scan
If you use a shell that supports | (such as bash or zsh), pipe the output of the ansible-inventory -i hosts.ini --list command to cnspec scan --inventory-format-ansible:
ansible-inventory -i hosts.ini --list | cnspec scan --inventory-file - --inventory-format-ansibleOption B: Scan Ansible inventory hosts.json
If your shell does not support pipes, you can generate a hosts.json from the ansible-inventory command and then pass that file to cnspec scan using the --inventory-file flag.
ansible-inventory -i hosts.ini --list > hosts.json

cnspec scan --inventory-file hosts.json --inventory-format-ansible
Both cnspec and the Mondoo App show results from each policy that runs against your assets.
Show or hide example CLI scan output.
Asset: (Ubuntu 22.04.5 LTS) mysystem.internal.dmz
-------------------------------------------------

Passing:
✓ Ensure all GIDs in /etc/passwd exist in /etc/group
✓ Ensure default group for the root account is GID 0
✓ Ensure no duplicate UIDs exist
✓ Ensure no duplicate user names exist
✓ Ensure prelink is disabled
✓ Ensure root group is empty
✓ Ensure secure permissions on /etc/passwd are set
✓ Ensure secure permissions on /etc/shadow are set
✓ Ensure system accounts are non-login
✓ Ensure telnet server is stopped and not enabled
✓ Ensure X Window System is not installed

Failing:
✕ HIGH (80):      Ensure address space layout randomization (ASLR) is enabled
✕ HIGH (80):      Ensure core dumps are restricted
✕ MEDIUM (60):    Ensure Advanced Intrusion Detection Environment (AIDE) is installed
✕ MEDIUM (60):    Ensure IP forwarding is disabled
✕ MEDIUM (40):    Ensure auditd is installed
✕ MEDIUM (40):    Ensure login and logout events are collected
! Error:          Ensure sudo logging is enabled
. Skipped:        Ensure secure permissions on /etc/passwd- are set
. Skipped:        Ensure secure permissions on /etc/shadow- are set

Risks / Preventive Controls:
✓ no downgrading risks detected

Scanned 1 asset

Ubuntu 22.04.5 LTS
  HIGH (80):    mysystem.internal.dmz

See more scan results and asset relationships on the Mondoo App: https://app.mondoo.com/space/inventory/12ejfpX1SbxfrNf6bq8f8gCCgMb?spaceId=ansible-hosts
Step 3: View scan reports in the Mondoo App
Once Ansible completes, cnspec sends scan results to Mondoo Platform so you can see the generated scores and reports in the Mondoo App.
To view the reports in the Mondoo App:
-
In the Mondoo App side navigation bar, under Inventory, select Assets. All your assets should now be reported and have asset scores for the policies executed.
-
To view detailed results and the policies that ran on an asset, select the asset in the list. If you don't see the asset you want, use the search bar to filter assets.
The Policies, Findings, Data Queries, and Software tabs let you dive into greater detail.
Mondoo relies on the ansible-inventory command to support various inventory formats and to reuse dynamic inventory. This command outputs a standardized format regardless of whether an ini or yaml inventory is used.
Currently Mondoo does not support group patterns. If you need additional support, please contact us.
Scan on demand using an Ansible task
You can use the cnspec scan command in an Ansible task. Mondoo uses the ssh-agent, so you don't need to set up additional credential configuration.
Step 1: Set up or validate your Ansible inventory
An Ansible inventory is a list of hosts typically stored in one of two common formats: ini and yaml. These examples illustrate their structure. The ini format allows grouping and easy configuration of additional properties.
[workers]
34.243.41.251 ansible_user=ec2-user
instance1 ansible_host=18.203.250.158 ansible_user=ubuntu
The same structure in yaml:
all:
  children:
    ungrouped: {}
    workers:
      hosts:
        34.243.41.251:
          ansible_user: ec2-user
        instance1:
          ansible_host: 18.203.250.158
          ansible_user: ubuntu
You can validate connectivity with the Ansible inventory by running this command:
ansible all -i hosts.ini -m pingExample output
instance1 | SUCCESS => {
    "ansible_facts": {
        "discovered_interpreter_python": "/usr/bin/python"
    },
    "changed": false,
    "ping": "pong"
}
34.243.41.251 | SUCCESS => {
    "ansible_facts": {
        "discovered_interpreter_python": "/usr/bin/python"
    },
    "changed": false,
    "ping": "pong"
}
Step 2: Set up playbook.yaml to run cnspec scan
Create a playbook to run a cnspec scan against your inventory. This example playbook.yaml executes the scan locally against Linux hosts:
---
- hosts: all
  gather_facts: no
  tasks:
    - name: add key to ssh-agent
      local_action: ansible.builtin.command ssh-agent
      run_once: true
    - name: add key to ssh-agent
      # activate rsa key if that is used
      # local_action: command ssh-agent ssh-add ~/.ssh/id_rsa
      local_action: ansible.builtin.command ssh-add ~/.ssh/id_ed25519
      run_once: true
    - name: run cnspec scan for target destination
      local_action: ansible.builtin.command cnspec scan ssh {{ ansible_user }}@{{ inventory_hostname }} --insecure --risk-threshold 90
Be sure to save the file.
Step 3: Run Ansible
Run the playbook with this command:
ansible-playbook -i hosts.ini playbook.ymlStep 4: View scan reports in the Mondoo App
Once Ansible completes, scan results are sent to Mondoo Platform so you can view asset scores and reports for all assets scanned in the Mondoo App.
To view the reports in the Mondoo App:
-
In the Mondoo App side navigation bar, under Inventory, select Assets. All your assets should now be reported and have asset scores for the policies executed.
-
To view detailed results and the policies that ran on an asset, select the asset in the list. If you don't see the asset you want, use the search bar to filter assets.
The Policies, Findings, Data Queries, and Software tabs let you dive into greater detail.
To learn more about how Mondoo scores assets, read Score Policies.
Next steps
With cnspec deployed and reporting to Mondoo, assess and improve your security to see your findings in priority order.