Scan EC2 Instances Using AWS Systems Manager
Configure AWS Systems Manager (SSM) to scan EC2 instances for security misconfigurations without installing agents.
Use AWS Systems Manager (SSM) to scan EC2 instances without installing agents. When Mondoo runs an SSM scan, it installs cnspec on the instance for the duration of the scan and removes it afterward.
This page walks through configuring SSM so the Mondoo AWS integration can scan your EC2 instances. To run a one-off scan of an SSM-managed instance from your workstation, see Scan an SSM-managed instance from your workstation. For instances that SSM doesn't manage, see Scan Instances Using Instance Connect or Scan Instances Using EBS Snapshots. For other AWS scan targets, see the AWS overview.
How Mondoo scans with SSM
When Mondoo performs an SSM scan, these steps occur:
- SSM Run Command calls the
AWS-RunShellScriptSSM document. - The latest version of cnspec is installed and configured to authenticate with your Mondoo Platform account.
- The EC2 instance runs
cnspec scanto execute policy checks. - cnspec publishes the scan results to Mondoo Platform.
- cnspec is uninstalled from the EC2 instance.
Configure AWS SSM
This section walks through a fresh SSM setup. If SSM is new to you, the AWS documentation covers it in greater depth.
Create an IAM role and instance profile for SSM
Before you can manage EC2 instances using SSM, complete these steps in the AWS console or the AWS CLI:
- Set up an IAM role with a trust policy for EC2.
- Attach the AWS managed
AmazonSSMManagedInstanceCorepolicy to the IAM role. - Create an instance profile (only needed if you're using the AWS CLI).
- Attach the IAM role to the instance profile (only needed if you're using the AWS CLI).
Choose a workflow:
Requirements
- AWS console access to any account you plan to integrate with Mondoo
- Administrator privileges in those accounts
Create an IAM role with the AmazonSSMManagedInstanceCore policy
- Log in to the AWS console.
- Navigate to IAM.
- Select Roles.
- Select Create Role.
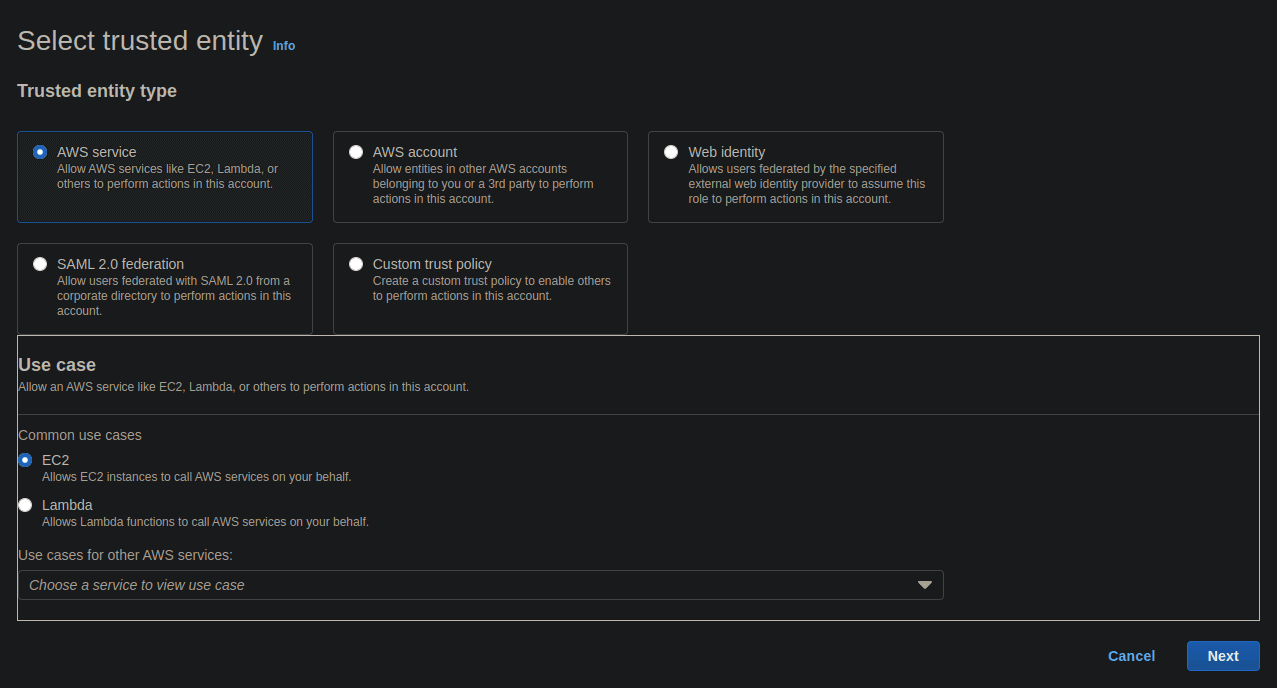
- For Trust entity type, select AWS service. For Use case, select EC2. Select Next.
- In the Filter policies box, search for SSM, select AmazonSSMManagedInstanceCore, and select Next.
- Under Role details, give the role a name (such as
EC2_SSM_ROLE) and an optional description. Select Create role.
The role is now ready. You can attach it to existing EC2 instances or assign it as the instance profile when launching new instances.
Launch an EC2 instance with the new instance profile
- Log in to the AWS console.
- Navigate to EC2.
- Select Launch Instance.
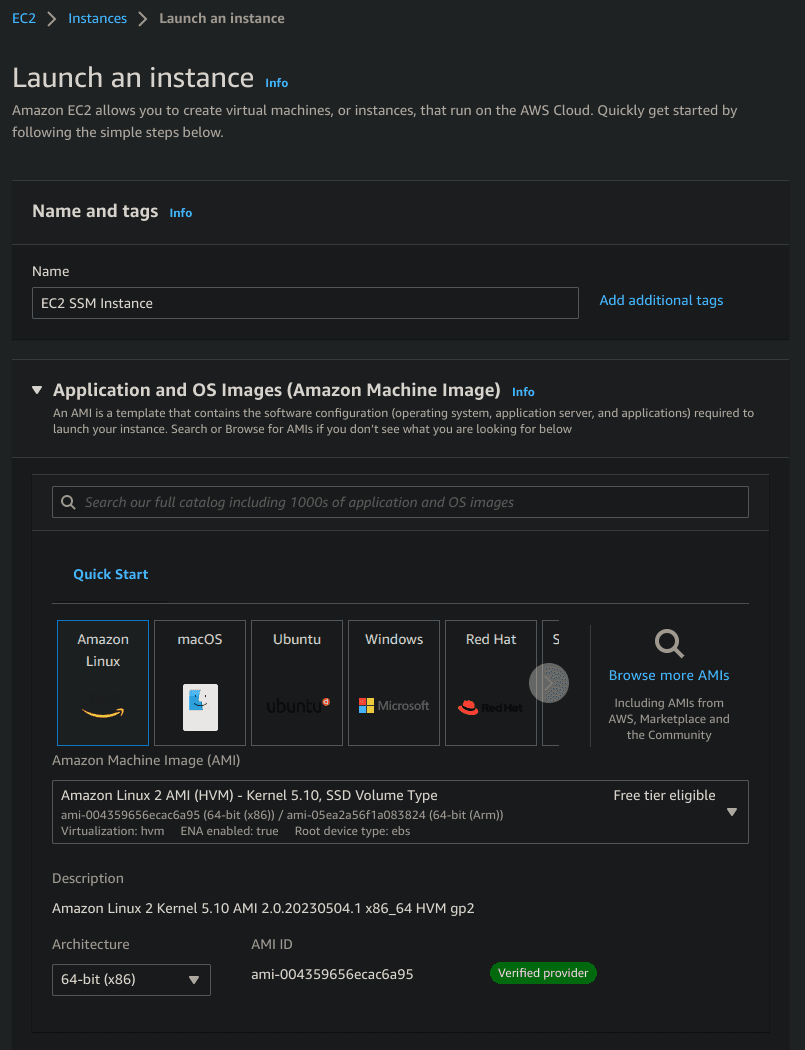
- Under Name and tags, enter a name (for example, EC2 SSM Instance).
- Under Application and OS Images (Amazon Machine Image), select an image with the SSM Agent preinstalled (for example, the latest Amazon Linux AMI).
- Under Instance type, select
t3.micro(or another type that fits your workload).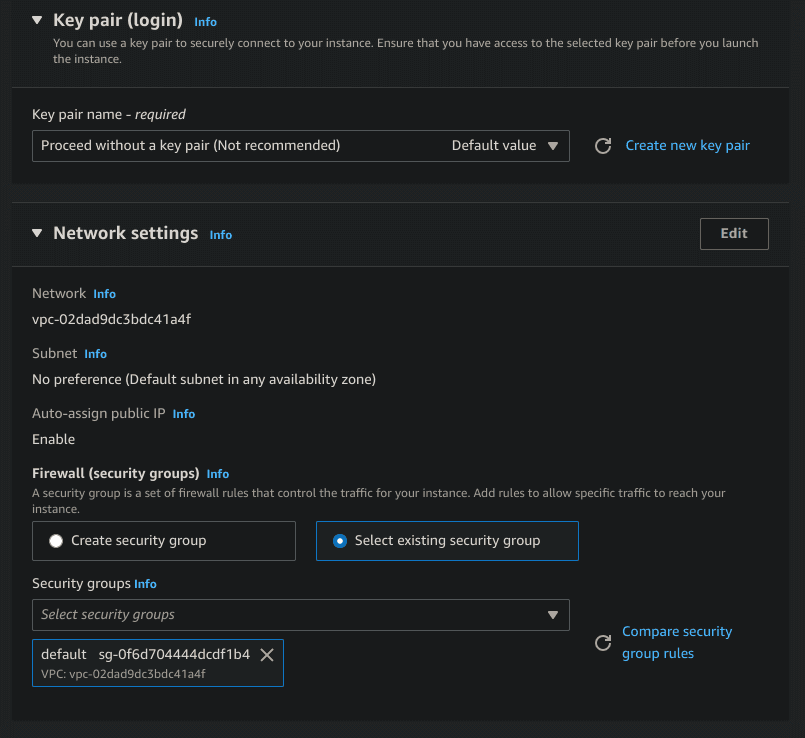
- Under Key pair (login), you can either add an SSH key or select Proceed without a key pair. SSH access is not required for SSM scanning.
- Under Network settings, in Firewall (security groups), choose an appropriate security group. SSM does not require open inbound ports.
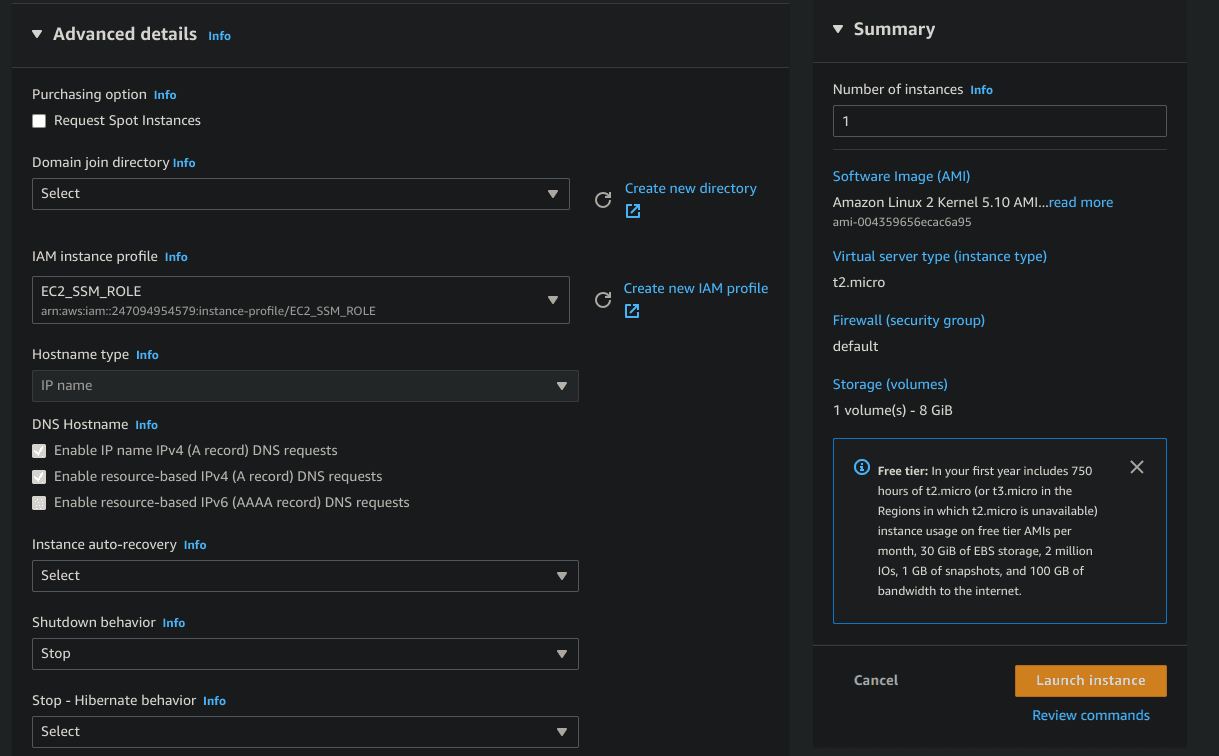
- Expand Advanced details. Under IAM instance profile, select the role you created above.
- Review the configuration, then select Launch.
- Copy the instance ID for the next step.
Confirm the instance is managed by SSM
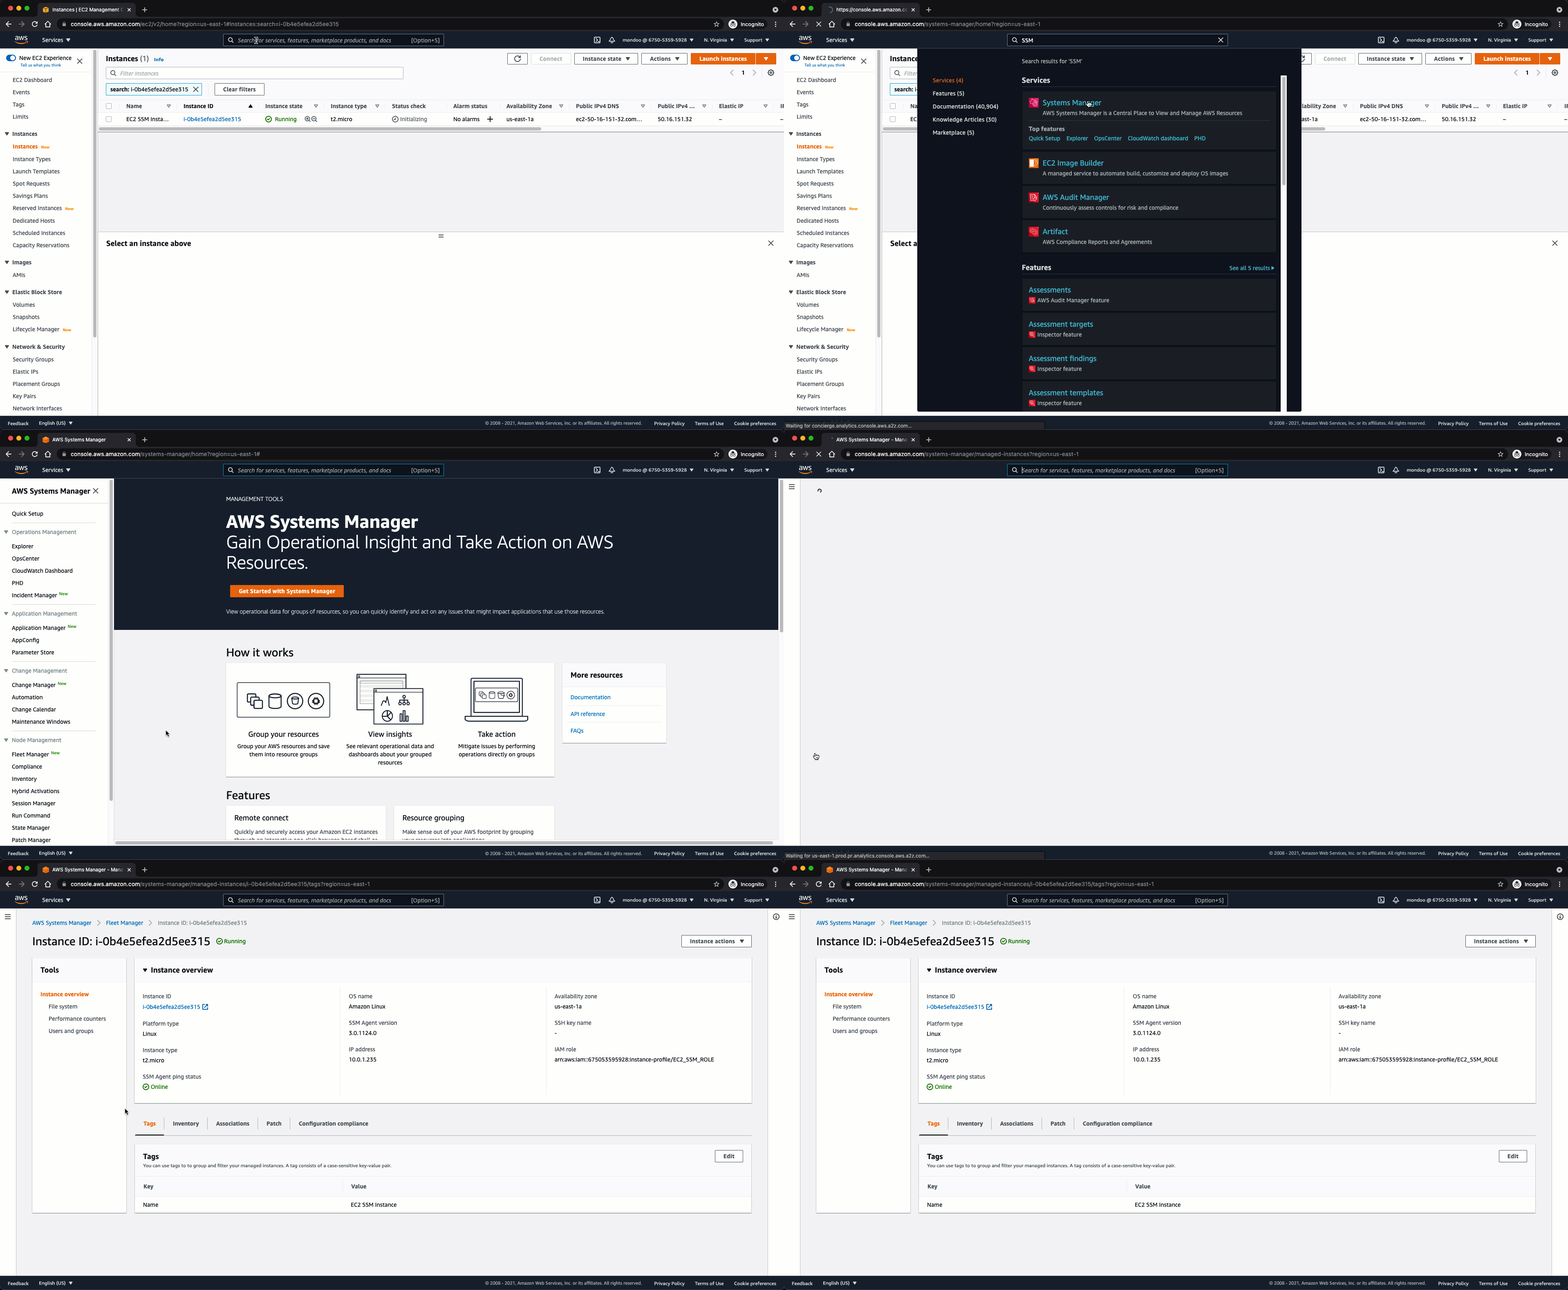
- Log in to the AWS console.
- Navigate to Systems Manager.
- Select Fleet Manager.
- Locate the instance ID you copied in the previous step and select it.
If the instance appears in Fleet Manager, it is under SSM management and Mondoo can use it to perform continuous scans.
Scan an SSM-managed instance from your workstation
You can also run a one-off scan of an SSM-managed instance with cnspec. cnspec opens an SSM port-forwarding session to the instance, pushes a short-lived SSH key through EC2 Instance Connect, and scans over that tunnel. The instance needs no public IP address and no open inbound ports.
Before you begin:
- Install the Session Manager plugin for the AWS CLI on your workstation.
- Make sure the instance runs an AMI that supports EC2 Instance Connect.
- Make sure your AWS credentials allow
ssm:StartSessionon the instance,ec2-instance-connect:SendSSHPublicKey, andec2:DescribeInstances.
Run cnspec, substituting the AMI's default user and the instance ID:
cnspec scan aws ec2 ssm USER@INSTANCE_IDFor example, to scan an Amazon Linux instance in us-east-1:
cnspec scan aws ec2 ssm ec2-user@i-0123456789abcdef0 --region us-east-1Use --profile to select a named AWS CLI profile and --sudo to run checks that need elevated privileges.
To learn how to read the scan report, including scores and remediation guidance, see Understand cnspec Results.
Learn more
- Scan Instances Using EBS Snapshots: assess instances by mounting volume snapshots
- Continuously Scan AWS: set up the Mondoo AWS integration
- The cnspec documentation: learn more about cnspec