Manage Ticketing
View, close, and configure tickets across Mondoo and your external ticketing system.
Managing tickets includes:
- Viewing open and closed tickets
- Examining ticket details and progress
- Closing tickets
- Changing settings that control how tickets work in a space
View tickets
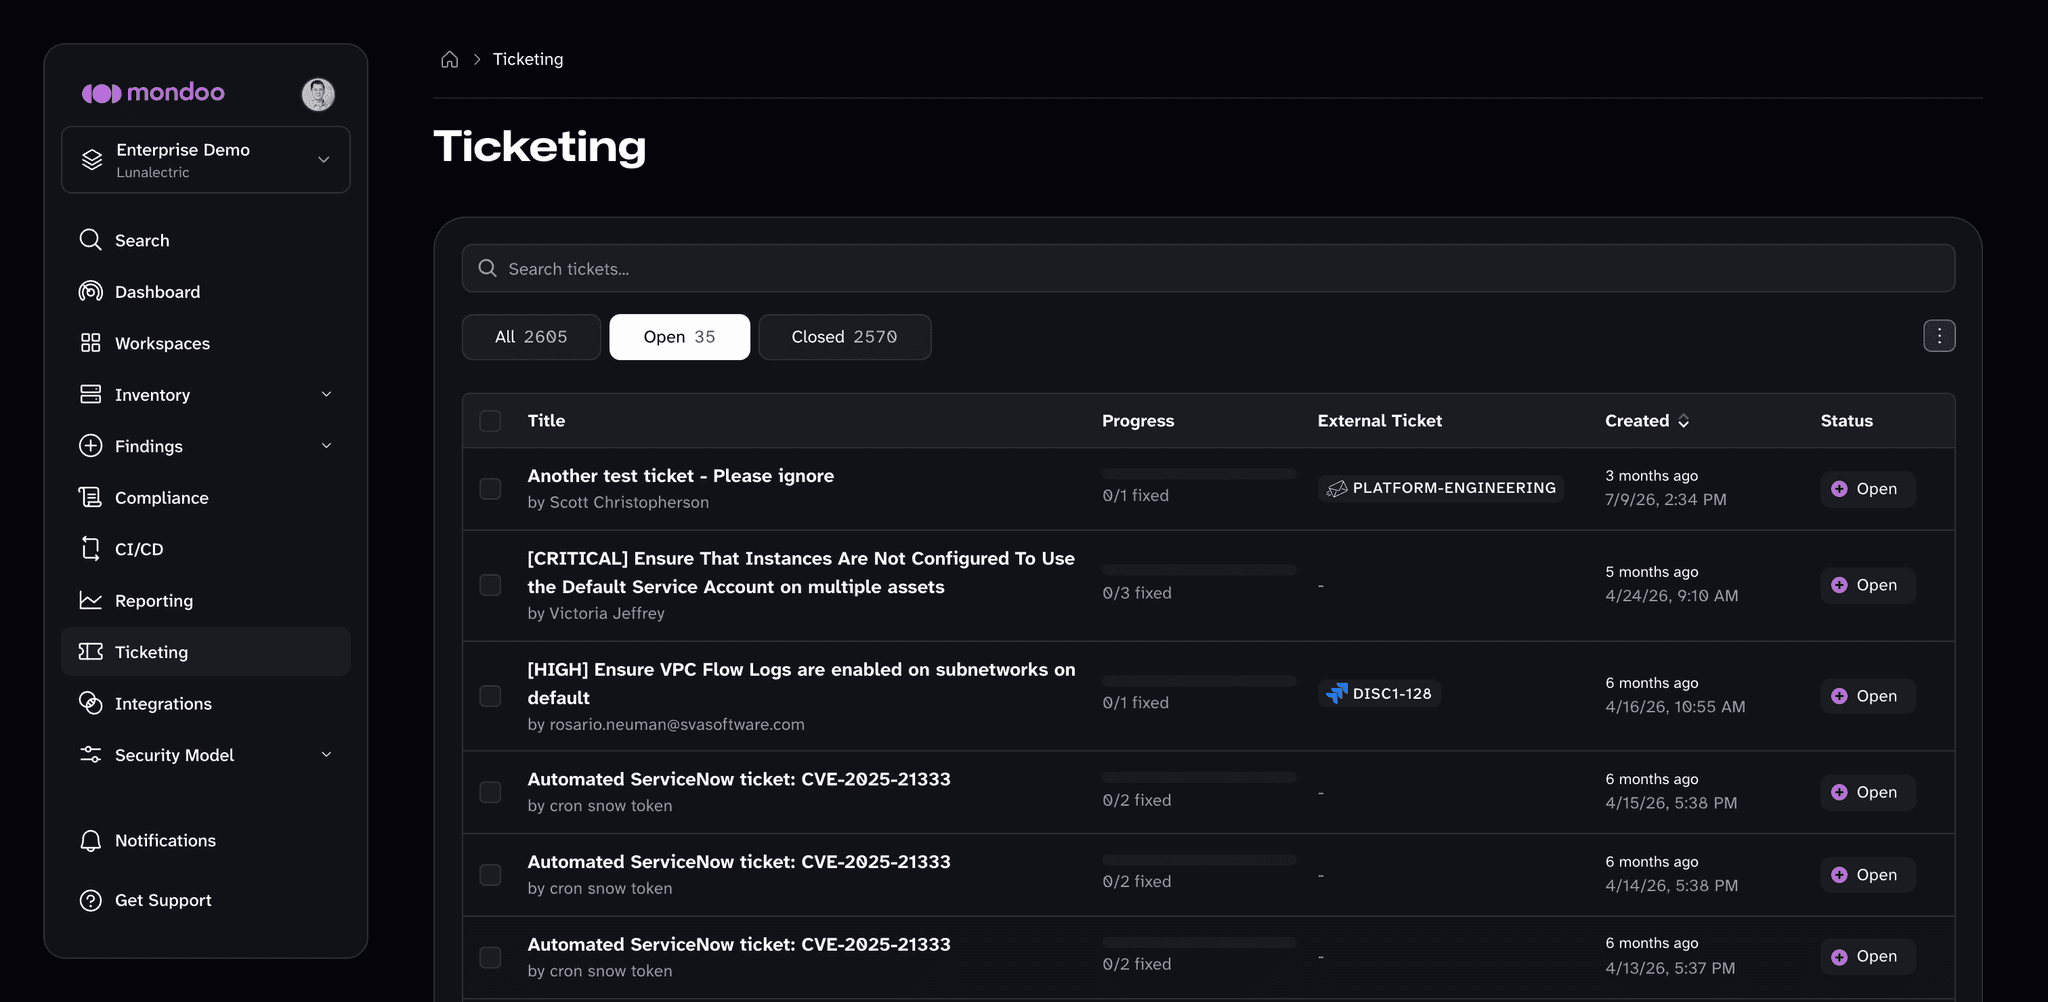
On the Ticketing page in the Mondoo App, you can view all the open and closed tickets in a space and see the progress made toward fixing the assets they track. To view tickets in a space:
-
In the Mondoo App, navigate to the space.
-
In the side navigation bar, select Ticketing.
Mondoo lists the tickets in the space, starting with the Open tab. Use the All, Open, and Closed tabs to filter by status, or the search box to find a specific ticket by title. The Open tab also includes tickets that Mondoo is still creating in your external system and tickets whose external creation failed.
For each ticket, the list shows:
- Title: The ticket title and the name of the person or service account that created it
- Progress: A bar and count of how many affected assets are fixed
- External Ticket: The issue or ticket that Mondoo created in your external system, linked when the system provides a URL
- Created: When the ticket was created
- Status: Open, Pending (Mondoo is still creating the external ticket), Error (external ticket creation failed), or Closed
To choose which columns to show, change the sort order, or copy or export the list, select the table options menu (⋮) at the top right of the table.
-
Select a ticket to see its details.
The ticket detail page shows the ticket's status, who created it and when, and three summary cards: Progress (how many affected assets are fixed), Assets (how many assets the ticket tracks), and External Tickets (links to the corresponding issues or tickets in your external systems). Below the summary, Contained Findings lists the findings the ticket tracks and Assets lists the assets, with All, Affected, and Mitigated tabs.
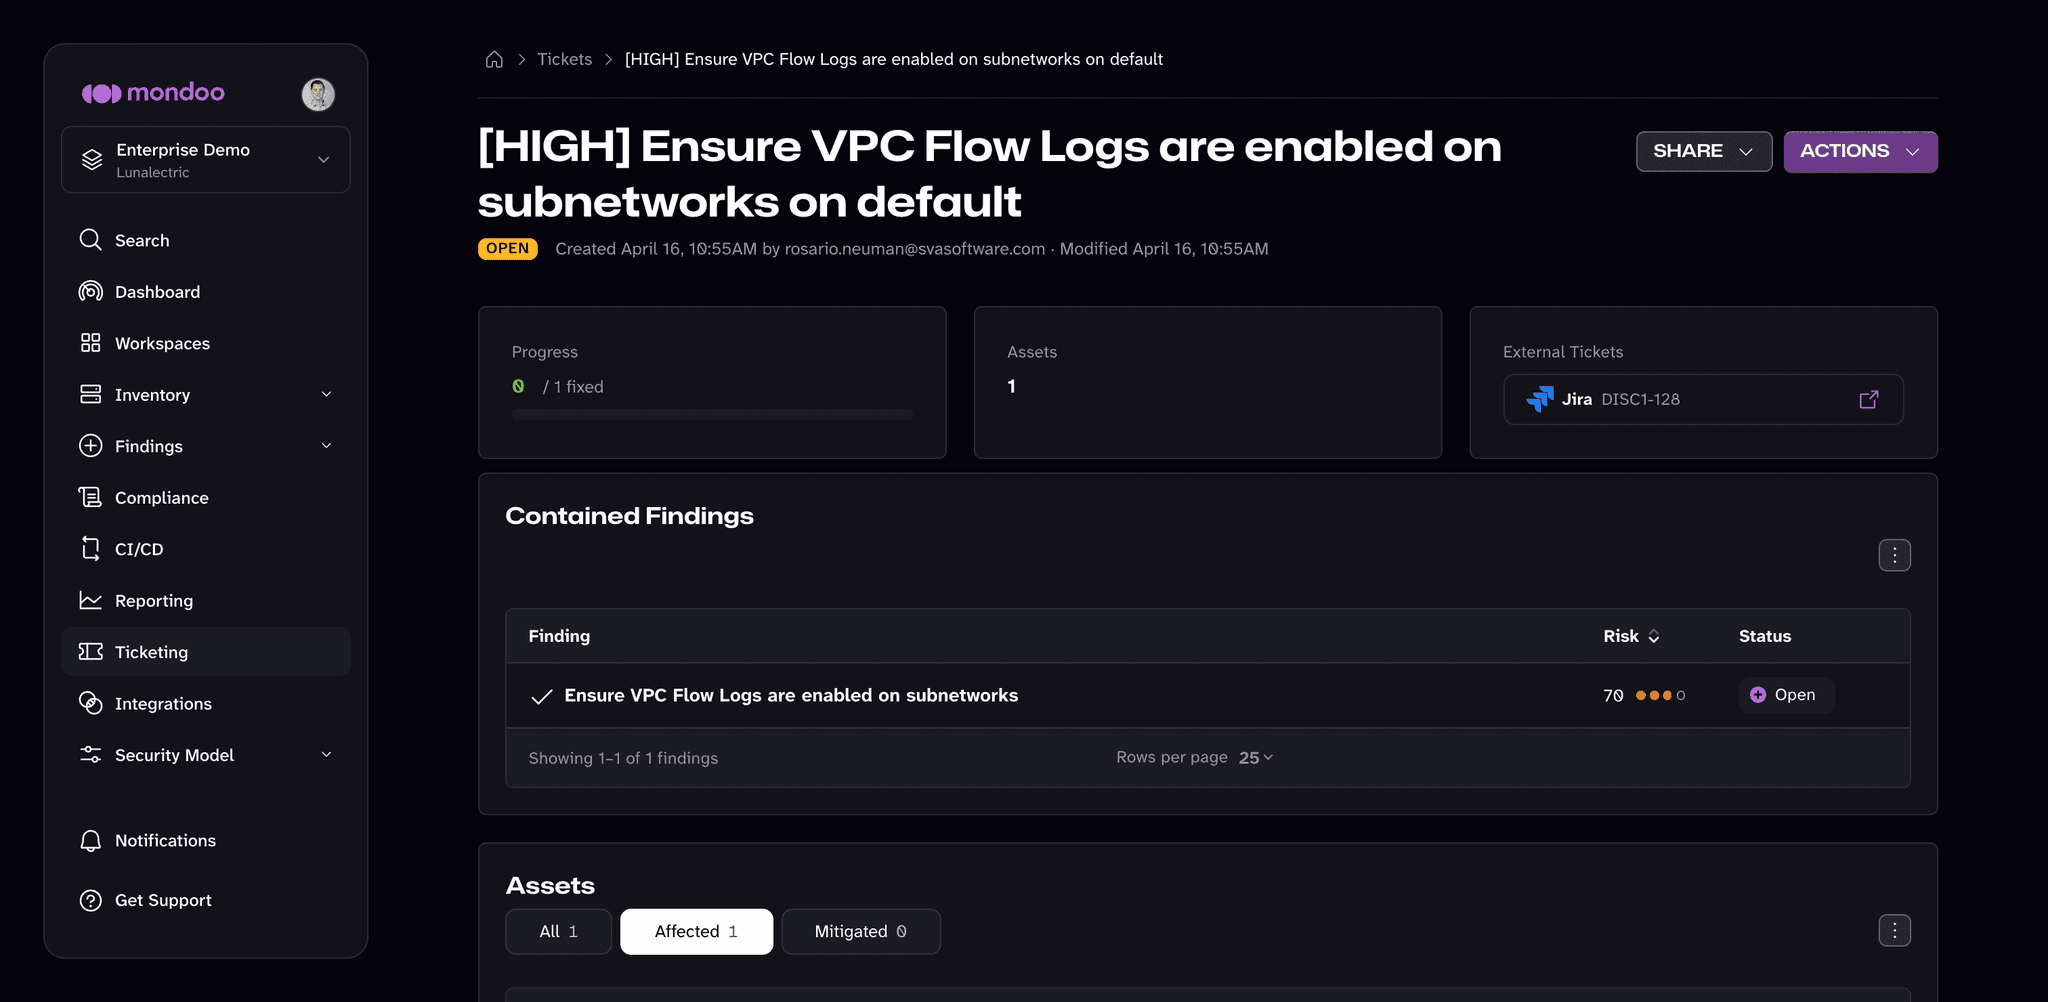
Changes you make to a Mondoo-based ticket in your external tracking system do not affect the ticket in Mondoo. Updates travel in the other direction only: when a ticket changes in Mondoo, Mondoo updates the corresponding ticket in your external tracking system.
Close a ticket
Close a ticket to indicate that the work is completed or to stop tracking it. You can close a ticket from the list of tickets or from the ticket detail page.
Only team members with Editor or Owner access can perform this task.
-
In the Mondoo App, navigate to the space.
-
In the side navigation bar, select Ticketing.
-
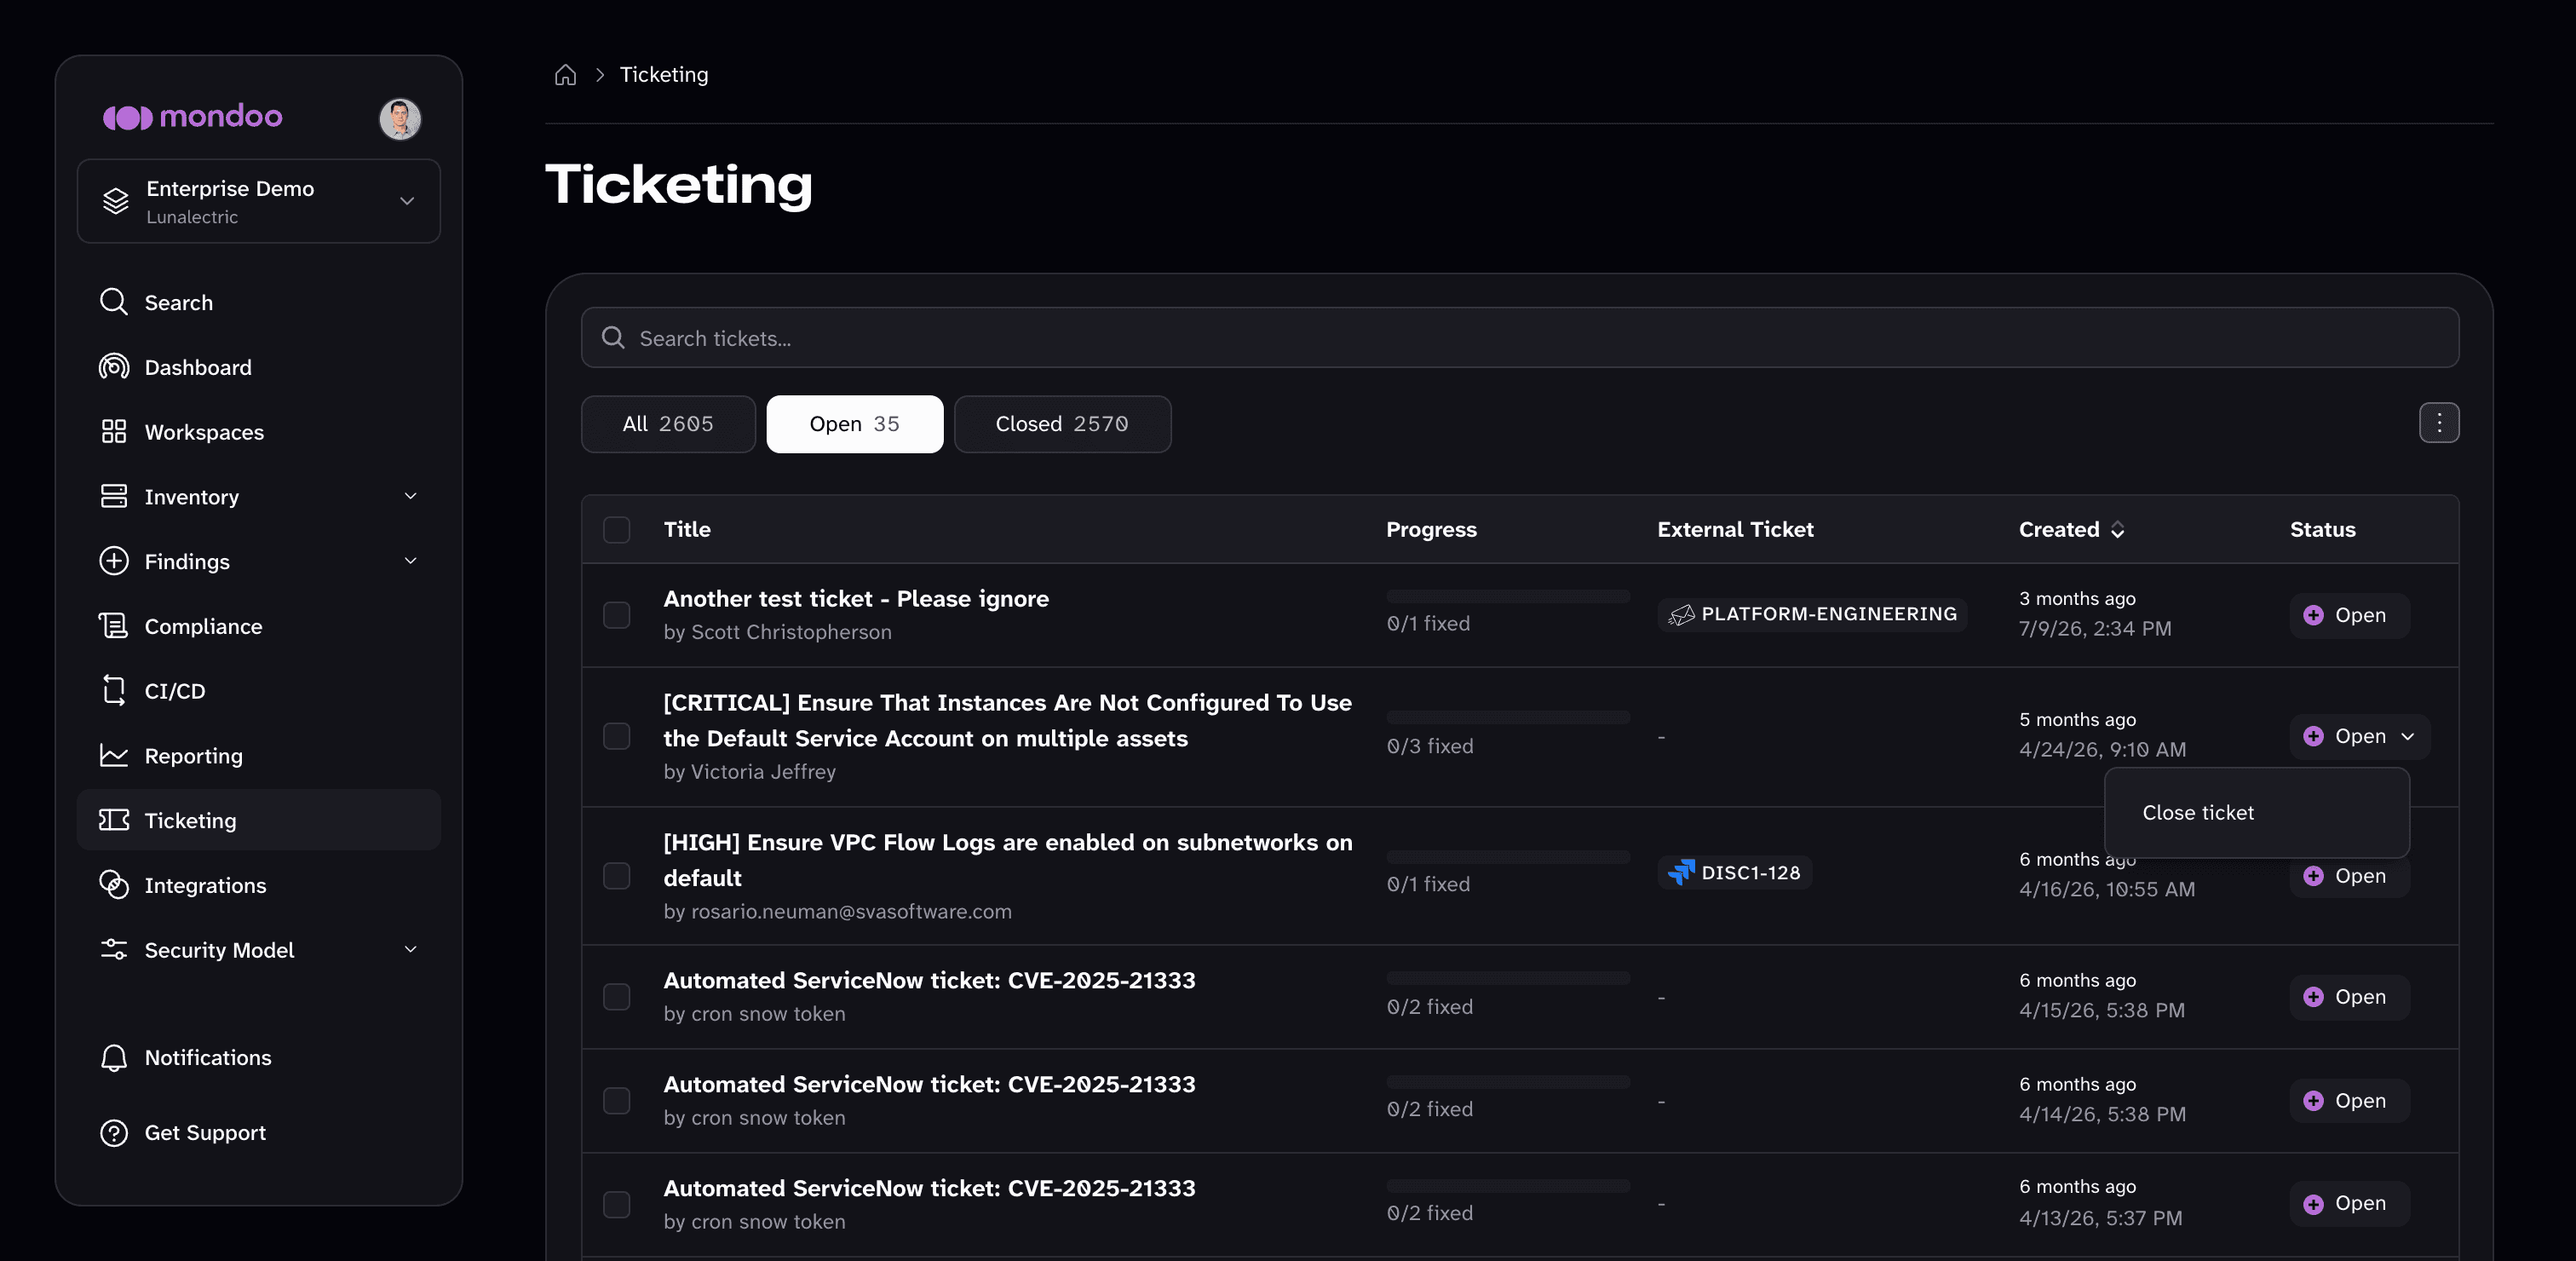
To close a ticket, do one of the following:
-
In the ticket's row, select its status menu (Open), then select Close ticket.
-
Select the ticket to open its detail page, then select ACTIONS near the top-right corner and choose Close ticket.
-
To close several tickets at once, select the checkbox beside each ticket you want to close, then select Close tickets in the selection bar at the bottom of the page and confirm. Your selection stays in place when you move between pages of the list, so you can close tickets from more than one page together.
-
Closing a ticket or issue in your external tracking system does not close the corresponding ticket in Mondoo. If you create tickets using a direct integration with your ticket system, a setting on the integration controls whether closing a ticket in Mondoo automatically closes the corresponding issue or ticket in your external tracking system. To learn more, read Choose whether to close external tickets/issues when you close Mondoo tickets.
Automatically create tickets on drift
Drift occurs when, instead of improving security, an asset becomes more vulnerable to attack:
- An asset previously passed a check in a policy but is now failing that check
- Mondoo previously did not detect a vulnerability on an asset, but now does detect that vulnerability
It's important to catch drift quickly. Mondoo makes that possible with automatic drift detection. When an asset becomes less secure, Mondoo can automatically create a ticket to alert you of the change and track the work on resolving the problem.
Drift detection runs continuously: Mondoo flags drift the moment a scan reveals that an asset has regressed (a previously passing check now fails, or a previously undetected vulnerability is now detected).
Two settings work together:
- The space-wide Regression setting controls whether Mondoo opens a ticket when it detects drift. It's off by default. You'll find it under Settings > Ticketing, in the Ticket Processing section.
- A drift setting on each ticketing integration controls whether that integration receives drift tickets, and for some ticket systems, where they go. To learn more, read Choose a destination for drift tickets.
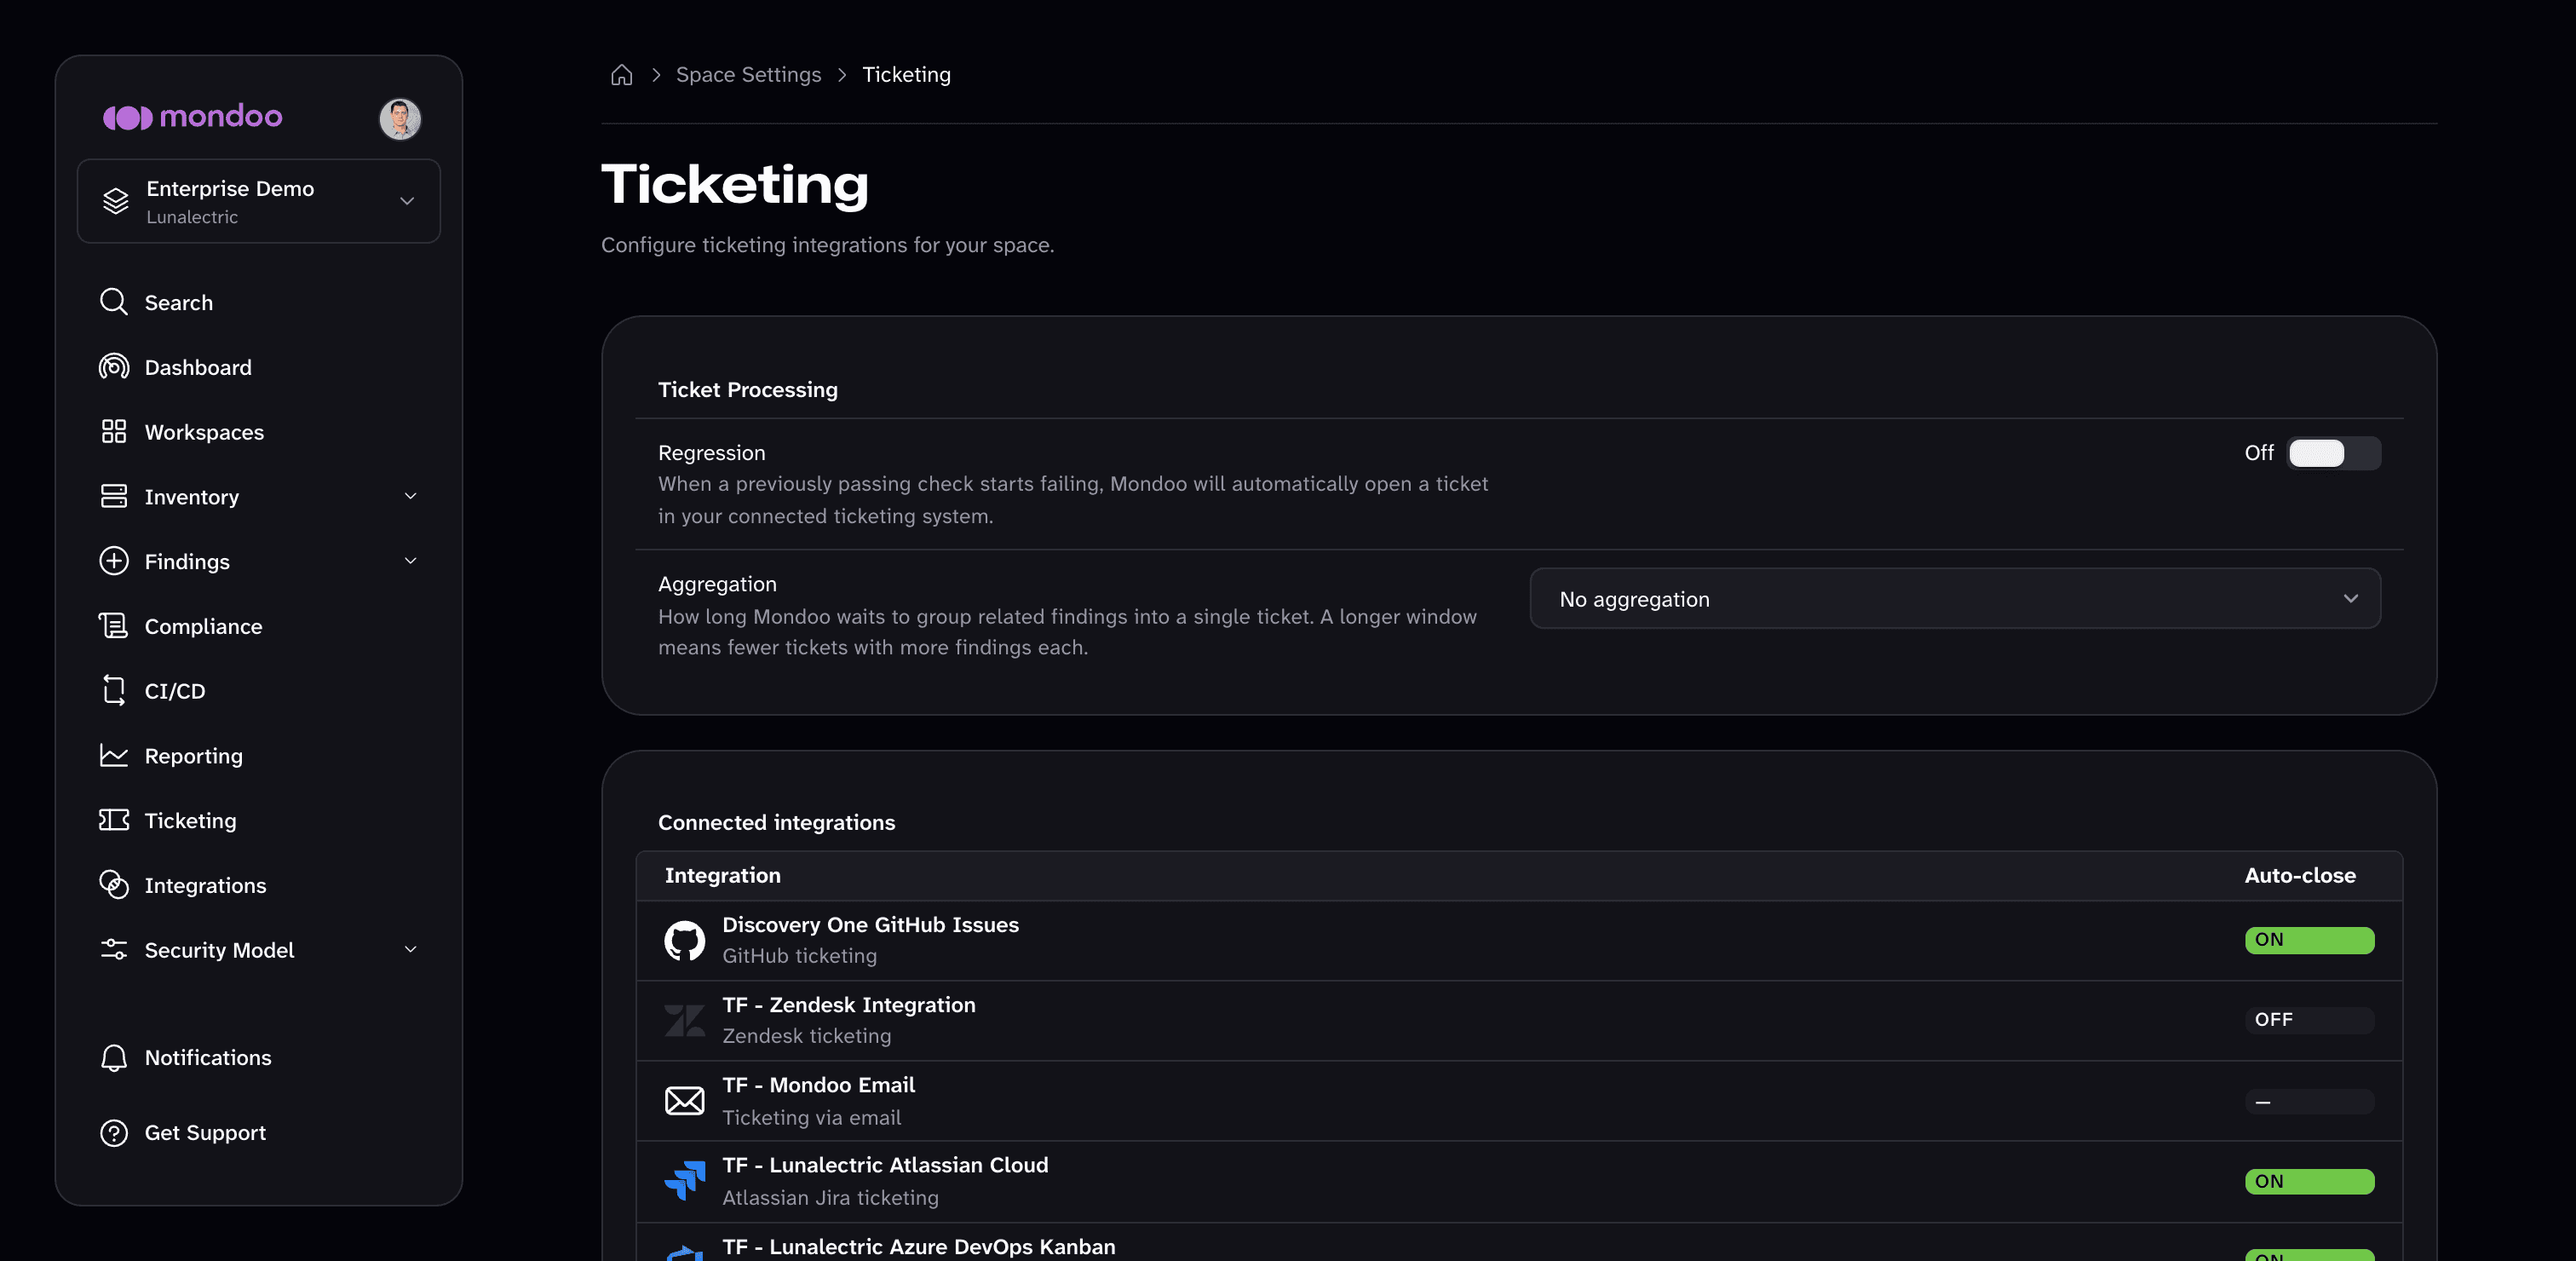
The Ticketing settings page appears only after you add at least one ticketing integration to the space. Until then, it offers to add a ticket system.
To enable or disable automatic drift tickets:
Only team members with Editor or Owner access can perform this task.
-
Navigate to the space where you want to change the drift setting.
-
In the left navigation, select Settings.
-
Select Ticketing.
-
In the Ticket Processing section, turn Regression on or off. Mondoo saves the change immediately.
Choose a destination for drift tickets
Like all tickets, Mondoo can share automatically created drift tickets with your ticket system. When you add a new ticketing integration, you choose whether it receives drift tickets. You can change this option any time in the integration's settings. The option's name depends on the ticket system:
| Ticket system | Drift option | Destination |
|---|---|---|
| GitHub Issues | Create drift issues in this integration | The GitHub organization and repository you enter |
| GitLab Issues | Create drift issues in this integration | The GitLab group and project you enter |
| Send drift email to this recipient | The recipient you select | |
| Jira | Automatically create tickets on drift | Mondoo creates a Jira issue for each drift ticket |
| Azure DevOps | Automatically create work items on drift | Mondoo creates an Azure DevOps work item for each drift ticket |
| Zendesk | Automatically create tickets on drift | Mondoo creates a Zendesk ticket for each drift ticket |
| ServiceNow | Automatically create incidents on drift | Mondoo creates a ServiceNow incident for each drift ticket |
| Webhook | Automatically create tickets on drift | Mondoo sends a delivery to your endpoint for each drift ticket |
For Azure DevOps, the drift option appears only when you edit an existing integration, not when you first add it.
To change where an integration sends drift tickets:
Only team members with Editor or Owner access can perform this task.
-
Navigate to the space where you want to change the drift setting.
-
In the left navigation, select Settings.
-
Select Ticketing.
-
In the Connected integrations list, select the integration.
-
On the integration's page, select the pencil icon (Edit integration).
-
Under Preferences, turn the drift option on or off. For GitHub Issues, GitLab Issues, and email integrations, also specify where to create drift issues or send drift email.
-
Save your changes.
Group similar drift occurrences into one ticket
If the same drift occurs on multiple assets, you may not want a separate ticket for each asset. Mondoo can group the drift detection of multiple assets into a single ticket. To do this, it waits a configurable period of time before finalizing the Mondoo ticket and creating an issue or ticket in your external tracking system.
For example, suppose you configure Mondoo to create a new ticket and a corresponding Jira issue whenever it detects drift. You also configure Mondoo to wait four hours to group multiple instances of the same drift into one ticket. Mondoo scans asset 1, which fails check X. Mondoo identifies that asset 1 previously passed check X. This is drift, so Mondoo generates a ticket. However, Mondoo doesn't immediately save the ticket or create a Jira issue. Instead, Mondoo waits four hours to determine if any other assets also have incurred drift on check X. During these four hours, asset 5 and asset 6, which previously passed check X, now fail check X. Instead of creating new tickets for assets 5 and 6, Mondoo adds information about assets 5 and 6 to the ticket initially created for asset 1. Now there is a single ticket with information about the three assets that incurred drift on check X. When four hours have passed, Mondoo creates a single Jira issue with the details about asset 1, asset 5, and asset 6 all incurring drift on check X.
The Aggregation space setting controls how long Mondoo waits to group similar drift occurrences in a single ticket. Choose 1 hour, 4 hours, 8 hours, 12 hours, or 24 hours, or choose No aggregation (the default) to create a unique ticket (and corresponding issue or ticket) for each asset that incurs the same drift.
To automatically group similar drift occurrences into one ticket:
Only team members with Editor or Owner access can perform this task.
-
Navigate to the space where you want to change the drift settings.
-
In the left navigation, select Settings.
-
Select Ticketing.
-
In the Aggregation drop-down list, choose how long to wait to detect the same drift on other assets before finalizing a ticket and creating an issue/ticket in your ticket system.
Choose whether to close external tickets/issues when you close Mondoo tickets
This setting applies only to direct integrations (Jira, ServiceNow, GitHub, GitLab, Zendesk, Azure DevOps, Webhook), not to email integrations. For a webhook integration, the setting is Send close notifications: closing a Mondoo ticket sends a delivery to your endpoint.
When enabled, closing a Mondoo ticket in the Mondoo App also closes the corresponding issue or ticket in your external tracking system.
Mondoo turns this setting on by default for new integrations. You can turn it off when you create the integration, or later in the integration's settings. Existing integrations keep whatever setting they already have.
The Auto-close column of the Connected integrations list, under Settings > Ticketing, shows whether the setting is on for each integration. To change it:
Only team members with Editor or Owner access can perform this task.
-
Navigate to the space where you want to change the closing behavior.
-
In the left navigation, select Settings.
-
Select Ticketing.
-
In the Connected integrations list, select the integration.
-
On the integration's page, select the pencil icon (Edit integration).
-
Under Preferences, turn the automatic close option on or off, then save your changes.
Learn more
- Track and Fix Findings with Ticketing
- Set up Ticketing and Azure DevOps
- Set up Ticketing and GitHub
- Set up Ticketing and GitLab
- Set up Ticketing and Jira
- Set up Ticketing and ServiceNow
- Set up Ticketing and Zendesk
- Set up Ticketing with a Webhook
- Set up Ticketing to Email Your External Ticket System
- Create Tickets from Advisories
- Create Tickets from Checks